【IMSVA】如何備份 IMSVA 8.x中的設定、Log、Report & Quarantine


一、匯出IMSVA 8.x 設定
(1) 登入 IMSVA 8.x 管理主控台
(2) 點選 Administration → Import/Export,點選 Export。

(3) 匯出完成後會彈出檔案下載的詢問視窗,請將該設定備份儲存在您所指定的路徑

二、備份IMSVA postfix中的main.cf、master.cf
註:此步驟是針對您有再特別對postfix中的main.cf、master.cf進行調整才需手動備份這兩個檔案,如果您未做任何特別調整,此步驟可略過。
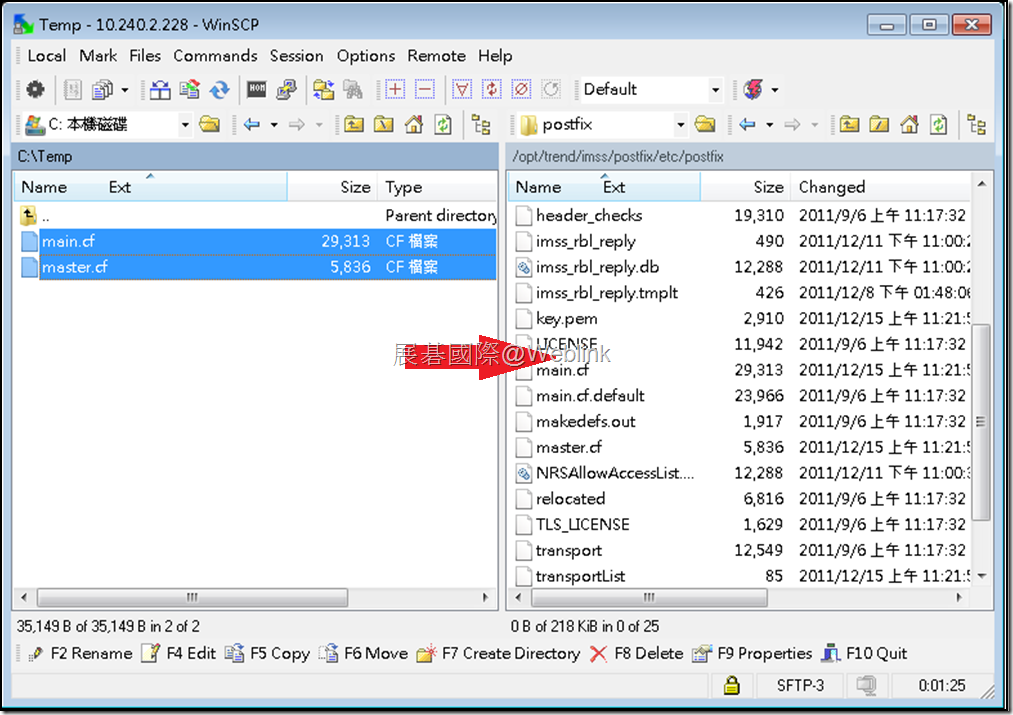
(1) 您可以透過Winscp這套工具連進IMSVA中備份main.cf、master.cf
WinSCP下載連結:http://winscp.net/eng/download.php
(2) 使用WinSCP連線至IMSVA下的 /opt/trend/imss/postfix/etc/postfix/ 路徑中備份main.cf、master.cf

三、備份IMSVA資料庫
(1) 請使用下列指令備份 IMSVA的 imss 資料庫
/opt/trend/imss/PostgreSQL/bin/pg_dump -U sa -f /tmp/imss_dump.sql imss
如果您的IMSVA 有啟用EUQ,請再用下列指令備份EUQ資料庫
/opt/trend/imss/PostgreSQL/bin/pg_dump -U sa -f /tmp/imsseuq_dump.sql imsseuq
(2) 使用WinSCP連線至IMSVA下的 /tmp路徑中取出資料庫備份檔
imss_dump.sql
imsseuq_dump.sql
四、備份IMSVA Log File
(1) 請使用WinSCP連線至IMSVA下的 /opt/trend/imss/log (var/app_data/imss/log)路徑中
(2) 請備份該路徑內的所有檔案
五、備份隔離區信件
(1) 請使用WinSCP連線至IMSVA下的 /opt/trend/imss/queue/quarantine路徑中
(2) 請備份該路徑內的所有檔案
六、備份IMSVA Report檔案
(1) 請使用WinSCP連線至IMSVA下的 /opt/trend/imss/UI/adminUI/ROOT/logs/
(2) 請備份該路徑內的所有檔案及目錄
※ 以排程方式備份IMSVA
1. 編輯一文件檔,並將內容編輯如下:
cd /var/app_data/imsva_backup
tar -cvf postfix_`date +%F`.tar /opt/trend/imss/postfix/etc/postfix/*.cf
cp -R /var/app_data/imss/log log
tar -cvf log_`date +%F`.tar log ← 可能會有問題,會中斷或產生error
cp -R /var/app_data/imss/queue/quarantine quarantine
tar -cvf quarantine_`date +%F`.tar quarantine ← 可能會有問題,會中斷或產生error
tar -cvf report_`date +%F`.tar /opt/trend/imss//UI/adminUI/ROOT/logs
/opt/trend/imss/PostgreSQL/bin/pg_dump -U sa -f imss_dump_`date +%F`.sql imss
/opt/trend/imss/PostgreSQL/bin/pg_dump -U sa -f imsseuq_dump_`date +%F`.sql imsseuq
2. 將此文件檔令存檔名為xxxxxx.sh (如imsva_backup.sh,非txt檔)
3. 將此檔案置放於imsva中,並賦予此檔root之權限
#chmod 777 imsva_backup.sh
4. 使用crontab指令(linux備份指令)來自定排程執行imsva_backup.sh進行備份排程作業。
※ Configuring a scheduled backup of local settings and policies in InterScan Messaging
Security Virtual Appliance (IMSVA)
Problem Description:
Currently, the only way to back up the local settings and policies of IMSVA is using the “Export” function in the web console. You cannot use this to perform a scheduled backup.
An alternative way to conduct a scheduled backup is through a cron job.
Solution:
To configure a scheduled backup:
Note: This will not back up log files.
1.Log in to IMSVA with root privileges through the local console or an SSH connection.
2.Run the following command to edit the scheduled jobs:
# crontab -e
3.Go to the “Insert” mode by pressing the I key.
4.Add the following line at the end of all jobs:
0 6 * * * /opt/trend/imss/script/imp_exp.sh -e /tmp/IMSVAConfigExport$(date +\%Y\%m\%d.dat) > /dev/null 2>&1
This will back up the configuration into the /tmp folder every day at 6:00 AM, and name it in the format “IMSVAConfigExportyyyymmdd.dat”. It can then be directly imported into another IMSVA from the web console.
5.Save the changes and quit by pressing the combination of keys in the order they appear:
[ESC] : x
6.Press Enter.
7.Run the following command to verify the changes:
#crontab -1
※ [Linux 命令] crontab : 設定排程工作
屬性 : 系統相關 – 時間排程
語法 :
crontab [-u 使用者] 檔案名稱
crontab [-u 使用者] -l / -r / -e
參數:功能
-e:編輯該使用者的排程設定
-l:列出該使用者的排程設定
-r:刪除該使用者的排程設定
-u:設定該使用者的排程設定
排設設定格式 :
分 小時 日 月 星期 指令與參數
其中分是 0-59, 小時是0-23, 日為 1-31, 月為 1-12, 星期為0-7 (0,7 都是星期天)
執行範例:
* 列出自己的排程設定.
server1:~ # crontab -l
# DO NOT EDIT THIS FILE – edit the master and reinstall.
# (/tmp/crontab.XXXXQWEAHj installed on Mon Jul 20 05:46:44 2009)
# (Cron version V5.0 — $Id: crontab.c,v 1.12 2004/01/23 18:56:42 vixie Exp $)
# Min Hour Day Month Week Order
0 3 * * * /opt/check.pl -quiet
* 編輯自己的排程設定
server1:~ # crontab -e < 按下Enter後會進入編輯模式, 至於是哪一種編輯器, 視系統而定.>
* 刪除其他使用者的排程設定
server1:~ # crontab -u john -l
# DO NOT EDIT THIS FILE – edit the master and reinstall.
# (/tmp/crontab.XXXXkhAaya installed on Mon Jul 20 05:50:30 2009)
# (Cron version V5.0 — $Id: crontab.c,v 1.12 2004/01/23 18:56:42 vixie Exp $)
0 3 * * * /opt/check.pl -quiet
server1:~ # crontab -u john -r <移除john的排程設定>
server1:~ # crontab -u john -l
no crontab for john
補充說明 :
1. 我們可以透過排程設定定期幫我們做備份檔案, 安全檢測, 清理磁碟等, 因此要學好這項好用的指令.

近期迴響