【Kaspersky企業版】卡巴斯基管理中心及用端安裝建置步驟


卡巴斯基防毒軟體建置步驟
管理中心程式載點KSC10.3.407 : 繁體中文 ; 英文
( 上述程式已包含用戶端所需防毒軟體程式,無需下載 )
硬體需求 :
CPU 1 GHz 或更高. 64-位元 作業系統, 最低需求CPU 1.4 GHz
4 GB 可用記憶體
10 GB 可用硬碟空間;若使用系統管理功能需100 GB 可用硬碟空間
軟體需求 :
- Microsoft Data Access Components (MDAC) 2.8
- Windows DAC 6.0
- Microsoft Windows Installer 4.5
作業系統需求 :
- Microsoft Windows 10 Pro 32-bit / 64-bit
- Microsoft Windows 10 Enterprise 32-bit / 64-bit
- Microsoft Windows 10 Education 32-bit / 64-bit
- Microsoft Windows 8.1 Pro 32-bit / 64-bit
- Microsoft Windows 8.1 Enterprise 32-bit / 64-bit
- Microsoft Windows 8 Pro 32-bit / 64-bit
- Microsoft Windows 8 Enterprise 32-bit / 64-bit
- Microsoft Windows 7 Professional SP1 32-bit / 64-bit
- Microsoft Windows 7 Enterprise SP1 32-bit / 64-bit
- Microsoft Windows 7 Ultimate SP1 32-bit / 64-bit
- Microsoft Windows 7 Professional 32-bit / 64-bit
- Microsoft Windows 7 Enterprise 32-bit / 64-bit
- Microsoft Windows 7 Ultimate 32-bit / 64-bit
- Microsoft Small Business Server 2008 Standard 64-bit
- Microsoft Small Business Server 2008 Premium 64-bit
- Microsoft Small Business Server 2011 Essentials 64-bit
- Microsoft Small Business Server 2011 Premium Add-on 64-bit
- Microsoft Small Business Server 2011 Standard 64-bit
- Microsoft Windows Server 2008 Datacenter SP1 32-bit / 64-bit
- Microsoft Windows Server 2008 Enterprise SP1 32-bit / 64-bit
- Microsoft Windows Server 2008 Foundation SP2 32-bit / 64-bit
- Microsoft Windows Server 2008 SP1 Server Core 32-bit / 64-bit
- Microsoft Windows Server 2008 Standard SP1 32-bit / 64-bit
- Microsoft Windows Server 2008 Standard 32-bit / 64-bit
- Microsoft Windows Server 2008 Enterprise 32-bit / 64-bit
- Microsoft Windows Server 2008 Datacenter 32-bit / 64-bit
- Microsoft Windows Server 2008 R2 Server Core64-bit
- Microsoft Windows Server 2008 R2 Datacenter 64-bit
- Microsoft Windows Server 2008 R2 Datacenter SP1 64-bit
- Microsoft Windows Server 2008 R2 Enterprise 64-bit
- Microsoft Windows Server 2008 R2 Enterprise SP1 64-bit
- Microsoft Windows Server 2008 R2 Foundation 64-bit
- Microsoft Windows Server 2008 R2 Foundation SP1 64-bit
- Microsoft Windows Server 2008 R2 SP1 Core Mode 64-bit
- Microsoft Windows Server 2008 R2 Standard 64-bit
- Microsoft Windows Server 2008 R2 Standard SP1 64-bit
- Microsoft Windows Server 2012 Server Core 64-bit
- Microsoft Windows Server 2012 Datacenter 64-bit
- Microsoft Windows Server 2012 Essentials 64-bit
- Microsoft Windows Server 2012 Foundation 64-bit
- Microsoft Windows Server 2012 Standard 64-bit
- Microsoft Windows Server 2012 R2 Server Core64-bit
- Microsoft Windows Server 2012 R2 Datacenter 64-bit
- Microsoft Windows Server 2012 R2 Essentials 64-bit
- Microsoft Windows Server 2012 R2 Foundation 64-bit
- Microsoft Windows Server 2012 R2 Standard 64-bit
資料庫需求 :
- Microsoft SQL Server 2005 Express Edition 32-bit
- Microsoft SQL Server 2008 Express 32-bit
- Microsoft SQL 2008 R2 Express 64-bit
- Microsoft SQL 2012 Express 64-bit
- Microsoft SQL 2014 Express 64-bit
- Microsoft SQL Server 2005 (all editions) 32-bit / 64-bit
- Microsoft SQL Server 2008 (all editions) 32-bit / 64-bit
- Microsoft SQL Server 2008 R2 (all editions) 64-bit
- Microsoft SQL Server 2008 R2 Service Pack 2 (all editions) 64-bit
- Microsoft SQL Server 2012 (all editions) 64-bit
一、 管理中心安裝步驟 :
1. 執行光碟內或上方下載連結之管理中心主程式 : setup10.3.407full_zh-hant.exe 在此安裝介面可選擇需要安裝的KSC元件
2. 等待程式初始化,開始進行安裝。
3. 選擇下一步開始進行安裝設定。
4. 同意授權協議條款,點選下一步。
5. 選擇自訂安裝
6. 安裝管理中心元件無需修改選擇下一步。
7. 網路規模依實際用戶端數量選擇,選擇下一步。
8. 預設設定即可,選擇下一步
9. 預設即可,選擇下一步
10. 預設選擇MS SQL 資料庫進行安裝。 ( 若公司使用MY SQL 請自行修改選項 ),選擇下一步。
11. 預設即可,選擇下一步。( 若想使用公司內部既有SQL 請自行輸入或瀏覽清單選擇 )
12. 預設即可,選擇下一步。( 若步驟11選擇既有SQL 帳號密碼需依實際情況輸入 )
13. 預設即可,選擇下一步。( 紅框處可修改共享資料夾路徑 )
14. 預設即可,不建議更改。選擇下一步。
15. 本步驟建議輸入IP ,可避免DNS解析所帶來的問題。選擇下一步。
16. 預設即可,選擇下一步。 ( 本步驟依用戶端安裝版本選擇可之後安裝 )
17. 選擇安裝。
18. 等待安裝過程結束。
19. 選擇安裝完成啟動管理伺服器。
20. 首次開啟管理中心時會出現以下快速設定精靈。選擇下一步。
21. 選擇企業端點所採購之授權*.key。( 授權型態請參考光碟內容安裝需知 )。
22. 預設同意加入KSN 雲端平台,選擇下一步。
23. 預設空白,選擇下一步。( 輸入SMTP位置可讓管理中心寄送信件通知事件、報告 )
24. 預設即可,選擇下一步。 ( 該步驟僅Advanced以上授權可啟用,其餘授權不影響 )
25. 精靈開始自動建立各項政策、工作。
26. 預設空白,選擇下一步。( Proxy Server視公司網路架構輸入 )
27. 下載更新,該步驟無需等待,選擇下一步。
28. 完成快速設定精靈,選擇完成。
29. 管理群組→政策→卡巴斯基安全管理中心10網路代理。
右鍵內容→設定→勾選使用移除密碼→修改→設定密碼→確定。
30. 選擇軟體更新與弱點 → 取消執行檔啟動時掃描其弱點並將鎖頭關閉 → 確定。
31. 開啟Kaspersky Endpoint Security 10 政策選擇防火牆 → 取消防火牆的啟用並確定鎖頭關閉。
32. 選擇應用程式設定 → 勾選將資源讓給其他應用程式;取消傾印寫入
33. 選擇介面 → 勾選啟用密碼防護 → 設定 。
輸入帳號及密碼,用於移除程式、關閉程式時輸入。
34. 選擇管理群組→工作,刪除弱點掃描及重大更新。 ( 該步驟考量該工作Loading 較重在未規劃軟體弱點或版本更新情況下先行刪除該工作 )
35. 選擇安裝更新工作→右鍵內容→內容→設定。
勾選卡巴斯基實驗室更新伺服器→確定。(完成後政策選單請選擇確定或套用,選擇取消將不保存本次設定)
36. 選擇管理伺服器 → 設定顯示在管理介面的功能項目→勾選顯示端點控制設定 → 確定。
上述相關設定步驟亦可參考直接匯入政策範本。
管理中心範本如下 :
政策 :
1. 管理伺服器政策 ( 用於管理伺服器基礎設定 )
2. 網路代理政策 ( 用於網路代理基礎設定 )
3. 端點安全防護政策 ( 用於用戶端防毒軟體基礎設定 )
工作 :
4. 管理伺服器備份工作 ( 預設排程時間每週日AM:3:00 )
5. 用戶端安裝更新 ( 預設排程時間依據管理伺服器更新工作 )
6. 用戶端掃描工作 ( 預設排程時間為手動請依實際執行時間修改 )
PS: 管理伺服器更新工作需於透過管理中心建立,不建議進行匯入
上述政策及下載連結如下 : 政策及工作範本
二、 安裝用戶端防毒軟體
KES10程式載點KES10.2.5.3201 : 繁體中文 ; 英文
( 上述程式已包含X86及X64所需程式 )
公司有網域,並用戶端加入網域,但電腦已安裝它牌防毒軟體請參考:
如何遠端移除它牌防毒軟體
公司環境有網域,並用戶端加入網域,請參考:
如何遠端安裝防毒軟體步驟
公司環境沒有網域,請參考:
如何本機安裝防毒軟體步驟
硬體需求 :
CPU : Intel Pentium 1GHz或更高
記憶體 : 2 GB可用記憶體
硬碟 : 2 GB可用硬碟空間
軟體需求 :
Microsoft Internet Explorer 7.0 或更高
Microsoft Windows Installer 3.0 或更高
作業系統需求 :
Microsoft Windows 10 Pro x86 / х64
Microsoft Windows 10 Enterprise x86 / х64
Microsoft Windows 8.1 Pro x86 / х64
Microsoft Windows 8.1 Enterprise x86 / х64
Microsoft Windows 8 Pro x86 / х64
Microsoft Windows 8 Enterprise x86 / х64
Microsoft Windows 7 Professional x86 / х64 SP1 或更高
Microsoft Windows 7 Enterprise / Ultimate x86 / х64 SP1 或更高
Microsoft Windows 7 Professional x86 / х64
Microsoft Windows 7 Enterprise / Ultimate x86 / х64
Microsoft Windows Vista x86 / х64 SP2 或更高
Microsoft Windows XP Professional x86 SP3 或更高
Microsoft Windows Server 2016 Standard / Essentials х64
Microsoft Windows Server 2012 R2 Foundation / Standard / Essentials х64
Microsoft Windows Server 2012 Foundation / Standard / Essentials х64
Microsoft Small Business Server 2011 Standard х64
Microsoft Windows MultiPoint Server 2011 х64
Microsoft Small Business Server 2008 Standard / Premium x64
Microsoft Windows Server 2008 R2 Foundation / Standard / Enterprise х64 SP1 或更高
Microsoft Windows Server 2008 Foundation / Standard / Enterprise х86 / х64 SP2 或更高
Microsoft Windows Server 2003 R2 Standard / Enterprise x86 / x64 SP2 或更高
Microsoft Windows Server 2003 Standard / Enterprise x86 / x64 SP2
1. 首先開啟管理中心選擇工作→建立工作→遠端安裝應用程式→下一步。
2. 選擇安裝卡巴斯基網路代理→下一步。
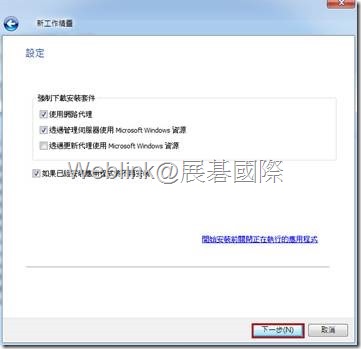
3. 請取消使用網路代理,保留Microsoft Windows 資源→下一步。
4. 選擇不重新啟動電腦→下一步。
5. 預設即可,選擇下一步。
6. 選擇欲派送電腦IP 或DNS Name或整個IP區段 →下一步。( 該步驟視公司實際情況及需求則其一挑選目標電腦,下方圖示為範例 : )
7. 選擇需要帳號,輸入網域管理員帳號及密碼請參考下圖範例 :
ABC\administrator或 administrator@abc.com
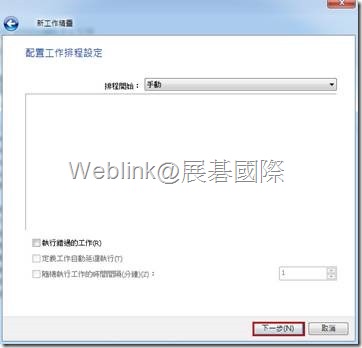
8. 選擇排程時間,若無特別需求預設即可→下一步。
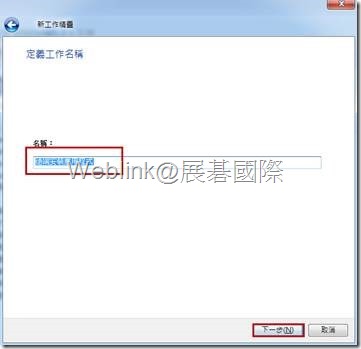
9. 輸入該工作顯示名稱,請以方便辨識為主,( 建議命名 : 安裝網路代理 )→下一步。
10. 勾選精靈完成後執行工作→下一步。
11. 等待工作派送並檢查是否完成。
12. 開啟管理中心選擇工作 → 建立工作 → 選擇遠端移除應用程式。
13. 選擇移除不相容的程式。 下方說明兩種不同移除方式。
移除不相容的程式 & 從應用程式登陸檔移除應用程式
14. 移除不相容的程式
選擇欲移除防毒軟體版本及語系。( 本步驟需確保程式版本號及語系服方可移除,若既有防毒軟體版本及語系未包含在清單中,請使用步驟15從應用程式登錄檔移除應用程式進行移除,若上述方式皆無法完成請與技術窗口聯繫 )
選擇欲移除防毒軟體版本,可多選 →選擇確定。
15. 從應用程式登陸檔移除應用程式
挑選您已安裝網路代理電腦中欲移除之應用程式 ( 該步驟取決程式本體是否有支援靜默移除參數,若支援參數將會顯示自動執行移除指令、若未支援移除指令需自行輸入,請自行搜尋或洽該防毒軟體廠商是否有靜默參數,再將其輸入其中 )
點選選取。
選擇欲移除它牌防毒軟體。
若支援靜默移除會顯示如下圖 : 自動定義移除指令,選擇下一步。
16. 舉凡移除相關工作請設定重新啟動通知使用者,另外請取消強制重新啟動電腦→選擇下一步。
17. 選取網路中管理伺服器發現的電腦。
18. 挑選欲移除它牌防毒軟體的電腦 → 下一步。( 依實際情況選擇,下圖為範例 : )
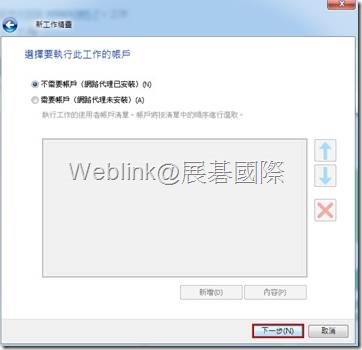
19. 網路代理已安裝故選擇不需要帳戶 → 選擇下一步。
20. 選擇排程時間,若無特別需求預設即可→下一步。
21. 勾選精靈完成後執行工作→下一步。
22. 等待移除工作完成。 ( 因移除步驟將提示使用者重新開機,若使用者未完成重新開機步驟,工作狀態會保持需重新啟動電腦 )
1. 首先開啟管理中心選擇工作→建立工作→遠端安裝應用程式→下一步。
2. 選擇卡巴斯基防毒軟體主程式 KES10 →選擇下一步。
3. 預設即可→選擇下一步 ( 該步驟取決網路代理是否已安裝,若已安裝無需勾選,若尚未安裝可與主程式一併安裝,但企業環境需有網域環境並確認用戶端無安裝它牌防毒軟體 )
4. 預設即可→選擇下一步。
5. 選擇不重新啟動電腦→下一步。
6. 預設即可,選擇下一步。
7. 選擇欲派送電腦IP 或DNS Name或整個IP區段 →下一步。( 該步驟視公實際情況及需求則其一挑選目標電腦,下方圖示為範例 : )
8. 網路代理已安裝故選擇不需要帳戶 → 選擇下一步。
9. 選擇排程時間,若無特別需求預設即可→下一步。
10. 輸入該工作顯示名稱,請以方便辨識為主,( 建議命名 : 安裝防毒軟體 )→下一步。
11. 勾選精靈完成後執行工作→下一步。
12. 等待工作派送並檢查是否完成。
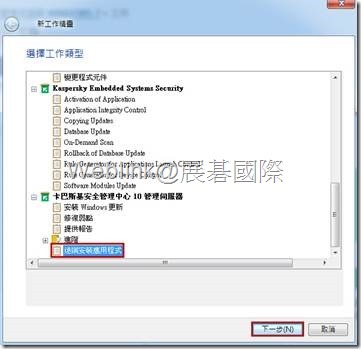
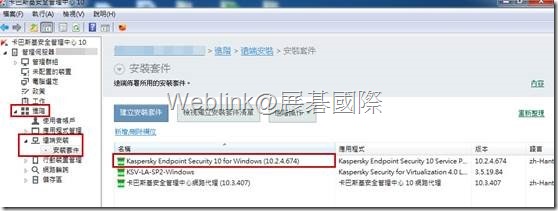
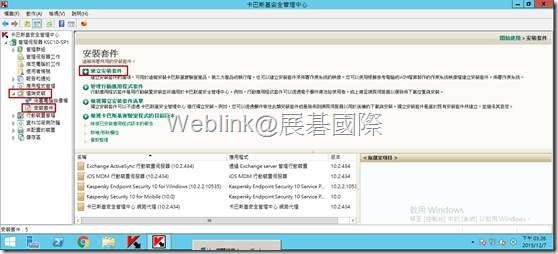
1. 開啟管理中心進階 → 遠端安裝 → 安裝套件 →
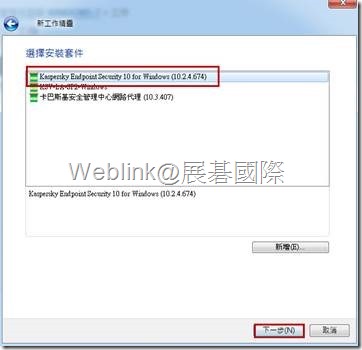
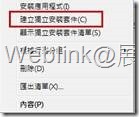
選擇Kaspersky Endpoint Security 10 for Windows 右鍵建立獨立安裝套件
(版本會因為程式版本不同而有所異動)
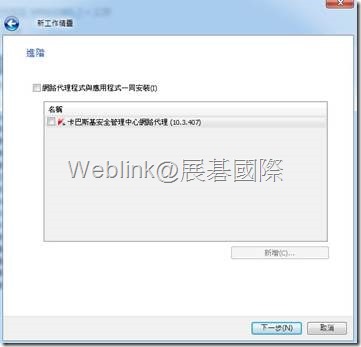
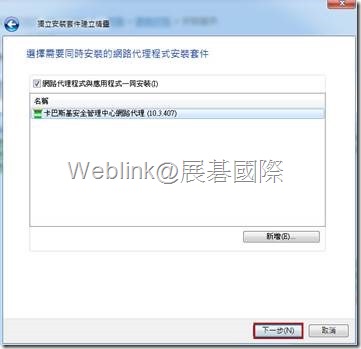
2. 選擇製作Kaspersky Endpoint Security 10 for Windows 一鍵安裝檔時會一併詢問是否與網路代理一起安裝,在此範例中建議勾選,確保安裝完畢後連線至管理中心進行控管 → 選擇下一步。
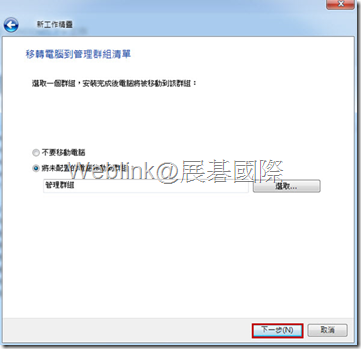
3. 預設即可,選擇下一步。
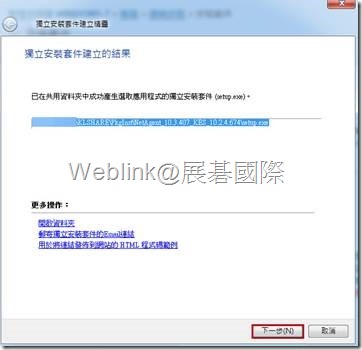
4. 等待製作一鍵安裝檔完成後,選擇下一步。
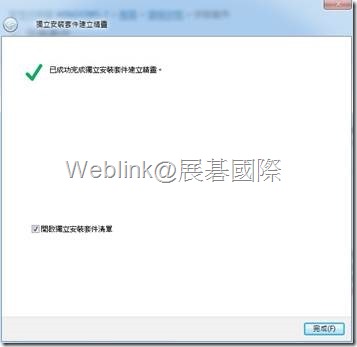
5. 選擇完成。
6. 預設一鍵安裝檔放置位置如下 : 會有對應資料夾名稱。
C:\Program Files (x86)\Kaspersky Lab\Kaspersky Security Center\Share\PkgInst\
7. 將資料夾內Setup.exe 拷貝至公司內部File Server 或 NAS ,建議更改套件名稱方便辨識。
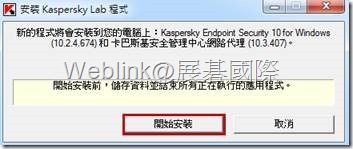
8. 執行過程無須應答,用於無網域環境電腦安裝使用。
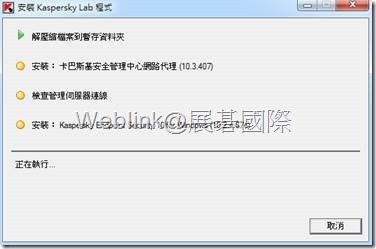
9. 等待安裝完畢關閉視窗。


![clip_image002[4] clip_image002[4]](http://i-services.info/wordpress/wp-content/uploads/2016/11/clip_image0024_thumb.jpg)
![clip_image004[4] clip_image004[4]](http://i-services.info/wordpress/wp-content/uploads/2016/11/clip_image0044.png)
![clip_image006[4] clip_image006[4]](http://i-services.info/wordpress/wp-content/uploads/2016/11/clip_image0064.png)
![clip_image008[4] clip_image008[4]](http://i-services.info/wordpress/wp-content/uploads/2016/11/clip_image0084.png)
![clip_image010[4] clip_image010[4]](http://i-services.info/wordpress/wp-content/uploads/2016/11/clip_image0104_thumb.png)
![clip_image012[4] clip_image012[4]](http://i-services.info/wordpress/wp-content/uploads/2016/11/clip_image0124_thumb.png)
![clip_image014[4] clip_image014[4]](http://i-services.info/wordpress/wp-content/uploads/2016/11/clip_image0144_thumb.png)
![clip_image016[4] clip_image016[4]](http://i-services.info/wordpress/wp-content/uploads/2016/11/clip_image0164_thumb.png)
![clip_image018[4] clip_image018[4]](http://i-services.info/wordpress/wp-content/uploads/2016/11/clip_image0184_thumb.png)
![clip_image020[4] clip_image020[4]](http://i-services.info/wordpress/wp-content/uploads/2016/11/clip_image0204_thumb.png)
![clip_image022[4] clip_image022[4]](http://i-services.info/wordpress/wp-content/uploads/2016/11/clip_image0224.png)
![clip_image024[4] clip_image024[4]](http://i-services.info/wordpress/wp-content/uploads/2016/11/clip_image0244_thumb.png)
![clip_image026[4] clip_image026[4]](http://i-services.info/wordpress/wp-content/uploads/2016/11/clip_image0264_thumb.png)
![clip_image028[4] clip_image028[4]](http://i-services.info/wordpress/wp-content/uploads/2016/11/clip_image0284_thumb.png)
![clip_image030[4] clip_image030[4]](http://i-services.info/wordpress/wp-content/uploads/2016/11/clip_image0304_thumb.png)
![clip_image032[4] clip_image032[4]](http://i-services.info/wordpress/wp-content/uploads/2016/11/clip_image0324_thumb.png)
![clip_image034[4] clip_image034[4]](http://i-services.info/wordpress/wp-content/uploads/2016/11/clip_image0344_thumb.png)
![clip_image036[4] clip_image036[4]](http://i-services.info/wordpress/wp-content/uploads/2016/11/clip_image0364_thumb.jpg)
![clip_image038[4] clip_image038[4]](http://i-services.info/wordpress/wp-content/uploads/2016/11/clip_image0384_thumb.jpg)
![clip_image040[4] clip_image040[4]](http://i-services.info/wordpress/wp-content/uploads/2016/11/clip_image0404_thumb.jpg)
![clip_image042[4] clip_image042[4]](http://i-services.info/wordpress/wp-content/uploads/2016/11/clip_image0424_thumb.jpg)
![clip_image044[4] clip_image044[4]](http://i-services.info/wordpress/wp-content/uploads/2016/11/clip_image0444_thumb.jpg)
![clip_image046[4] clip_image046[4]](http://i-services.info/wordpress/wp-content/uploads/2016/11/clip_image0464_thumb.jpg)
![clip_image048[4] clip_image048[4]](http://i-services.info/wordpress/wp-content/uploads/2016/11/clip_image0484_thumb.jpg)
![clip_image050[4] clip_image050[4]](http://i-services.info/wordpress/wp-content/uploads/2016/11/clip_image0504_thumb.jpg)
![clip_image052[4] clip_image052[4]](http://i-services.info/wordpress/wp-content/uploads/2016/11/clip_image0524_thumb.png)
![clip_image054[4] clip_image054[4]](http://i-services.info/wordpress/wp-content/uploads/2016/11/clip_image0544_thumb.jpg)
![clip_image056[4] clip_image056[4]](http://i-services.info/wordpress/wp-content/uploads/2016/11/clip_image0564_thumb.jpg)
![clip_image058[4] clip_image058[4]](http://i-services.info/wordpress/wp-content/uploads/2016/11/clip_image0584_thumb.jpg)
![clip_image060[4] clip_image060[4]](http://i-services.info/wordpress/wp-content/uploads/2016/11/clip_image0604_thumb.jpg)
![clip_image062[4] clip_image062[4]](http://i-services.info/wordpress/wp-content/uploads/2016/11/clip_image0624_thumb.jpg)
![clip_image064[4] clip_image064[4]](http://i-services.info/wordpress/wp-content/uploads/2016/11/clip_image0644_thumb.jpg)
![clip_image066[4] clip_image066[4]](http://i-services.info/wordpress/wp-content/uploads/2016/11/clip_image0664_thumb.jpg)
![clip_image068[4] clip_image068[4]](http://i-services.info/wordpress/wp-content/uploads/2016/11/clip_image0684_thumb.jpg)
![clip_image070[4] clip_image070[4]](http://i-services.info/wordpress/wp-content/uploads/2016/11/clip_image0704_thumb.jpg)
![clip_image072[4] clip_image072[4]](http://i-services.info/wordpress/wp-content/uploads/2016/11/clip_image0724_thumb.jpg)
![clip_image074[4] clip_image074[4]](http://i-services.info/wordpress/wp-content/uploads/2016/11/clip_image0744_thumb.jpg)
![clip_image076[4] clip_image076[4]](http://i-services.info/wordpress/wp-content/uploads/2016/11/clip_image0764_thumb.jpg)
![clip_image078[4] clip_image078[4]](http://i-services.info/wordpress/wp-content/uploads/2016/11/clip_image0784_thumb.jpg)
![clip_image080[4] clip_image080[4]](http://i-services.info/wordpress/wp-content/uploads/2016/11/clip_image0804_thumb.jpg)
![clip_image082[4] clip_image082[4]](http://i-services.info/wordpress/wp-content/uploads/2016/11/clip_image0824_thumb.jpg)
![clip_image084[4] clip_image084[4]](http://i-services.info/wordpress/wp-content/uploads/2016/11/clip_image0844_thumb.jpg)
![clip_image086[4] clip_image086[4]](http://i-services.info/wordpress/wp-content/uploads/2016/11/clip_image0864_thumb.jpg)
![clip_image088[4] clip_image088[4]](http://i-services.info/wordpress/wp-content/uploads/2016/11/clip_image0884_thumb.jpg)
![clip_image090[4] clip_image090[4]](http://i-services.info/wordpress/wp-content/uploads/2016/11/clip_image0904_thumb.jpg)
![clip_image092[4] clip_image092[4]](http://i-services.info/wordpress/wp-content/uploads/2016/11/clip_image0924_thumb.jpg)
![clip_image094[4] clip_image094[4]](http://i-services.info/wordpress/wp-content/uploads/2016/11/clip_image0944_thumb.jpg)
![clip_image096[4] clip_image096[4]](http://i-services.info/wordpress/wp-content/uploads/2016/11/clip_image0964_thumb.jpg)
![clip_image098[4] clip_image098[4]](http://i-services.info/wordpress/wp-content/uploads/2016/11/clip_image0984_thumb.jpg)
![clip_image100[4] clip_image100[4]](http://i-services.info/wordpress/wp-content/uploads/2016/11/clip_image1004_thumb.jpg)
![clip_image102[4] clip_image102[4]](http://i-services.info/wordpress/wp-content/uploads/2016/11/clip_image1024_thumb.jpg)
![clip_image104[4] clip_image104[4]](http://i-services.info/wordpress/wp-content/uploads/2016/11/clip_image1044_thumb.jpg)
![clip_image106[4] clip_image106[4]](http://i-services.info/wordpress/wp-content/uploads/2016/11/clip_image1064_thumb.jpg)
![clip_image108[4] clip_image108[4]](http://i-services.info/wordpress/wp-content/uploads/2016/11/clip_image1084_thumb.jpg)
![clip_image110[4] clip_image110[4]](http://i-services.info/wordpress/wp-content/uploads/2016/11/clip_image1104_thumb.jpg)
![clip_image112[4] clip_image112[4]](http://i-services.info/wordpress/wp-content/uploads/2016/11/clip_image1124_thumb.jpg)
![clip_image114[4] clip_image114[4]](http://i-services.info/wordpress/wp-content/uploads/2016/11/clip_image1144_thumb.jpg)
![clip_image116[4] clip_image116[4]](http://i-services.info/wordpress/wp-content/uploads/2016/11/clip_image1164_thumb.jpg)
![clip_image118[4] clip_image118[4]](http://i-services.info/wordpress/wp-content/uploads/2016/11/clip_image1184_thumb.jpg)
![clip_image120[4] clip_image120[4]](http://i-services.info/wordpress/wp-content/uploads/2016/11/clip_image1204_thumb.jpg)
![clip_image122[4] clip_image122[4]](http://i-services.info/wordpress/wp-content/uploads/2016/11/clip_image1224_thumb.jpg)
![clip_image124[4] clip_image124[4]](http://i-services.info/wordpress/wp-content/uploads/2016/11/clip_image1244_thumb.jpg)
![clip_image126[4] clip_image126[4]](http://i-services.info/wordpress/wp-content/uploads/2016/11/clip_image1264_thumb.jpg)
![clip_image096[5] clip_image096[5]](http://i-services.info/wordpress/wp-content/uploads/2016/11/clip_image0965_thumb.jpg)


![clip_image088[5] clip_image088[5]](http://i-services.info/wordpress/wp-content/uploads/2016/11/clip_image0885_thumb.jpg)
![clip_image090[5] clip_image090[5]](http://i-services.info/wordpress/wp-content/uploads/2016/11/clip_image0905_thumb.jpg)
![clip_image092[5] clip_image092[5]](http://i-services.info/wordpress/wp-content/uploads/2016/11/clip_image0925_thumb.jpg)
![clip_image100[5] clip_image100[5]](http://i-services.info/wordpress/wp-content/uploads/2016/11/clip_image1005_thumb.jpg)
![clip_image102[5] clip_image102[5]](http://i-services.info/wordpress/wp-content/uploads/2016/11/clip_image1025_thumb.jpg)



近期迴響