Introduction to Azure Information Protection, Unified Labeling, and Office 365 Message Encryption
1 of 6
Introduction to Azure Information Protection, Unified Labeling, and Office 365 Message Encryption
1 hr 48 min remaining
Introduction to Azure Information Protection, Unified Labeling, and Office 365 Message Encryption
Azure Information Protection (AIP) is a cloud-based solution that can help organizations to protect sensitive information by classifying and (optionally) encrypting documents and emails on Windows, Mac, and Mobile devices. This is done using an organization defined classification taxonomy made up of labels and sub-labels. These labels may be applied manually by users, or automatically by administrators via defined rules and conditions.
The phases of AIP are shown in the graphic below.

This lab will cover the Classify and label and Protect and control access phases.
Objectives
In this lab, you should be able to:
- Learn how to use AIP to classify, label, protect, and control access to sensitive data
- Learn basics about Azure Information Protection including configuring labels and policy within the Azure portal
- Learn about Unified Labeling and how to configure and deploy labels within the Security and Compliance Center for use with Windows, Mac, Mobile, and 3rd party Unified Labeling clients
- Learn how to configure recommended and automatic conditions in the Security and Compliance Center
- Test manual, recommended, and automatic labeling using the AIP unified labeling client on Windows systems
- Learn about sending email messages with Office 365 Message Encryption for secure collaboration to any recipient
Estimated time to complete this lab
60 minutes
2 of 6
Introduction to Azure Information Protection, Unified Labeling, and Office 365 Message Encryption
1 hr 48 min remaining
Getting Started with Azure Information Protection
With General Availability of Unified Labeling clients and Sensitivity Labels in the Security and Compliance Center, there has been some confusion on where customers should start their deployment and which clients they should use. This is a common question, and one that requires understanding of the capabilities available in the Azure Information Protection client (classic) versus what is currently available in the Azure Information Protection Unified Labeling client.
Azure Information Protection unified labeling client
The Azure Information Protection unified labeling client is an Office and Windows addin that pulls labels from the unified labeling store that multiple applications and services support. This client supports the latest advanced features and is recommended for all customers with some minor exceptions noted later. This client downloads sensitivity labels and policy settings from the Office/Microsoft 365 Security & Compliance center.
Azure Information Protection client (classic)
The Azure Information Protection client (classic) has been available since Azure Information Protection was first announced as a new service for classifying and protecting files and emails. This client downloads labels and policy settings from Azure, and you configure the Azure Information Protection policy from the Azure portal.
Migrating Labels to Unified Labeling
New tenants today have Unified Labeling enabled by default. For customers that have established tenants, you will be required to do a one time activation to migrate your labels from the Azure label store to the Unified Labeling store. Migrating these labels DOES NOT require that all Azure Information Protection classic clients be upgraded to the Unified Labeling client immediately. You can activate Unified Labeling today and migrate the clients in a phased manner after full testing has been done. This also allows you to begin testing and enabling your Mac, mobile, and other services that use the MIP SDK (PowerBI, SharePoint Online, Adobe PDF, DLP, Firewalls, etc…).
In this lab, we will look primarily at the Azure Information Protection unified labeling client because it now has the advanced features necessary for most Enterprise deployments.
Default Label Configuration
In new AIP tenants, Microsoft is no longer staging labels in the tenants by default. The demo tenants provided for this lab should be in this new default state with no labels. In this step, we will walk through the process of generation the default label set and assigning them to the global policy.
-
Open Microsoft Edge and navigate to https://aka.ms/AIPConsole and sign in with the following credentials
Provide the credentials below when prompted:
admin@M365x057144.onmicrosoft.comm6qh/vU67?=!NOTE: Although we are primarily focusing on the AIP unified labeling client in this lab, we recommend initially defining your labels in the Azure portal and activating Unified labeling to migrate them to the Security & Compliance Center backend. This allows you to use features that are available in the classic client and the AIP scanner as needed. When you generate the labels in a new tenant, the labels are stored in the SCC backend and are accessible from Azure or the SCC.
-
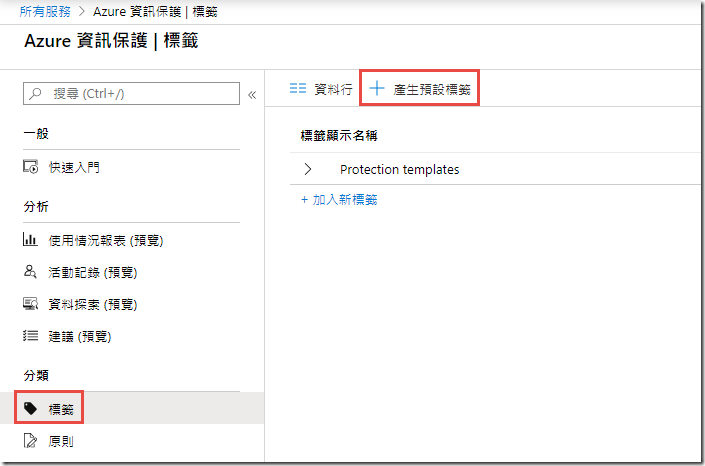
In the Azure Information Protection blade, under Classifications click on Labels
-
In the Labels blade, at the top, click the + Generate default labels button
You will see an image like the one below once the generation is complete.
-
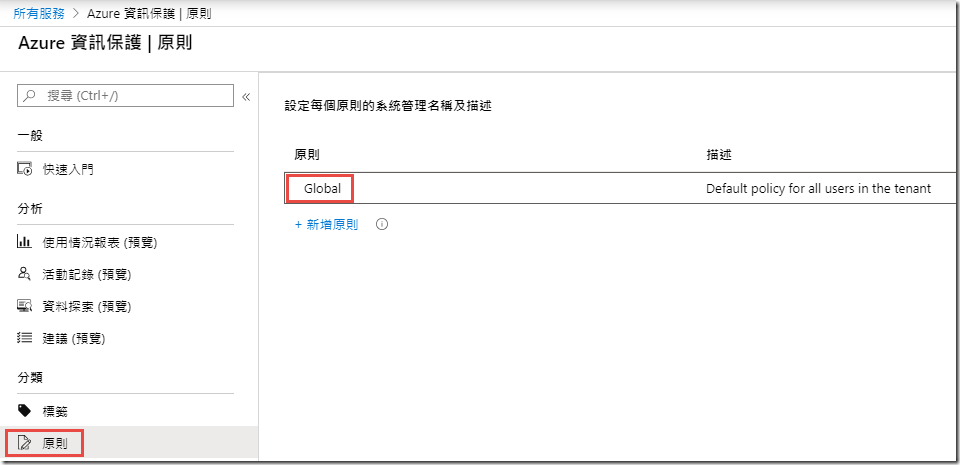
Next, under Classifications on the left, click Policies
-
In the Policies blade, click on Global to open the policy
-
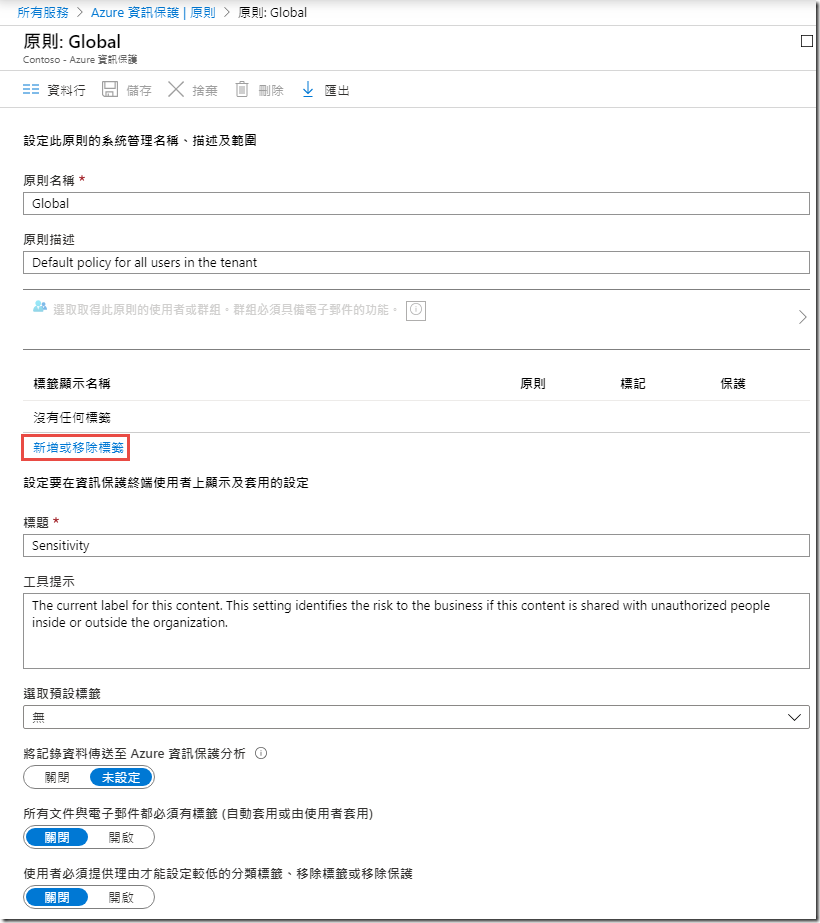
In the Policy: Global blade, wait until you see No labels under the LABEL DISPLAY NAME column, then click Add or remove labels
NOTE: If this is stuck on Loading… for more than about 10 seconds refresh the browser inside the VM and go back into the global policy.
-
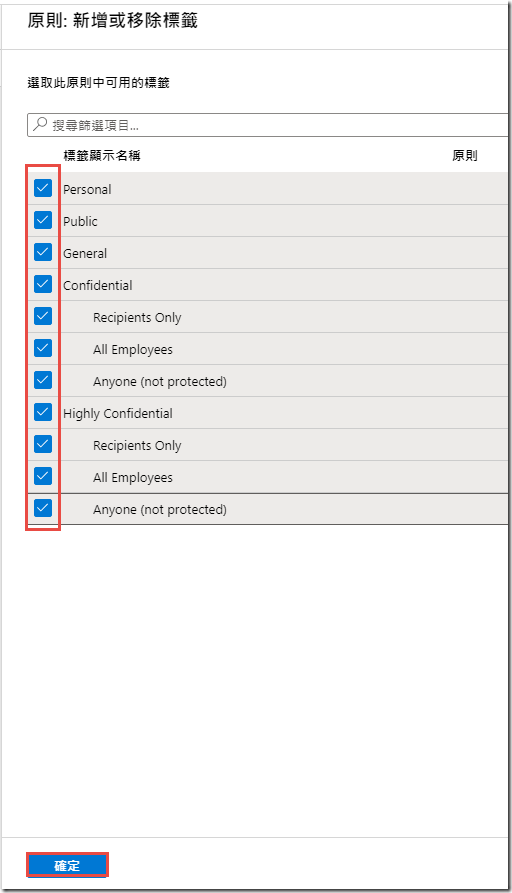
In the Policy: Add or remove labels blade, check the boxes next to each of the labels and click OK
-
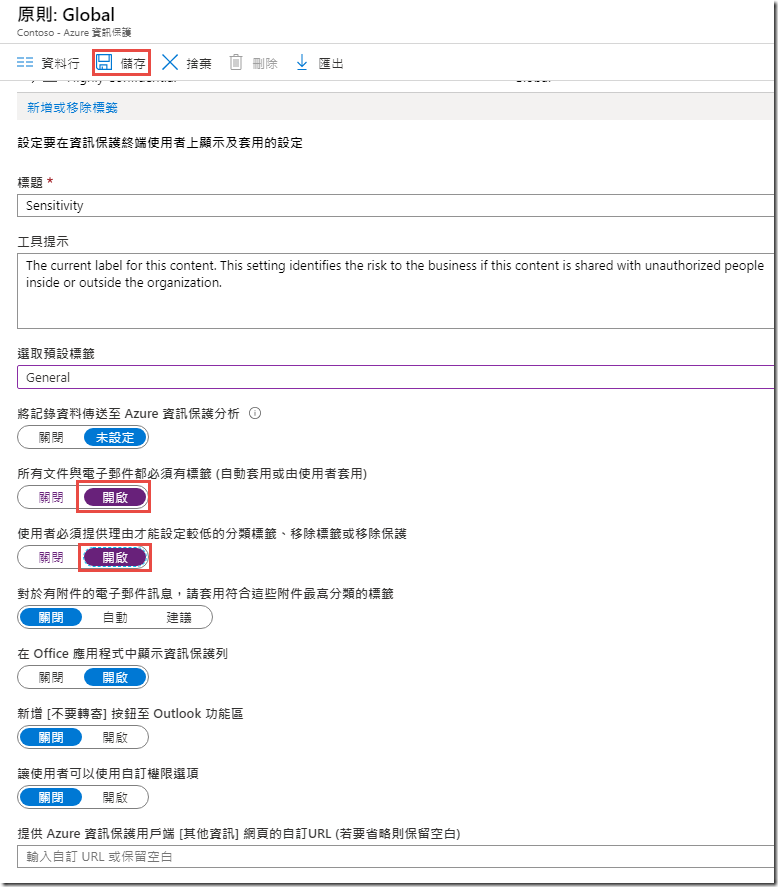
Back in the Policy: Global blade, under Select the default label choose General
-
Toggle the All documents and emails must have a label (applied automatically or by users) setting to On
-
Toggle the Users must provide justification to set a lower classification label, remove a label, or remove protection to On
-
-
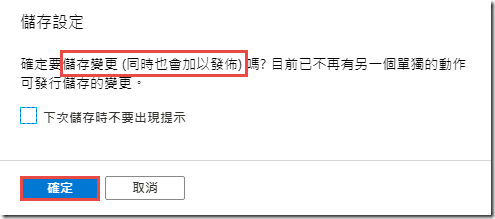
Click Save and OK
-
Click the X in the upper right corner to close the Policy:Global blade
-
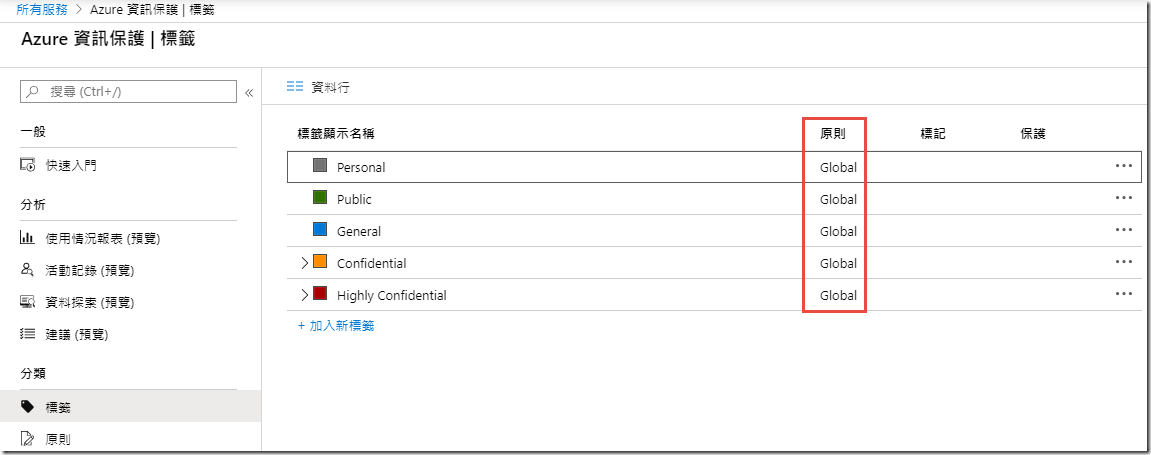
Next, under Classifications click on Labels
-
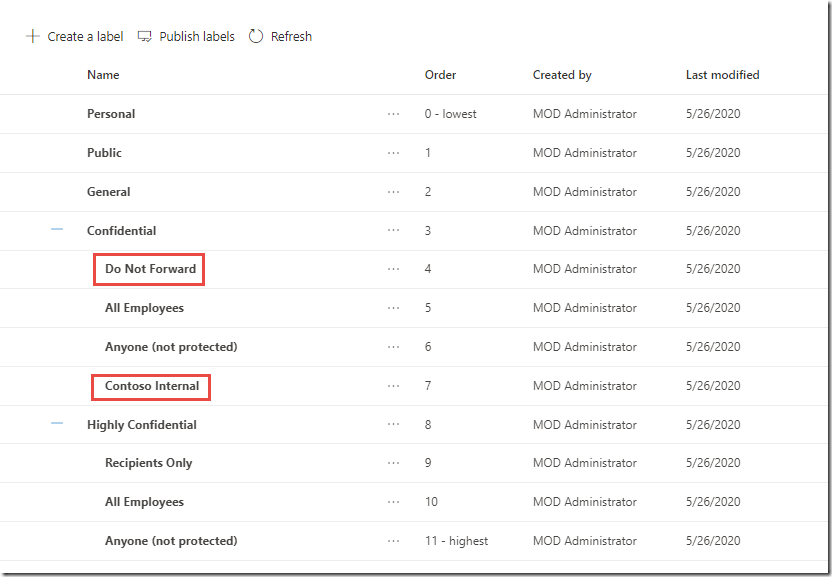
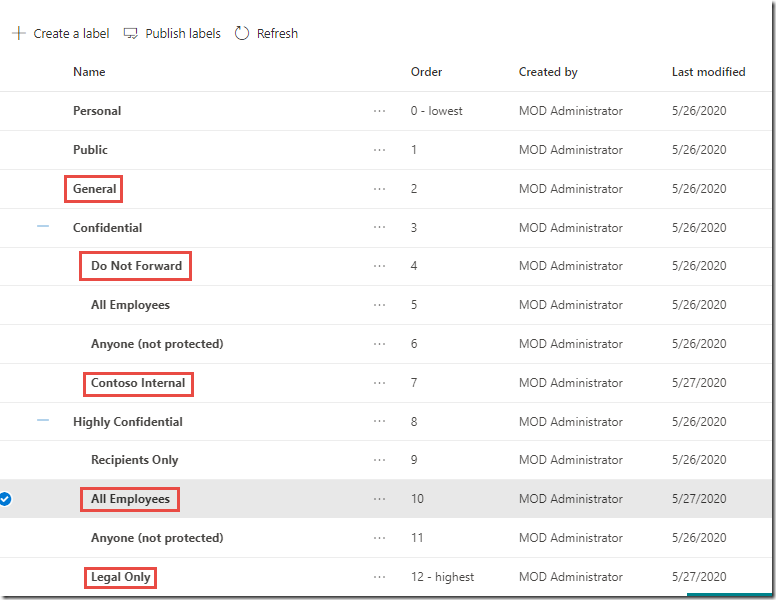
Expand the Confidential and Highly Confidential parent labels and your labels should look like the image below
Creating default labels in this way makes the labels available to both the Azure portal and the Security & Compliance Center. In the next task we will move over to the SCC for further configuration.
User Interface Walkthrough
Now that we have created the default label set, we will discuss the various elements of the Classification interface of the Security & Compliance Center.
-
In a new tab, browse to https://security.microsoft.com/
-
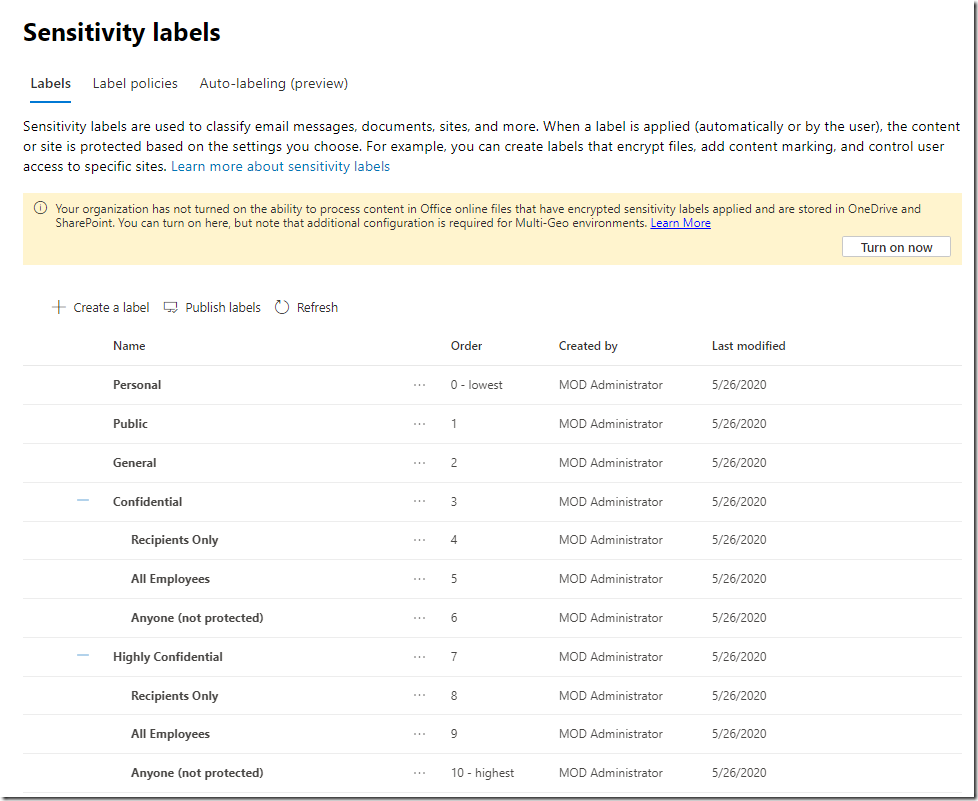
On the left side, expand Classification and click on Sensitivity Labels
In the Labels section, you will see the default labels configured for the AIP demo tenants.
These demo labels are modeled after the labels that Microsoft uses internally (with the exception of Personal where we use Non-Business) and are highly recommended as a baseline for customers that do not already have an established and effective classification taxonomy. More details on how Microsoft developed this taxonomy and how we deployed AIP internally are available in a video online at https://aka.ms/AIPShowcase
-
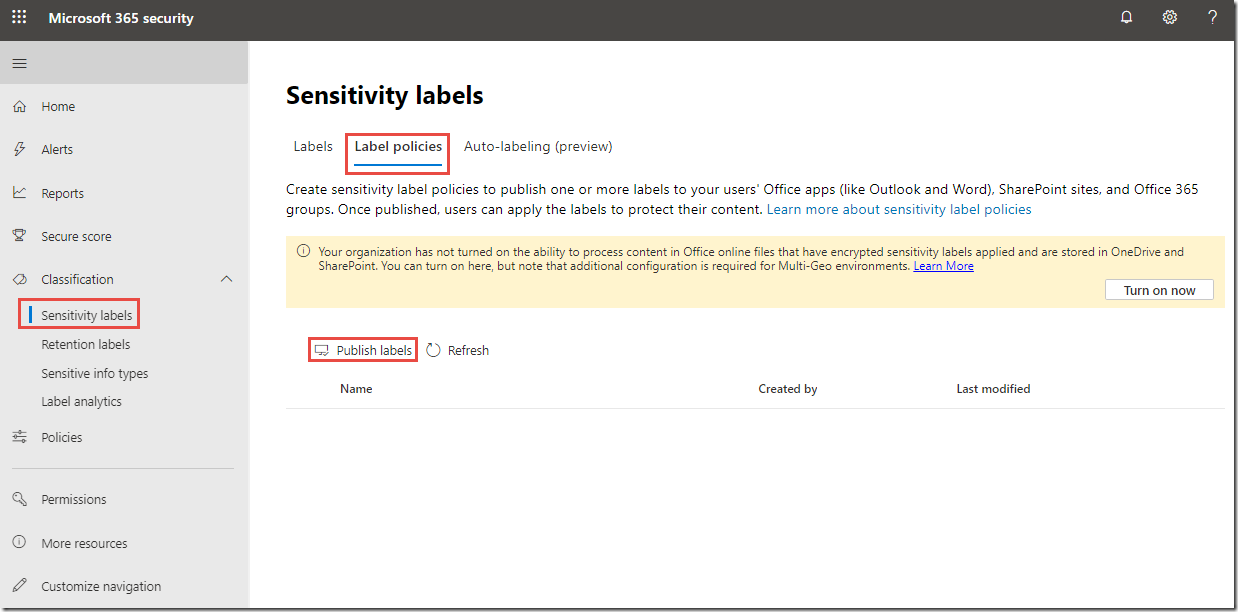
At the top of the page, click on Label policies
Note that there are no predefined label policies. Label policies in the Security & Compliance Center are more versatile than policies in the Azure portal because the same labels can be applied in multiple policies. This allows for a higher level of customization based on group or role.
-
On the Label policies page, click on Publish labels
-
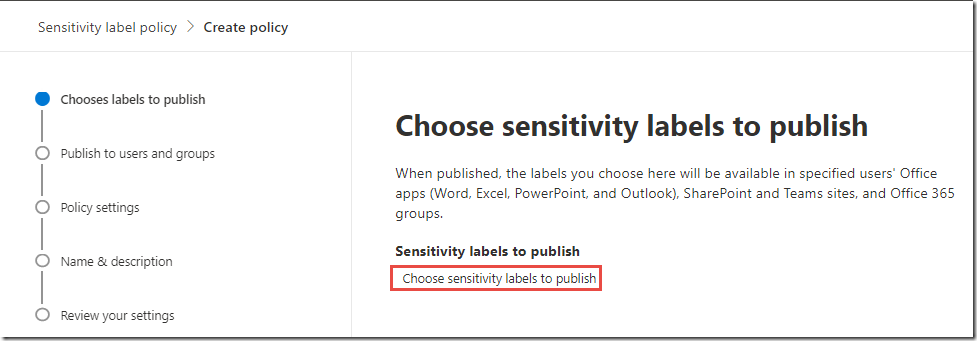
In the New sensitivity label policy, click Choose labels to publish
-
In the Choose labels blade, click the + Add button
-
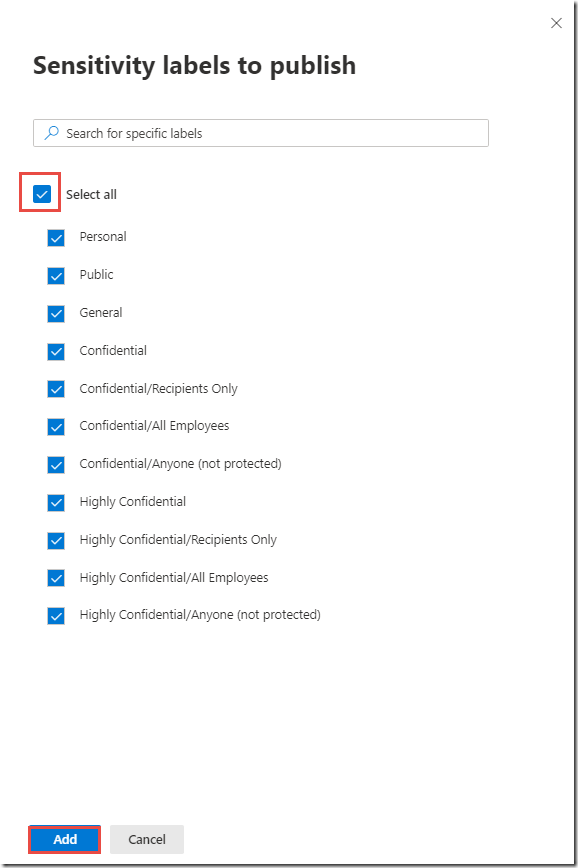
In the Choose labels blade, check the box next to Display name to select all labels and click the Add button
-
In the Choose labels blade, click the Done button
-
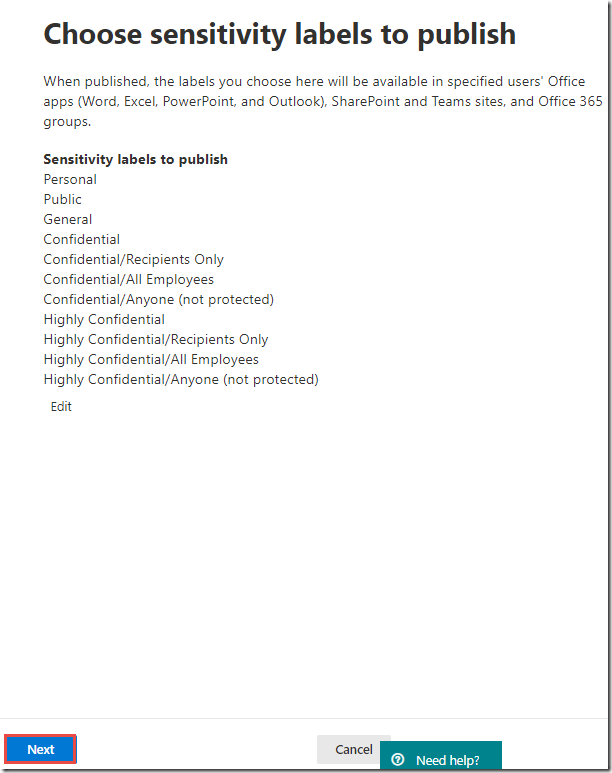
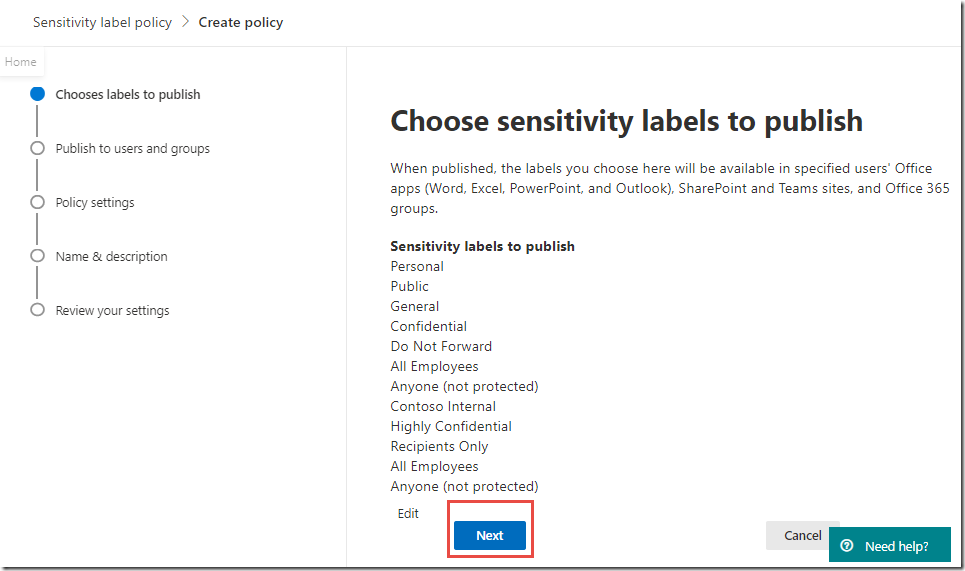
On the Choose labels to publish page, click the Next button
-
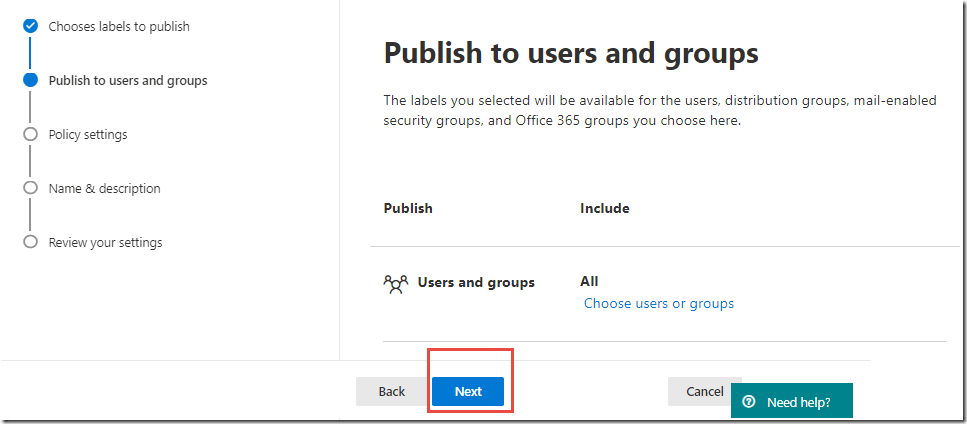
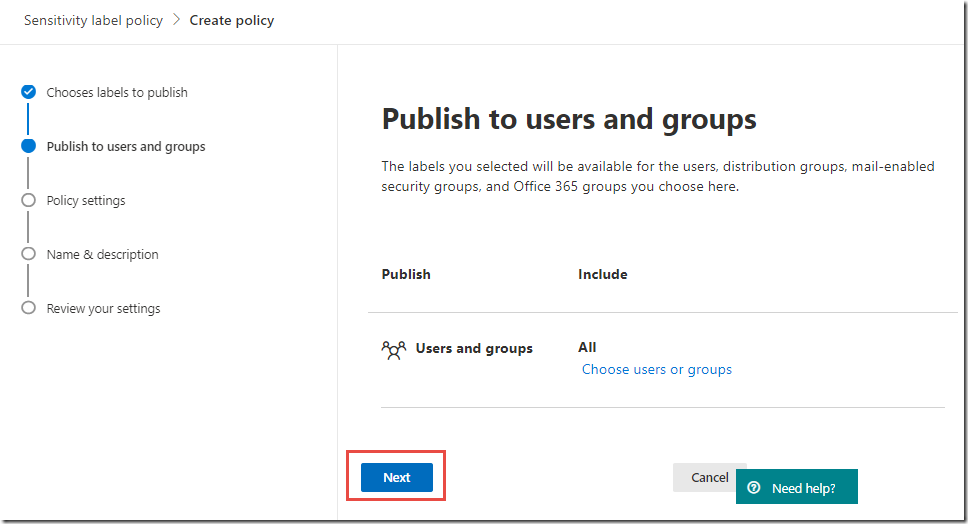
On the Publish these sensitivity labels page, click the Next button
-
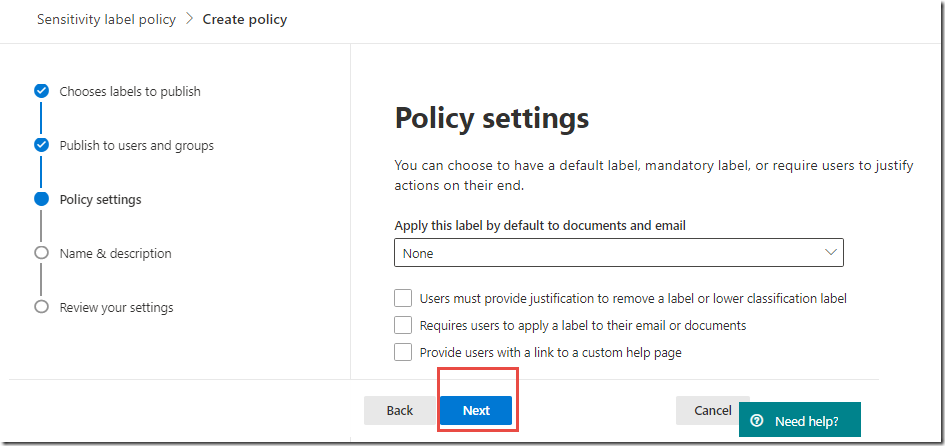
On the Policy settings page, click the Next button
NOTE: We will revisit these settings later in the lab
-
-
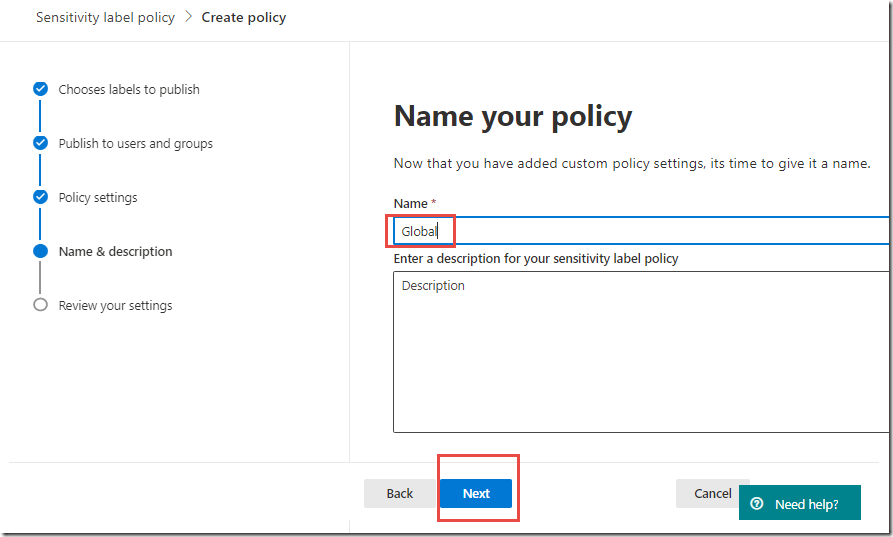
On the Policy settings page, in the Name text box, type Global
-
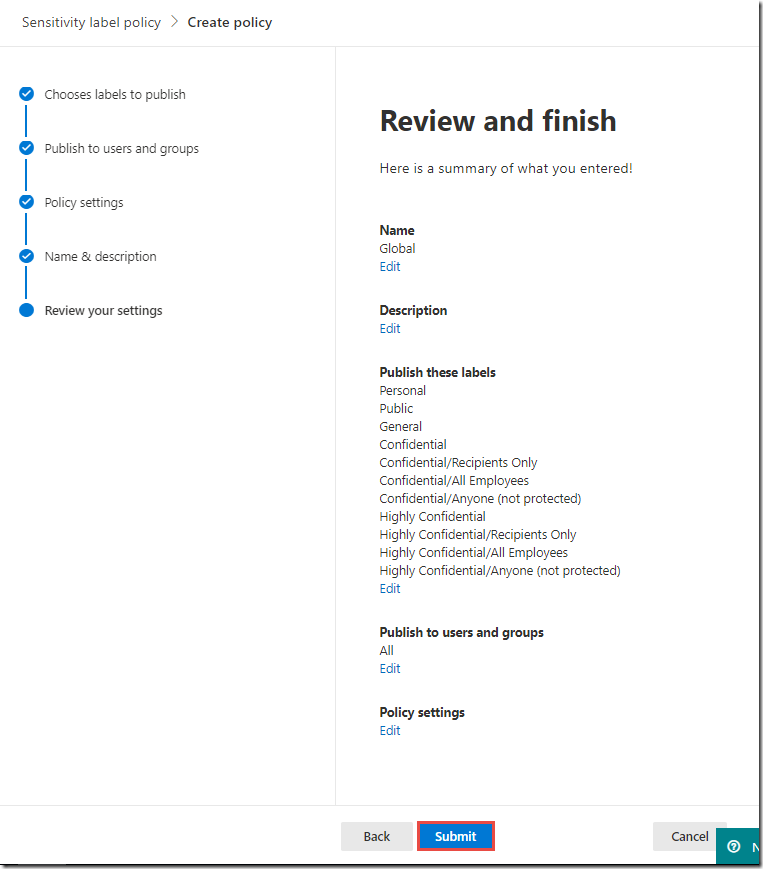
Click Next
-
On the Review your settings page, click Publish
-
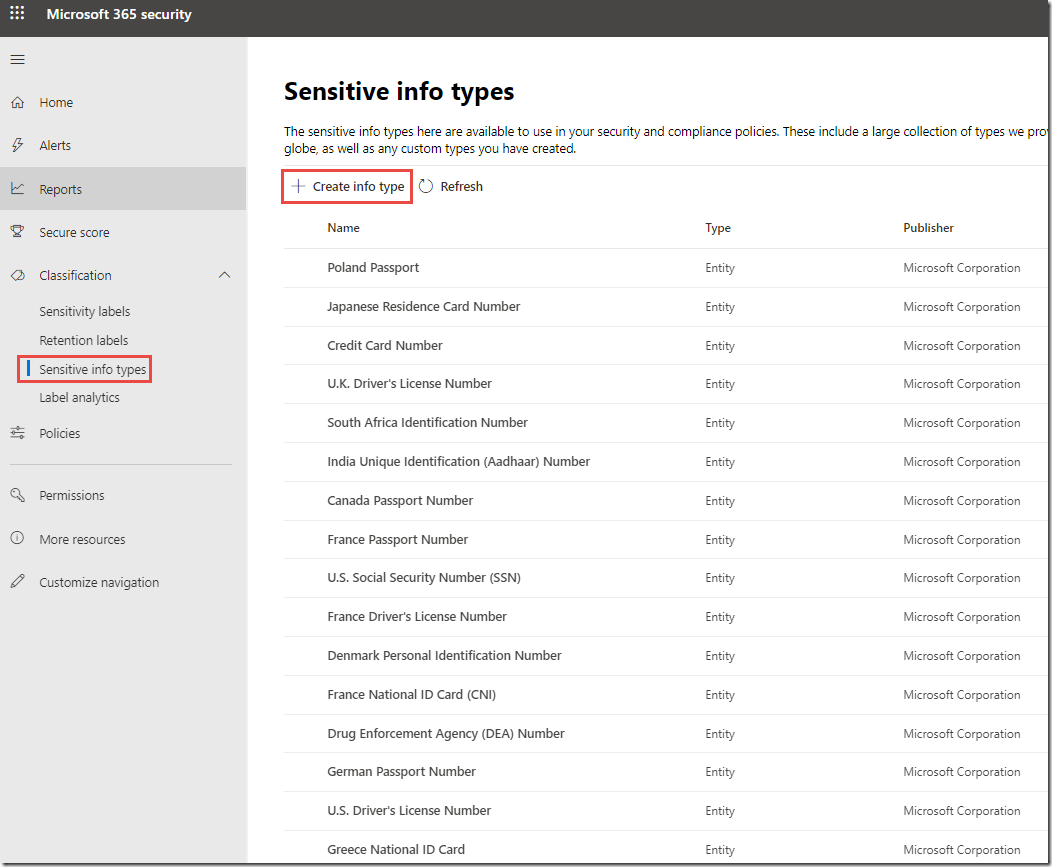
Under Classification on the left, click on Sensitive Info Types
This shows a list of the 100 sensitive info types that microsoft provides out of the box for use in our online services. These can be used to discover sensitive information using any services that use the Data Classification Service (some of these include the AIP unified labeling client, Office 365 DLP, and Microsoft Cloud App Security).
-
Next, On the Sensitive info types page, click the link to Manage sensitive info types in the Office 365 Security & Compliance Center
NOTE: In the Office 365 Security & Compliance Center you can create new sensitive info types. We will step through the process of creating a new sensitive info type below. Because this is an introductory lab, we will only be defining a simple new sensitive info type to use in this lab.
-
On the Sensitive info types page, click + Create
-
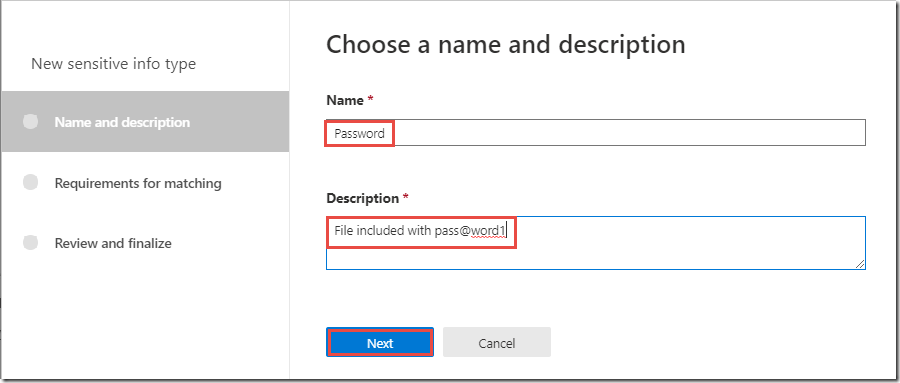
In the Name and Description boxes, type Password and click Next
-
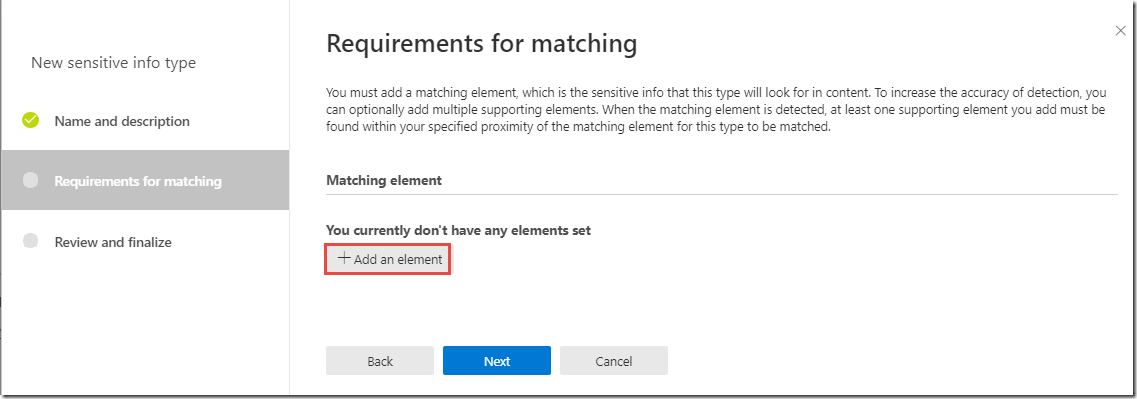
On the Requirements for matching page, under Matching element, click + Add an element
-
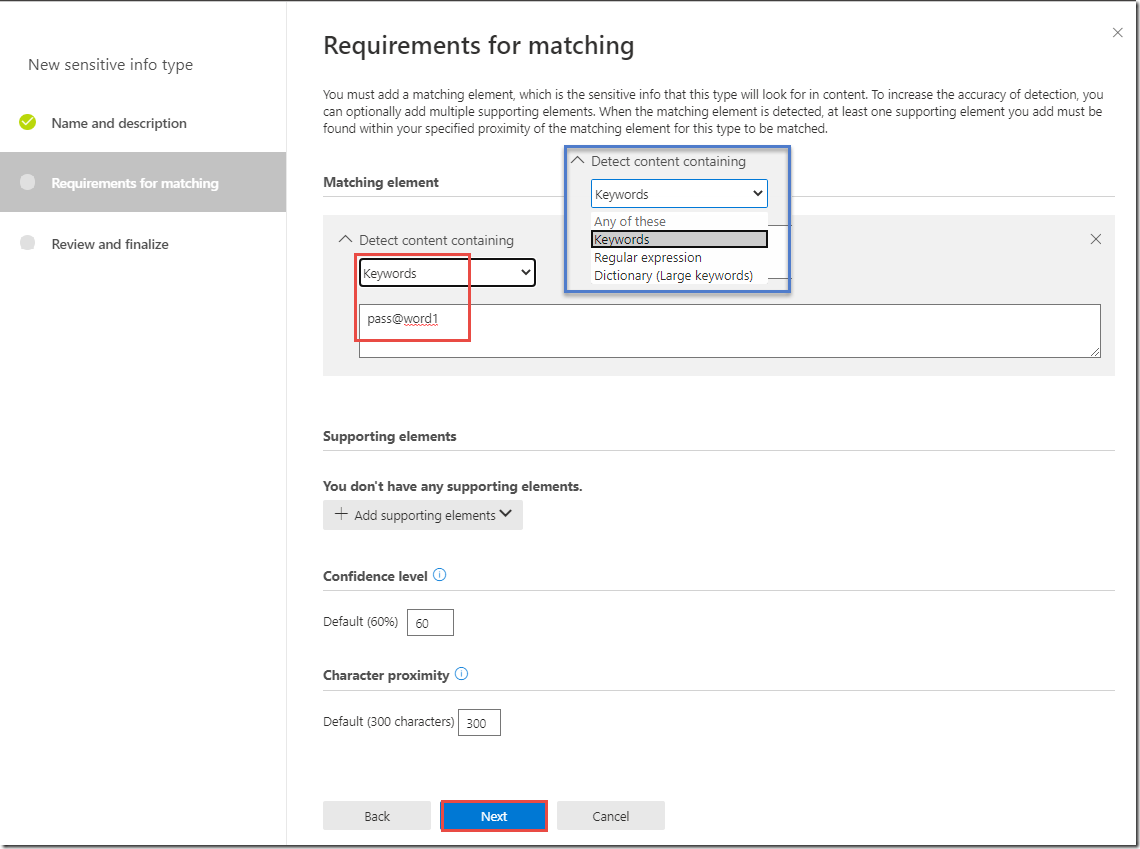
Next, under Detect content containing, click Any of these and select the Keywords option from the drop-down list
Note that there are currently 3 options for content detection, regular expression, keyword list, and dictionary. If you click on any of these elements you can further define the criteria used for the new sensitive type. You also have the ability to set a Confidence level and Character proximity to fine tune matches for your custom type.
-
In the Keywords text box, enter pass@word1
-
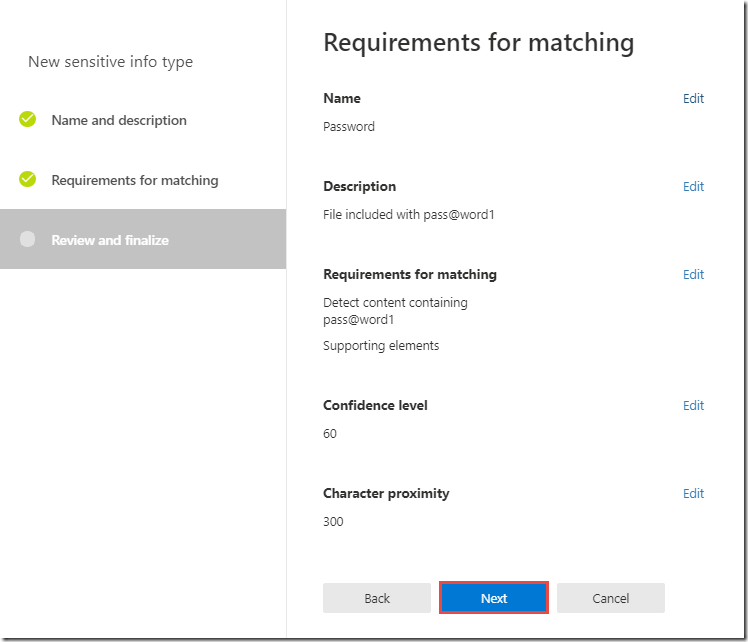
Click Next and Finish
-
In the Security & Compliance popup, click No to decline testing
-
Close the Office 365 Security & Compliance tab
-
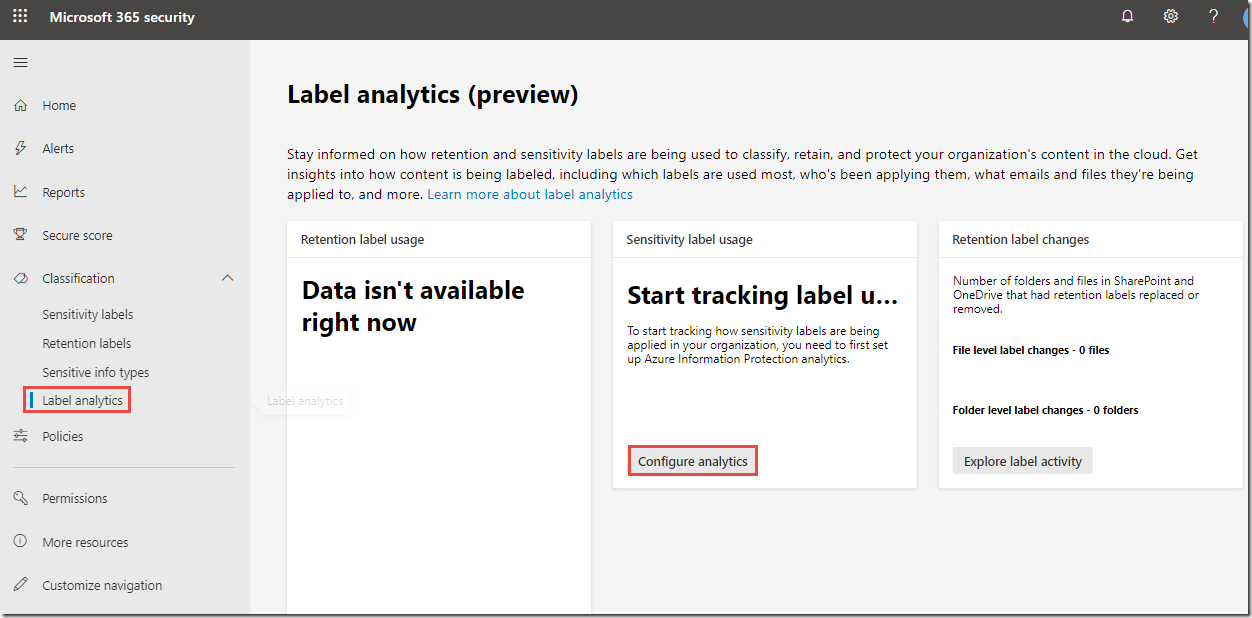
Return to the Microsoft 365 Security Center and under Classification, click on Label analytics
Note that there is no data available in the analytics portal currently. This is because it has not been configured. We will not be able to configure analytics in this lab as it requires access to an active Azure subscription, but we will walk through the analytics dashboards below.
-
On the Label analytics page, in the Sensitivity label usage box, click Configure analytics
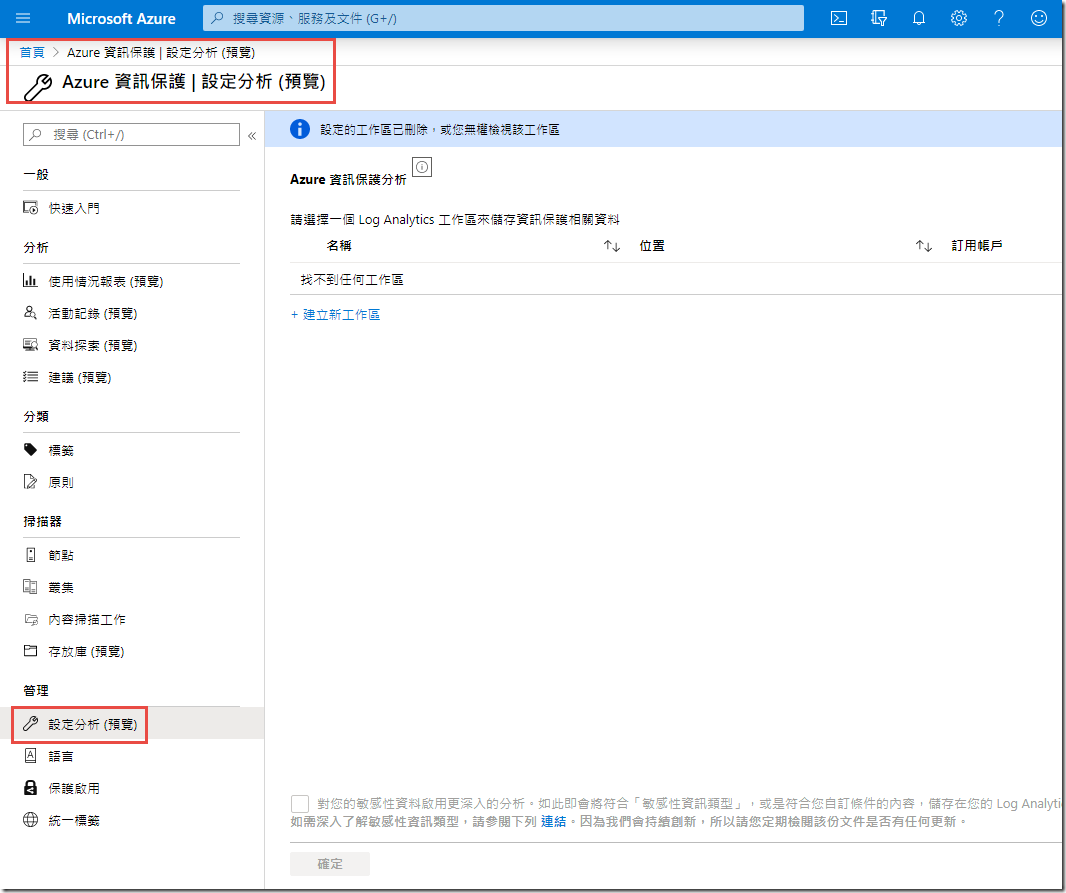
You will be redirected to the AIP analytics blade in the Azure portal. This blade is used for configuring AIP analytics. This is done by connecting an existing Azure Log Analytics workspace or creating a new one using the + Create new workspace link. Azure log analytics workspaces require an Azure subscription so we will not be able to demonstrate this functionality in this lab, but we will provide screenshots below of the various Analytics dashboards.
There is an additional option at the bottom of this blade to Enable deeper analytics into your sensitive data. This option is usually only used during testing as it allows the clients and scanner to collect the actual sensitive data contained in files rather than simply identifying that the data exists.
-
-
-
Below we will review some visualizations of the AIP Analytics
The Usage report can be used to show labeling and protection data for the last 31 days. It can also show how many users and devices have connected to your tenant. This is useful information for knowing how how active your users are and if your classification taxonomy is effective.
You can also see the distribution of labels and which applications they are primarily being used in. This will display Office applications, AIP scanner, File Explorer (right-click), and any other Microsoft and 3rd party applications that utilize the MIP SDK.

The Activity logs report shows all AIP activities that have taken place in a specified period of time. This defaults to 31 days, but can be used to target specific timeframes for investigation.
This report can be filtered and you can click on individual records to see detailed information about the activity. We do not go deep into the capabilities in this lab but we will cover this more in the Advanced AIP lab.

The Data discovery report shows a visualization of all labels that have been applied over the last 31 days and all the discovered information types in any scanned files. You can filter on specific types of information or specific locations including file repositories, on-premises sharepoint libraries, and even specific endpoints.
When used in conjunction with Microsoft Defender ATP, you can identify risky devices and see what sensitive information they contain to help prioritize remediation efforts.

The Recommendations report contains details on files that contain sensitive information that are not currently protected using recommended or automatic conditions. Without recommended or automatic conditions in place for sensitive data types, users may inadvertantly include sensitive information in documents and not label and protect them appropriately.
The Recommendations report also shows locations that contain sensitive information that are not currently being monitored by the AIP scanner or Microsoft Cloud Application Security. This can help admins locate file repositories that branch offices are using to better target them for discovery and protection.

While we are in the Azure portal, we will review the additional elements that are still managed from this portal.
-
On the left, under Scanner, click Nodes.
This blade will show any configured AIP scanner nodes reporting in to this tenant (none currently). This allows you to monitor the status of the AIP scanner and see details like version, scan rate, and number of files scanned. We will not be installing the AIP scanner in this lab but installation and configuration of the AIP scanner is available in other labs in this series.

-
Next, under Scanner, click on Profiles.
This blade is also related to the AIP scanner and is where you configure repositories and global settings for your AIP scanner instances. We go into more detail on this in the AIP scanner lab that is part of this lab series.
-
Next, under Manage, click on Languages.
The languages blade allows you to select languages that you would like to localize. This is done by checking the boxes next to each language that you will be providing localization for and clicking Export.
You will get an exported localizations.zip file containing xml files for each of the selected languages. Once you are done, you can zip these up and import them in the same location.
-
Next, under Manage, click on Protection activation.
The Protection activation blade shows the current status of Azure RMS protection in the tenant. This setting is required to be activated to use the protection capabilities of AIP. Most tenants have this activated by default.
-
Finally, Under Manage, click Unified labeling.
Unified labeling was described earlier in this section. Activation of unified labeling moves the AIP labels to the Security & Compliance Center back-end. Once activated, any changes that are made in the Azure portal will also be reflected in the Security & Compliance Center as there is only one copy of the labels.
The Publish button in this blade is needed if you make changes to labels in the Security & Compliance Center and want those changes reflected on endpoints running the AIP client (classic). We recommend continuing to manage labels from the Azure portal until you have migrated globally to the AIP unified labeling client.
Review
In this section, we have reviewed the various blades contained in the AIP console of the Azure portal and the Classification section of the Microsoft 365 Security Center.
In the next section, we will demonstrate the creation and modification of labels and policies, and walk through the various settings that are available for each.
Previous
3 of 6
Introduction to Azure Information Protection, Unified Labeling, and Office 365 Message Encryption
45 min remaining
Configuring Labels and Policies
This section demonstrates using the Azure Information Protection blade in the Azure portal to configure policies and sub-labels. We will create a new sub-label and configure protection and then modify an existing sub-label. We will also create a label that will be scoped to a specific group.
Next, we will configure AIP Global Policy to use the General sub-label as default, and finally, we will configure a scoped policy to use the new scoped label by default for Word, Excel, and PowerPoint while still using General as default for Outlook.
Creating, Configuring, and Modifying Sub-Labels
In this task, we will configure a label protected for internal audiences that can be used to help secure sensitive data within your company. By limiting the audience of a specific label to only internal employees, you can dramatically reduce the risk of unintentional disclosure of sensitive data and help reduce the risk of successful data exfiltration by bad actors.
However, there are times when external collaboration is required, so we will configure a label to match the name and functionality of the Do Not Forward button in Outlook. This will allow users to more securely share sensitive information outside the company to any recipient. By using the name Do Not Forward, the functionality will also be familiar to what previous users of AD RMS or Azure RMS may have used in the past.
-
In the Microsoft 365 Security Center, under Classification on the left, click on Sensitivity Labels
-
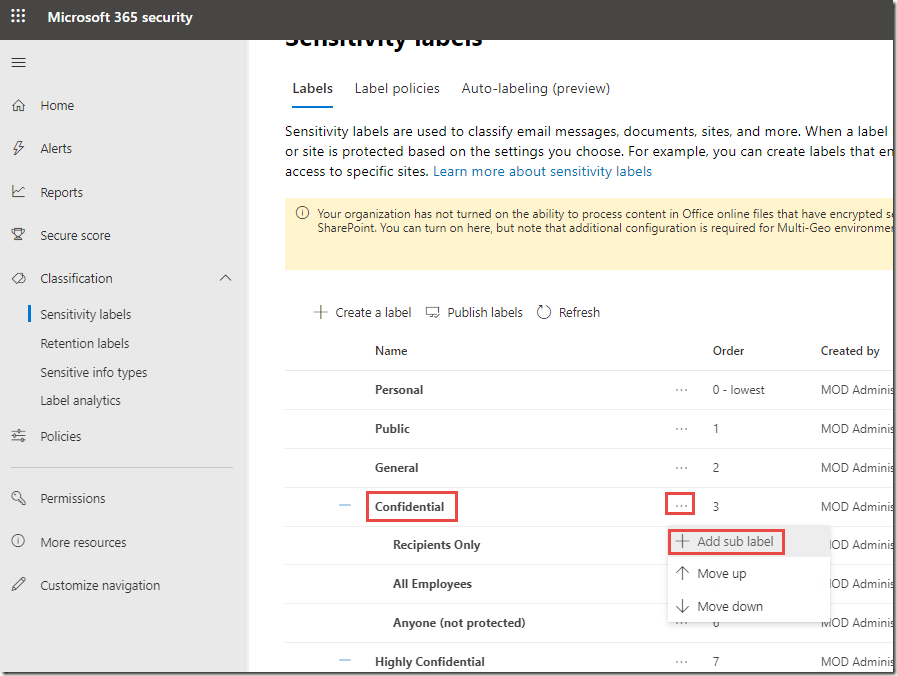
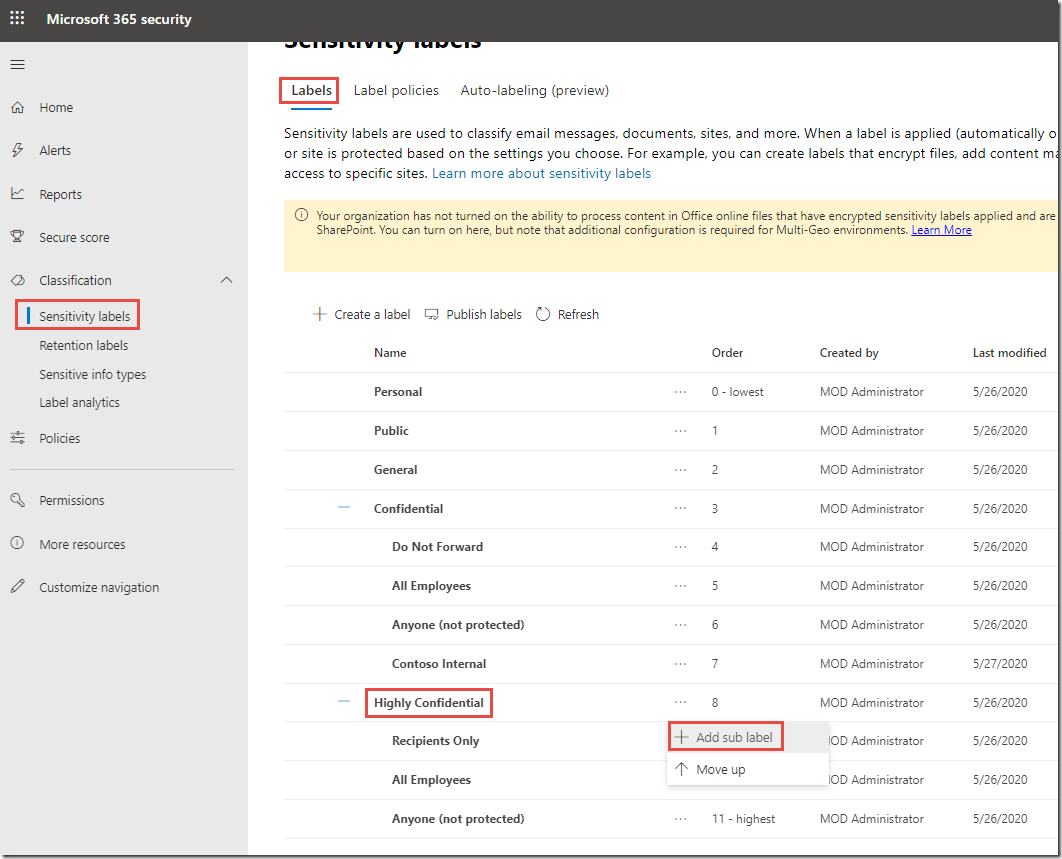
On the Labels page, click on the dots to the right of Confidential and click + Add sub label
NOTE: If you do not see the dots on the right, try reducing the zoom in the browser as this could be due to screen resolution issues.
-
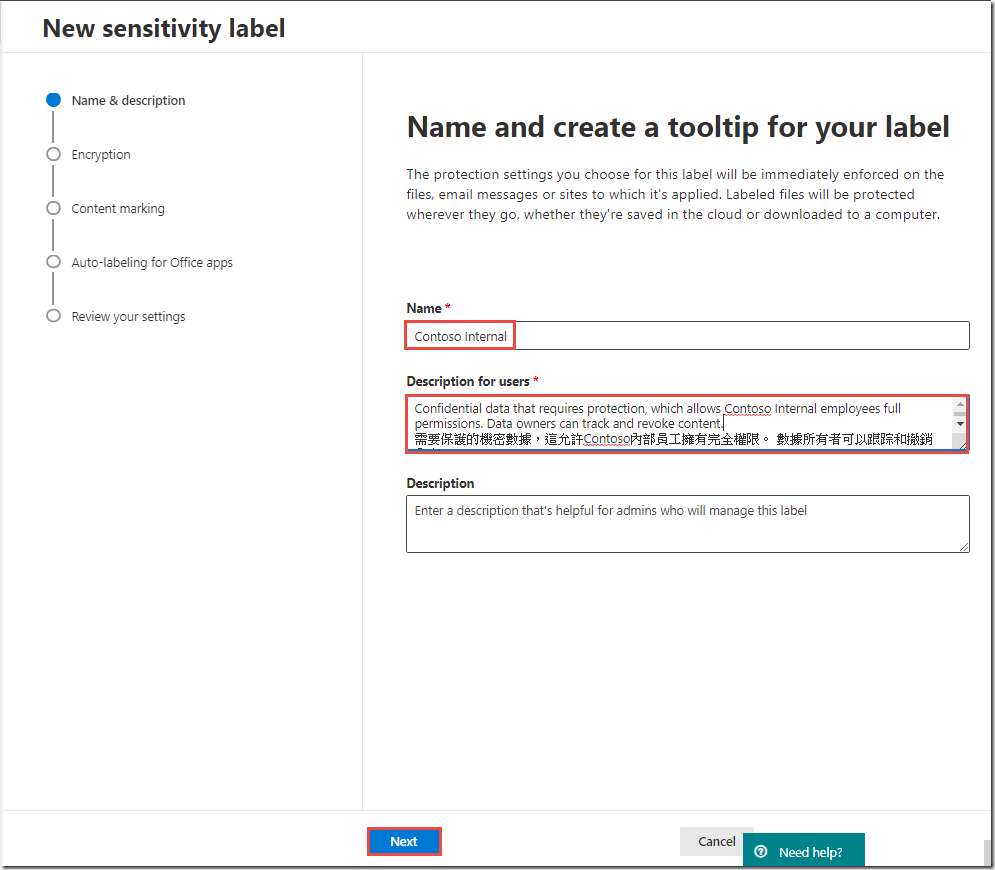
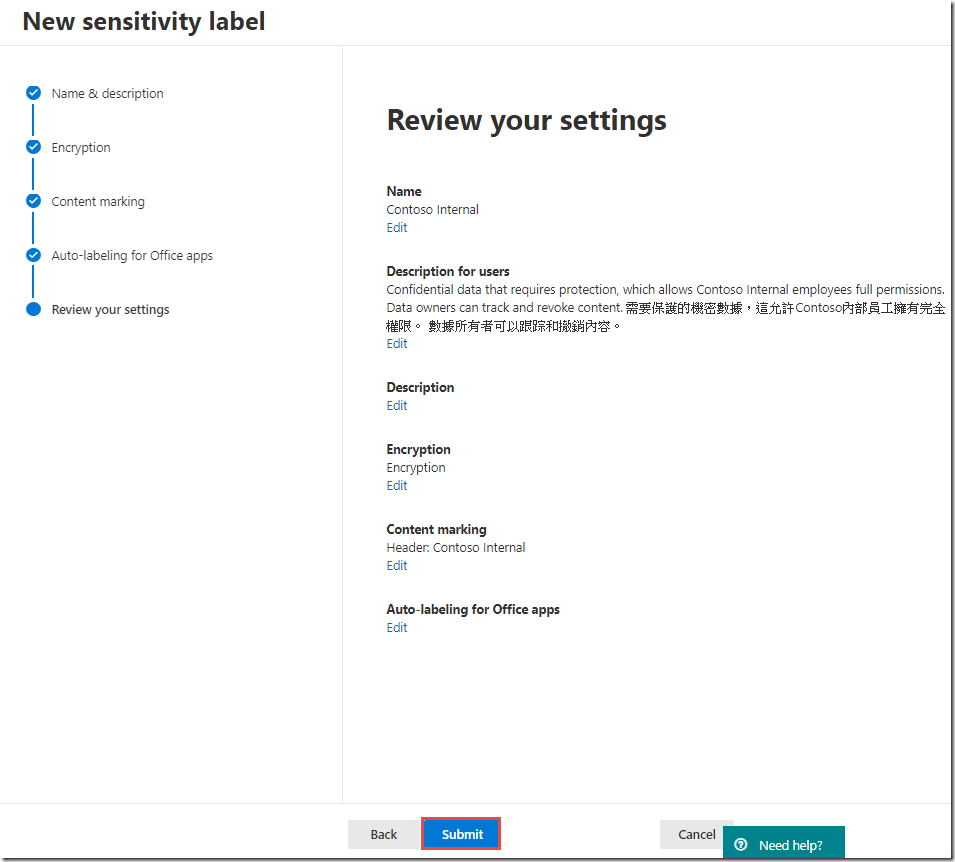
In the New sensitivity label page, type Contoso Internal for the Label name
-
In the Tooltip textbox, enter text similar to Confidential data that requires protection, which allows Contoso Internal employees full permissions. Data owners can track and revoke content.
-
【需要保護的機密數據,這允許Contoso內部員工擁有完全權限。 數據所有者可以跟踪和撤銷內容。】
-
Click Next
-
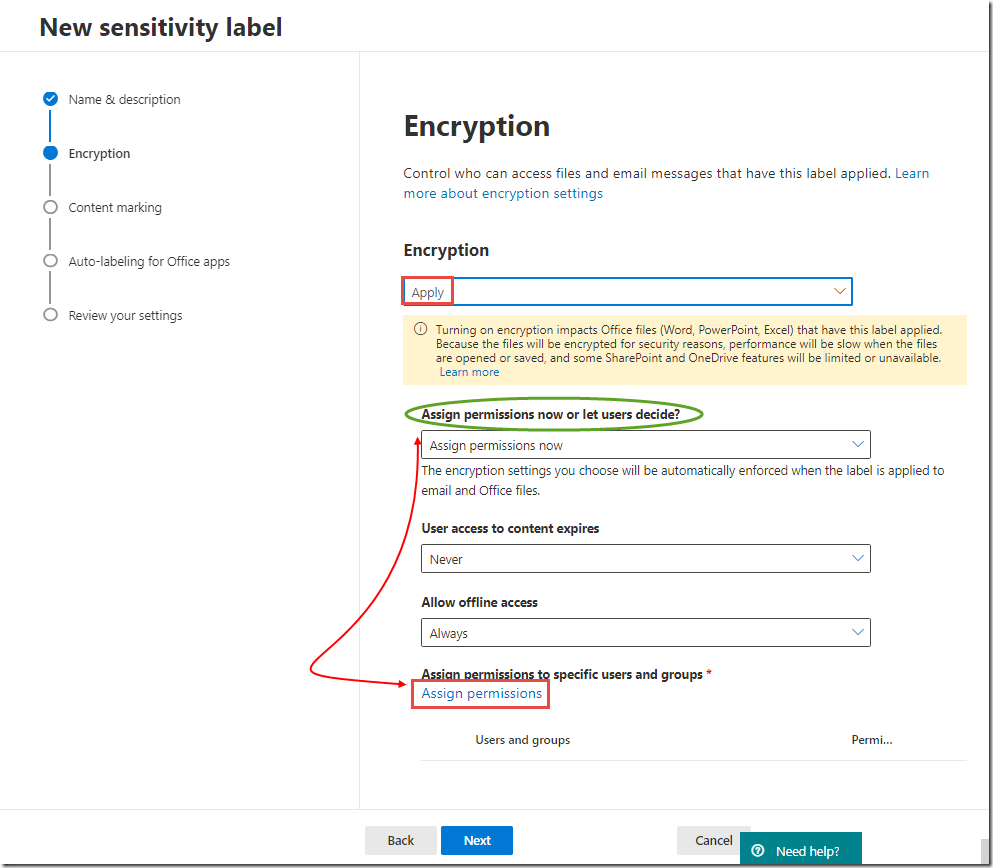
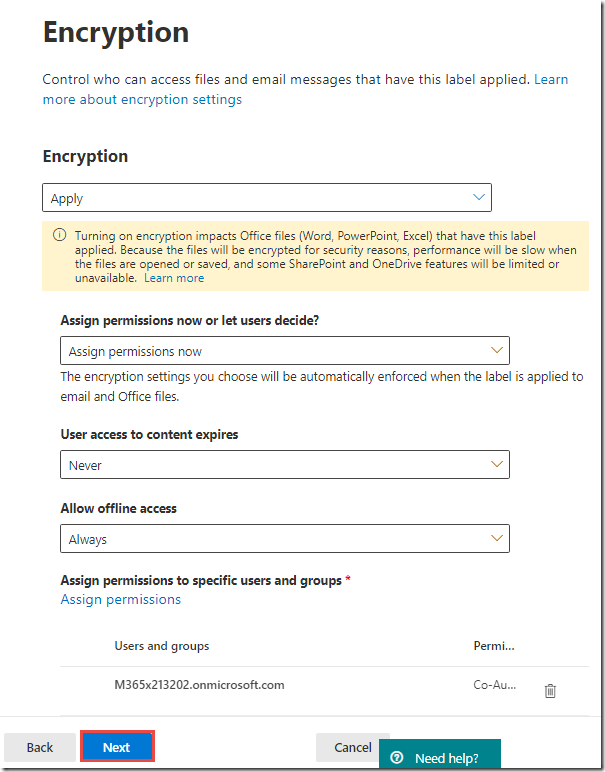
On the Encryption page, toggle Encryption to On
-
Under Grant permissions to specific users and groups, click Assign permissions
-
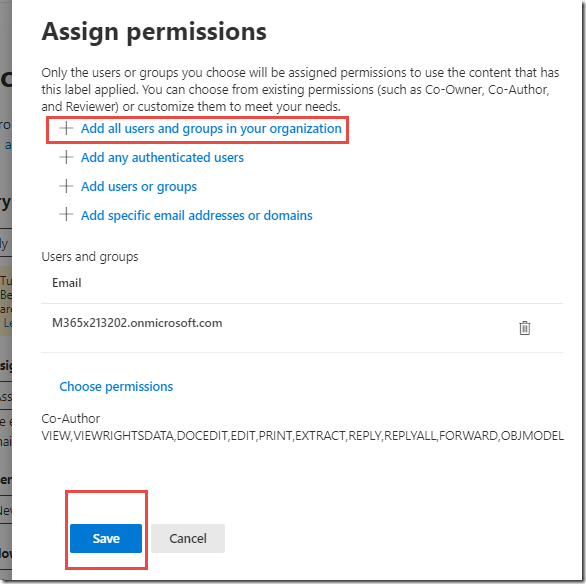
On the Assign permissions page, click on + Add all tenant members and click Save
-
On the Encryption page, click Next
-
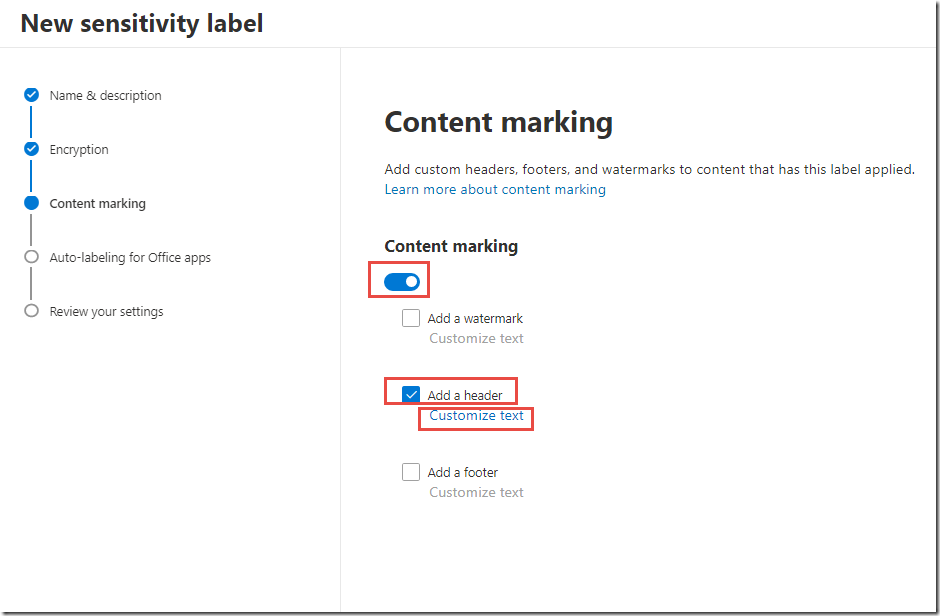
On the Content marking page, toggle Content marking to On
-
Check the box next to Add a header and click Customize text
-
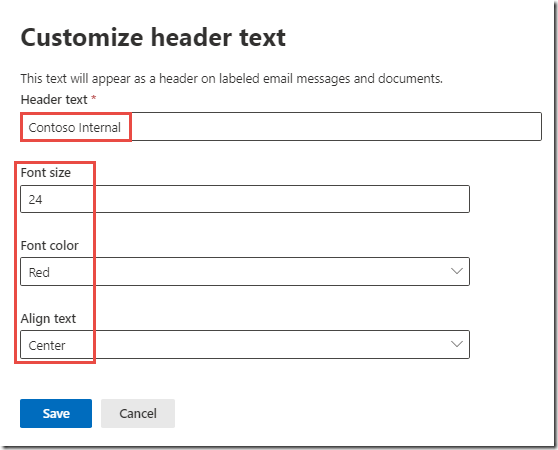
Use the values in the table below to configure the Header.
Setting
ValueHeader text
Contoso InternalFont size
24Font color
RedAlign text
CenterThese are sample values to demonstrate marking possibilities and NOT a best practice.
-
Click Save
-
On the Content marking page, click Next
-
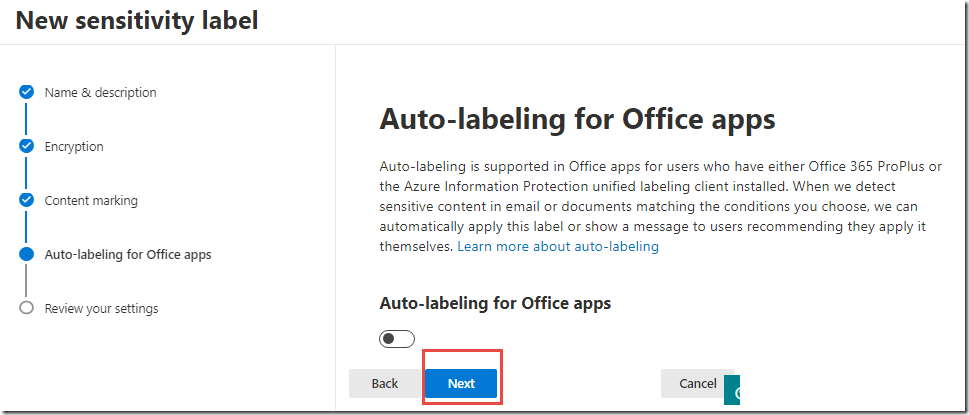
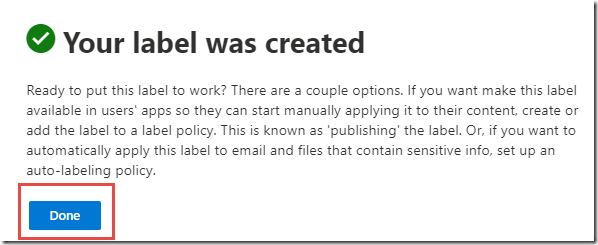
Click Next on the Endpoint data loss prevention and Auto labeling 【Auto-labeling for Office apps】 pages, then click Create to complete creation of the new sensitivity label
-
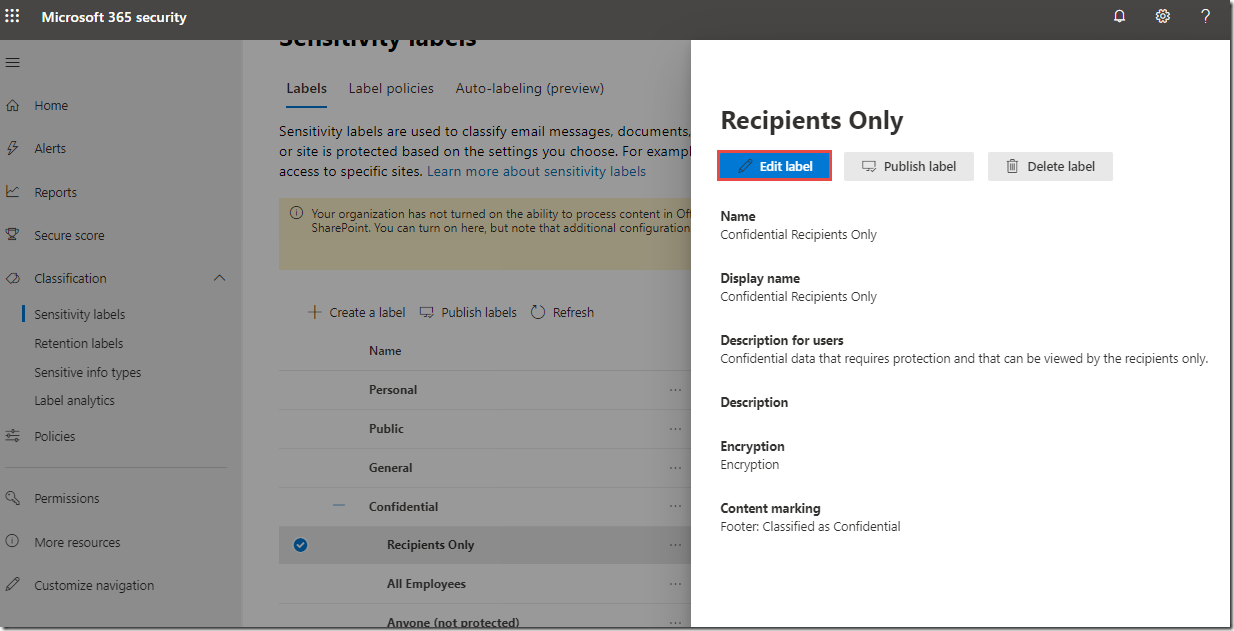
On the Labels page, expand Confidential (if necessary) and then click on Recipients Only.
-
On the Recipients Only page, click Edit label
-
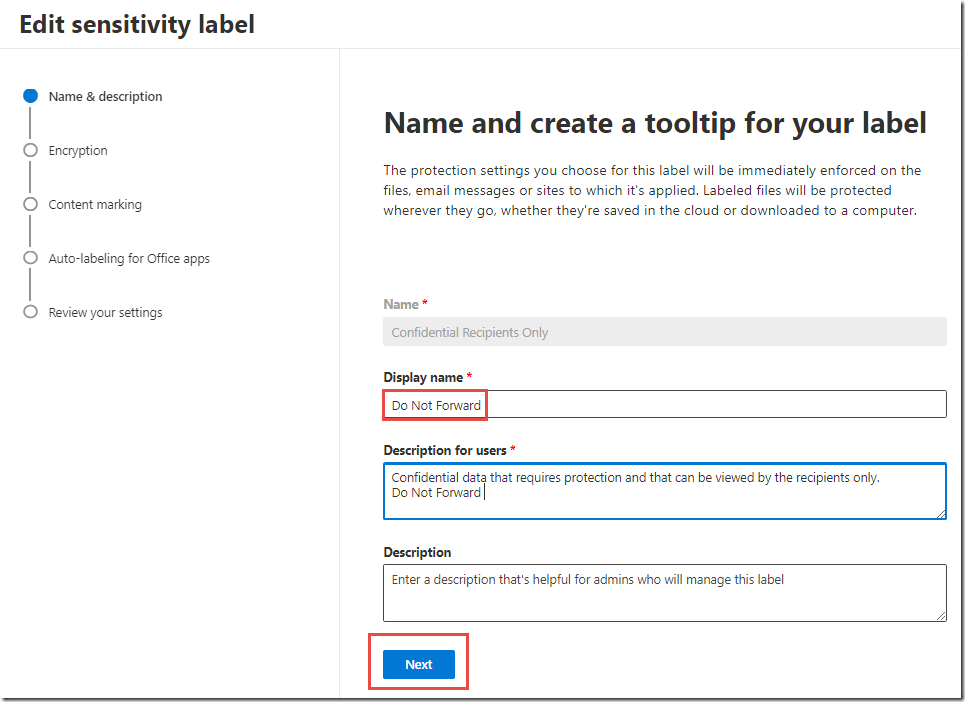
Change the Display name from Recipients Only to Do Not Forward and click Save
-
On the Do Not Forward page, next to Encryption, click Edit
-
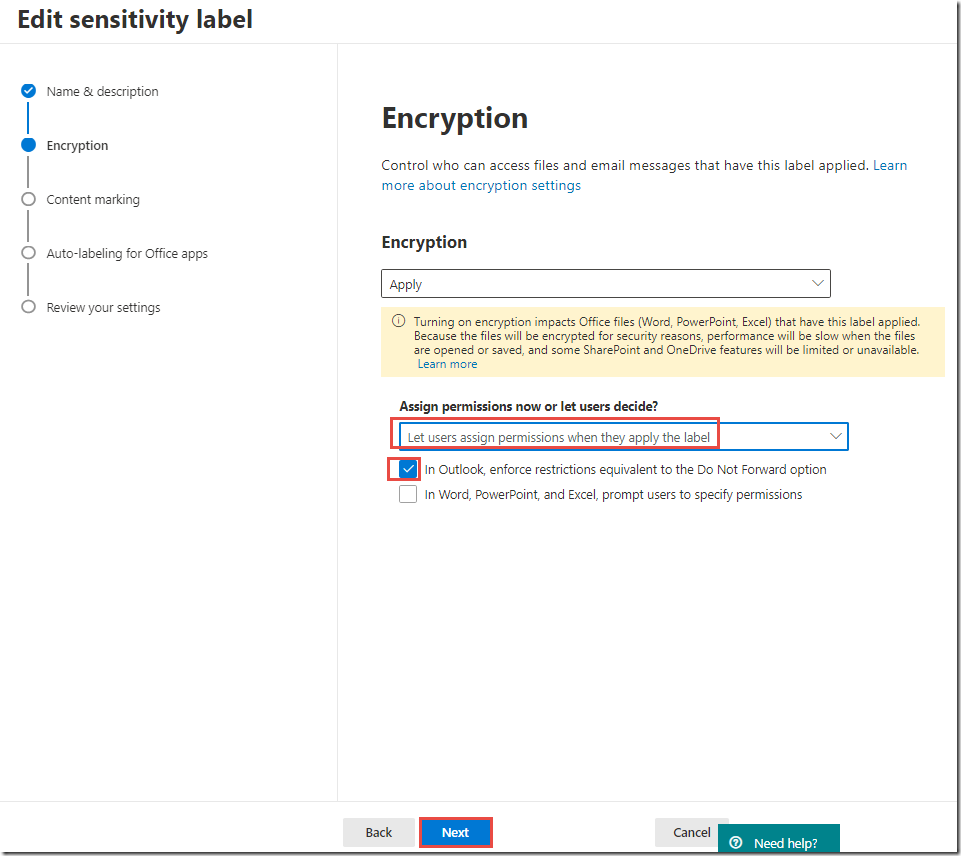
Note that this label will only apply in Outlook and will apply the Do Not Forward user defined protection template
-
-
-
-
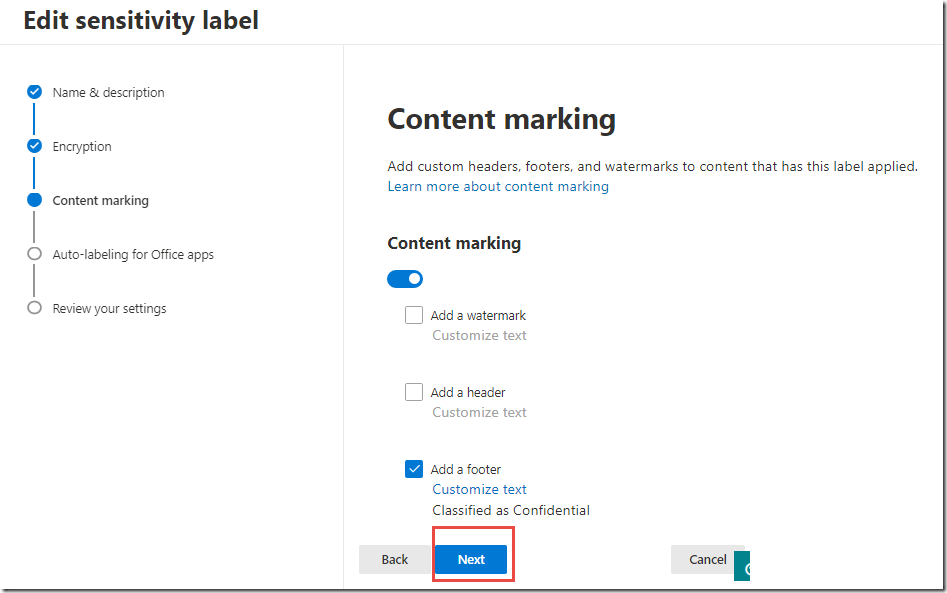
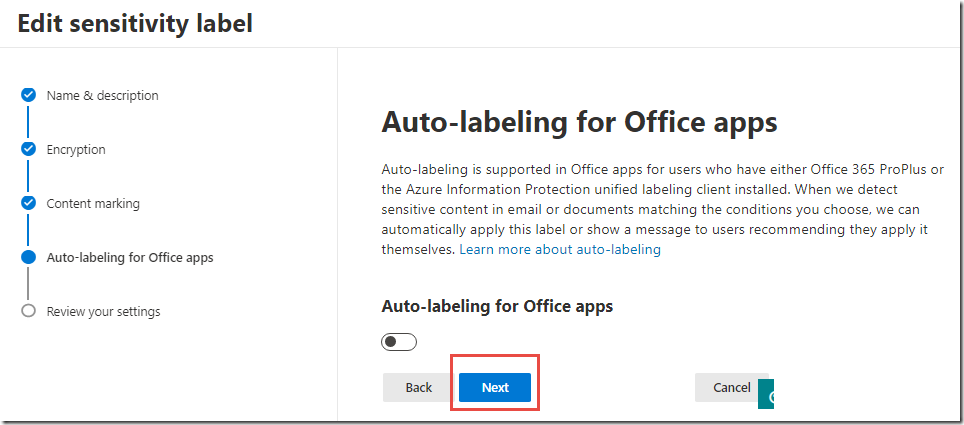
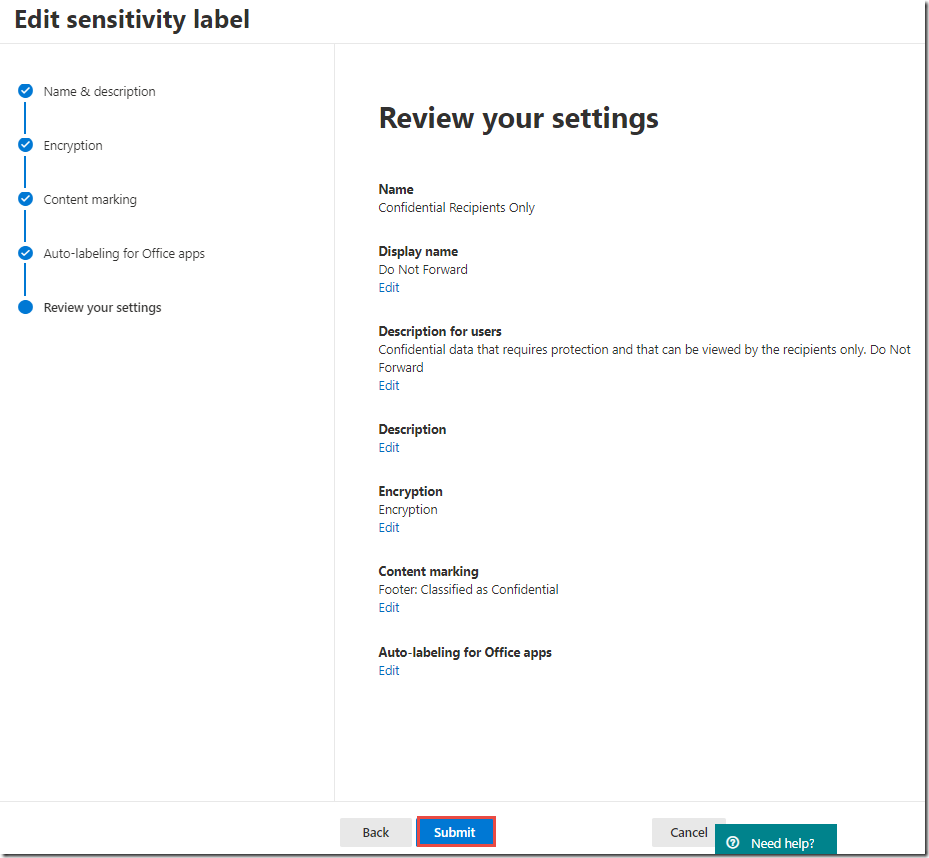
Although there is no action added during this step, it is included to show that this label will only display in Outlook and not in Word, Excel, PowerPoint or File Explorer.
-
Click Cancel on the Editing encryption page
-
Click Close to complete editing the Do Not Forward sub label
Configuring Global Policy
In this task, we will add the new sub label to the Global policy and configure several global policy settings that will increase Azure Information Protection adoption among your users and reduce ambiguity in the user interface.
-
Under Classification on the left, click Sensitivity Labels
-
At the top, click Label policies
-
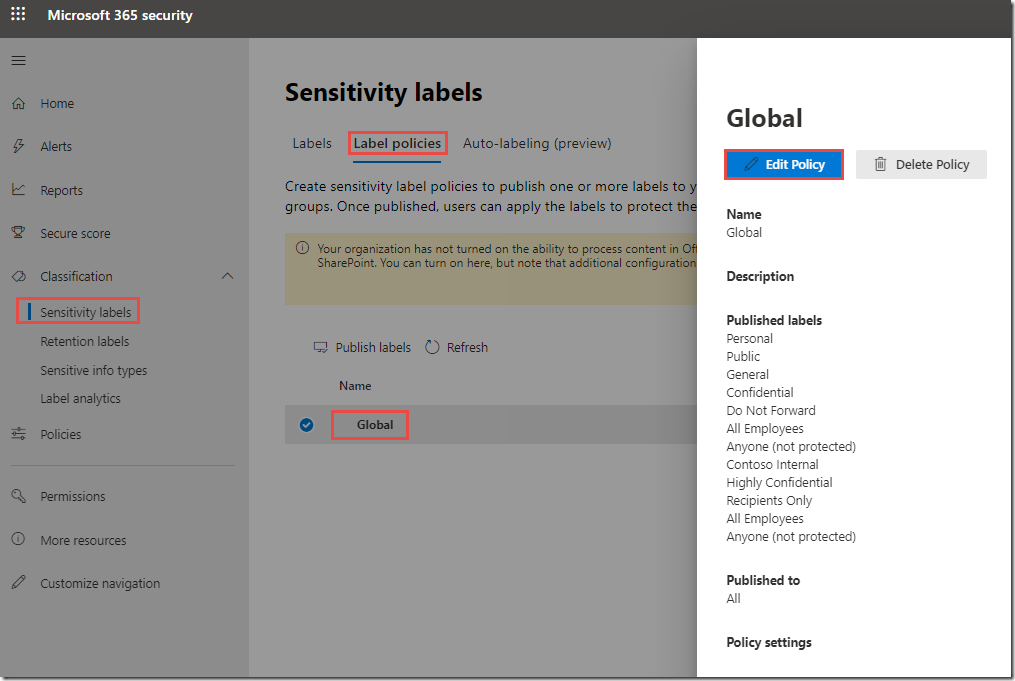
Click the Global policy
-
In the Global policy panel, scroll down and next to settings click Edit
-
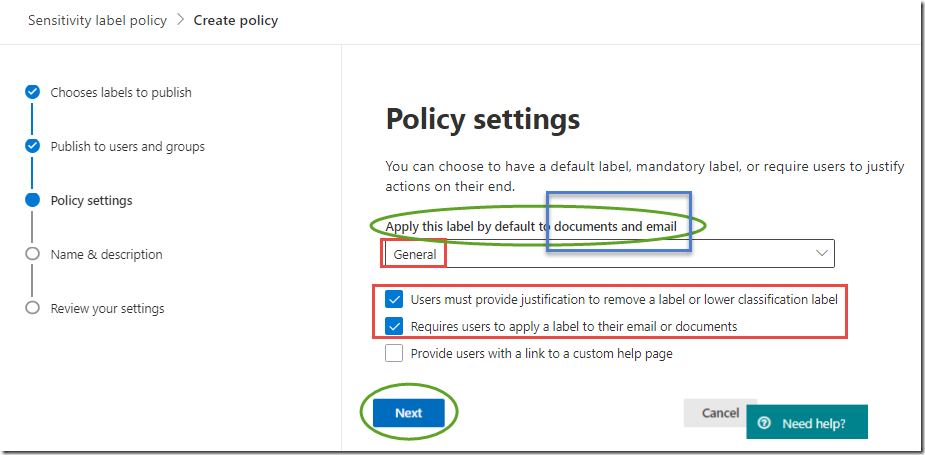
On the Policy settings page, next to Apply this label by default to documents and email, select the drop-down menu and click General
-
Check the box next to Users must provide justification to remove a label or lower classification label
-
Check the box next to Require users to apply a label to their email or documents
The settings page should now look like the image below.
-
These settings apply a default label to all documents and emails, requires users to justify any downgrade or removal of labels, and requires that all documents and email are labeled in some way. These policies help to minimize the impact on users while still enabling classification of all documents and emails.
-
Click Save and Close to complete editing the Global Policy
Creating a Scoped Label and Policy
Now that you have learned how to work with global labels and policies, we will create a new scoped label and policy for the Legal team at Contoso.
-
Under Classification on the left, click on Sensitivity Labels
-
On the Labels page, click on the dots to the right of Highly Confidential and click + Add sub label
-
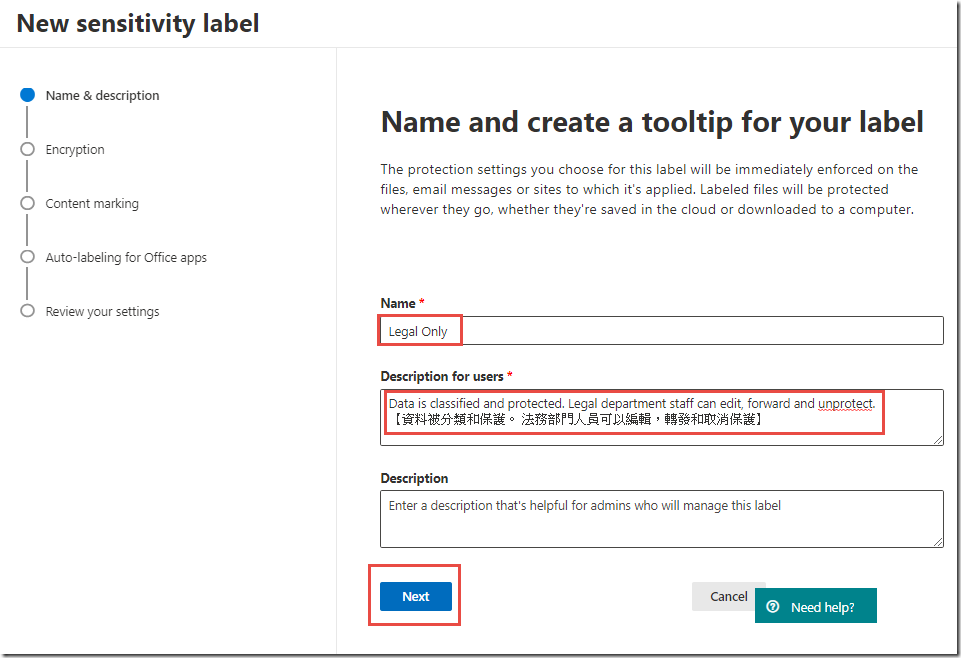
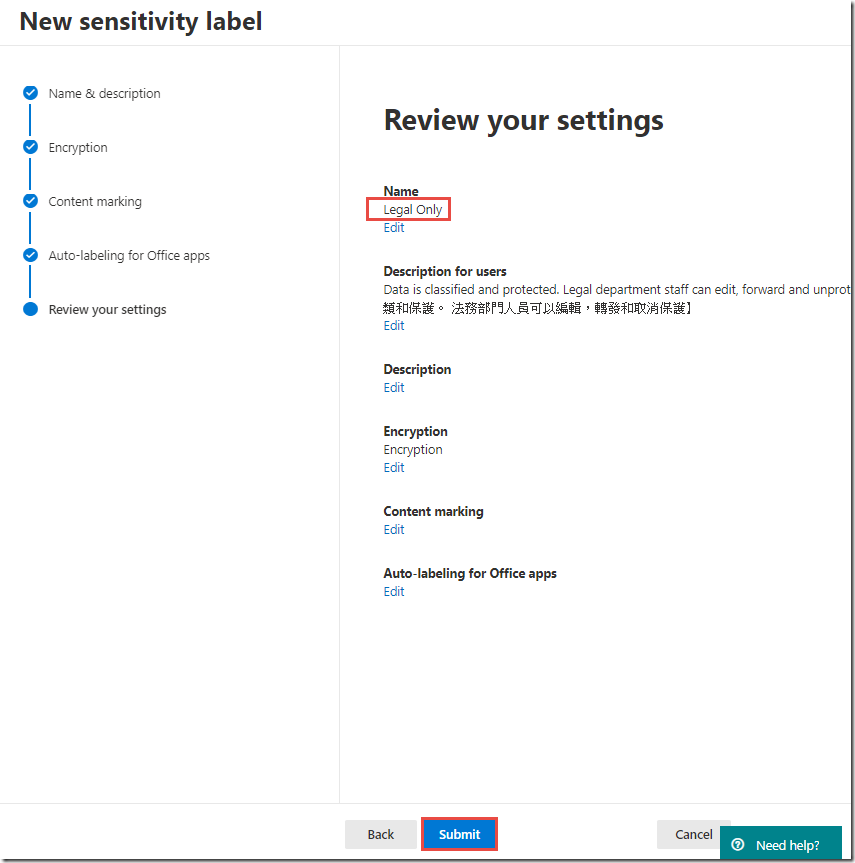
In the New sensitivity label page, type Legal Only for the Label name
-
In the Tooltip textbox, enter text similar to Data is classified and protected. Legal department staff can edit, forward and unprotect.【資料被分類和保護。 法務部門人員可以編輯,轉發和取消保護】
-
Click Next
-
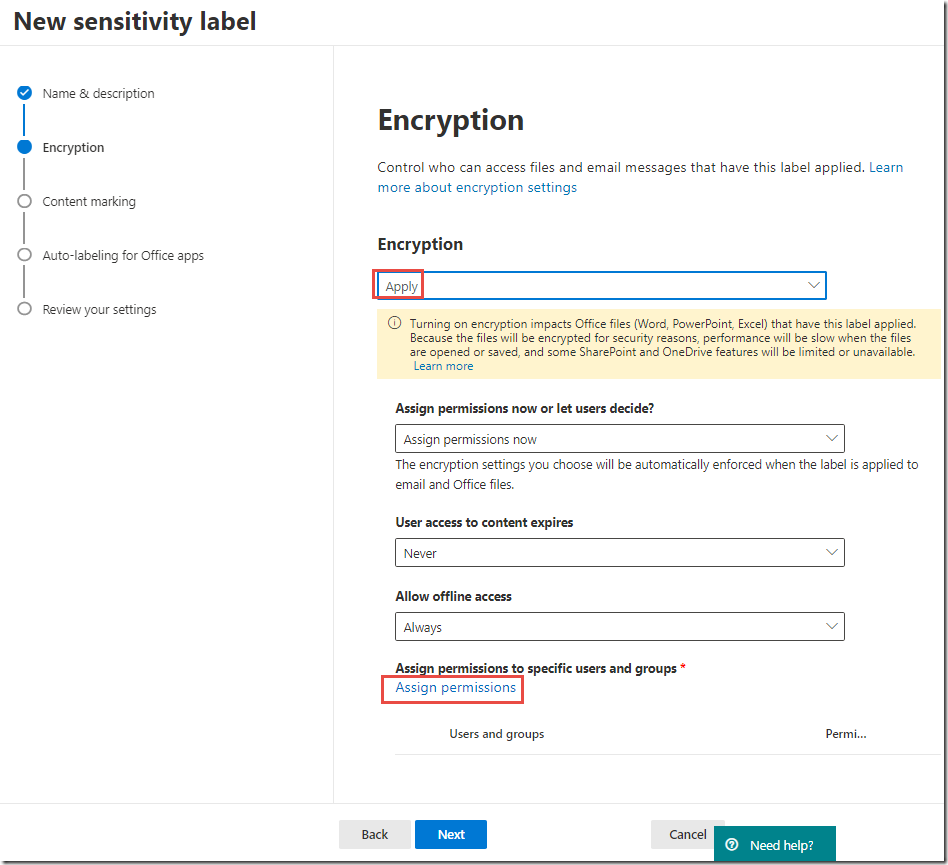
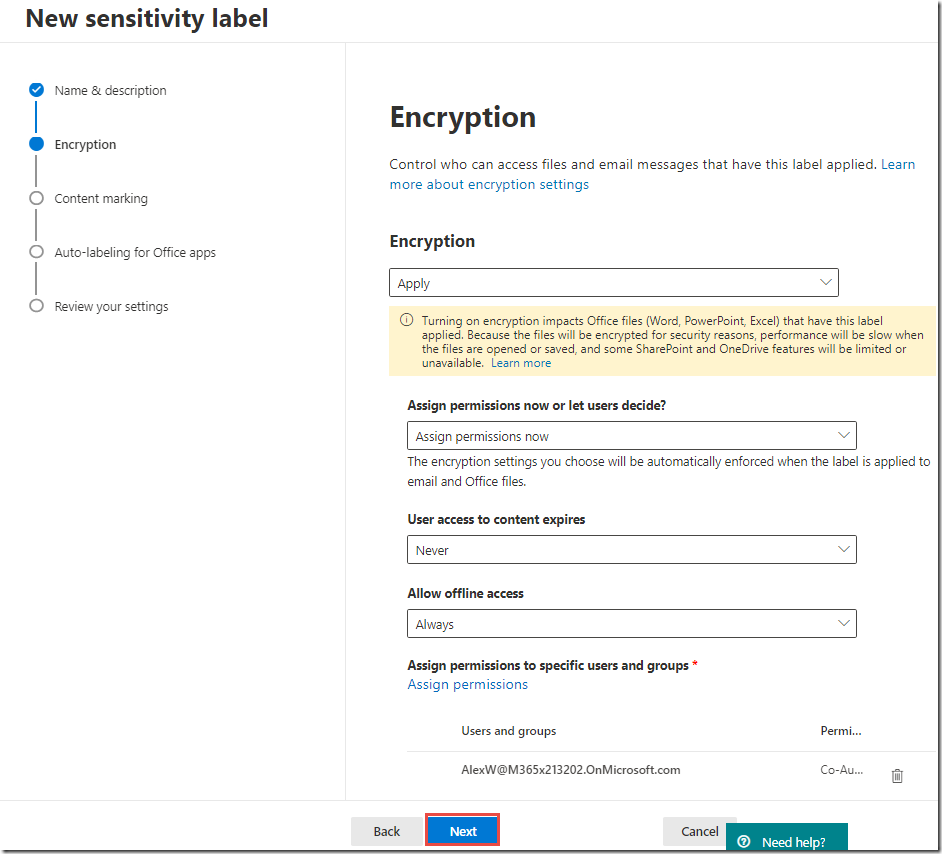
On the Encryption page, toggle Encryption to On
-
Under Grant permissions to specific users and groups, click Assign permissions
-
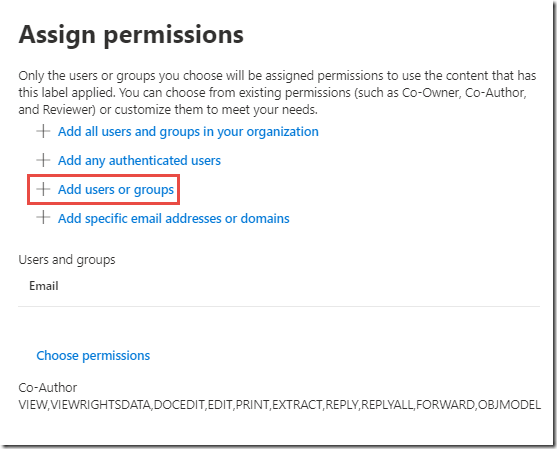
On the Assign permissions page, click on + Add users or groups
-
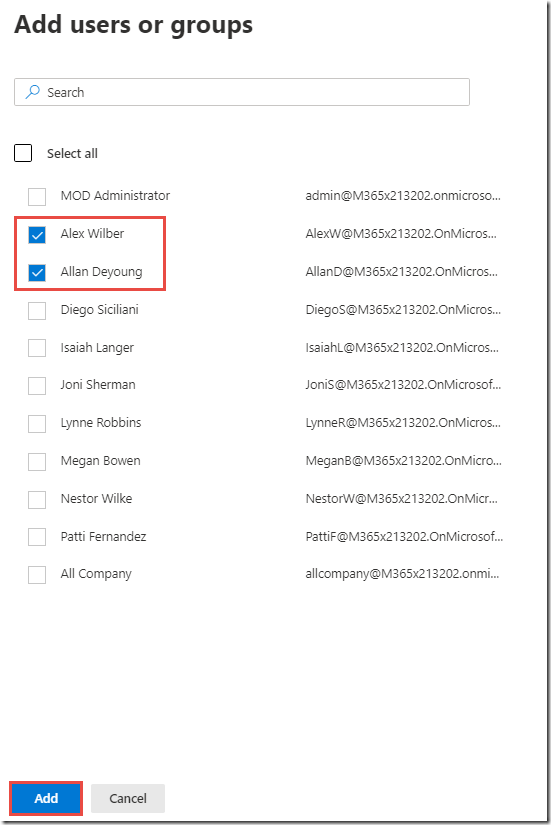
On the Add users or groups page, click + Add
-
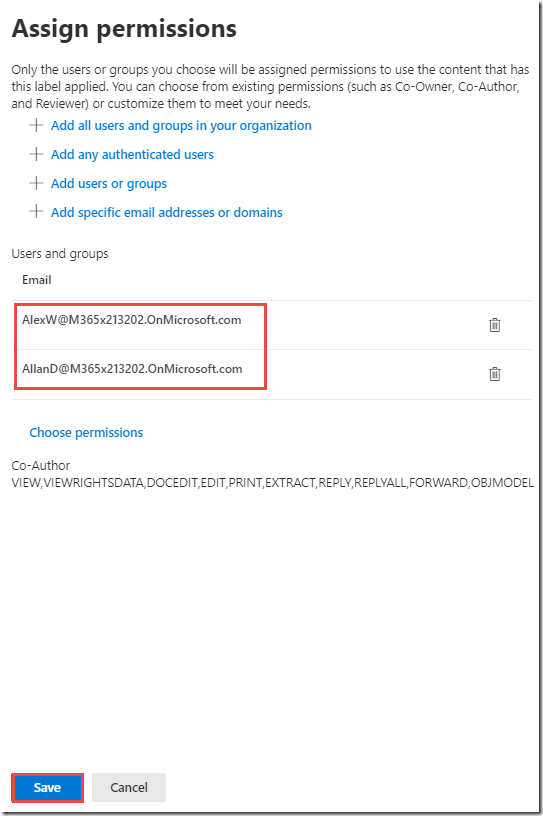
Check the boxes next to Alex Wilber and Allan Deyoung and click Add
-
Click Done
-
-
On the Assign users page, click Save
-
On the Encryption page, click Next
-
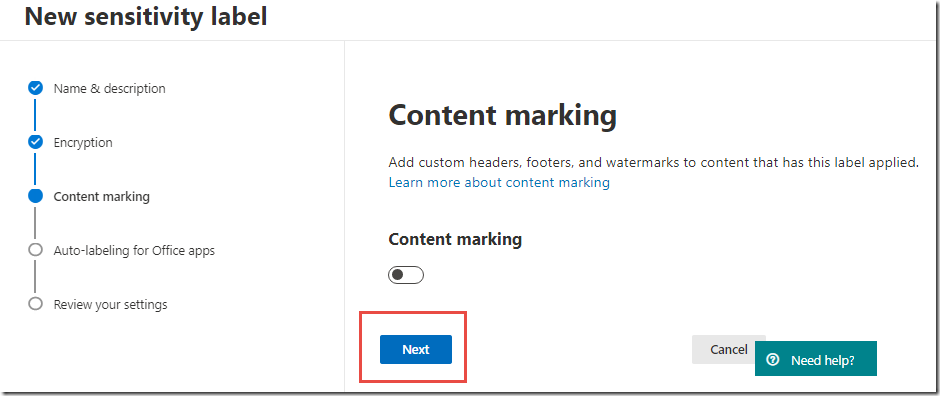
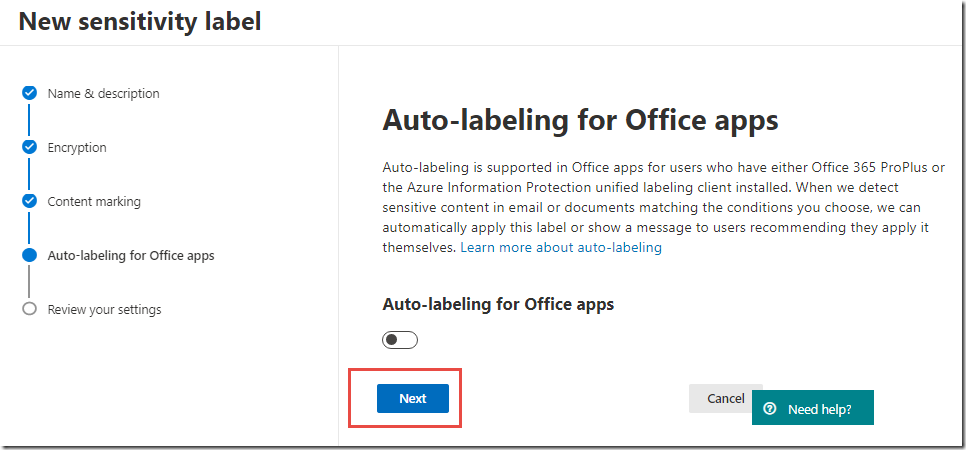
Click Next on the Content marking, Endpoint data loss prevention, and Auto labeling pages
-
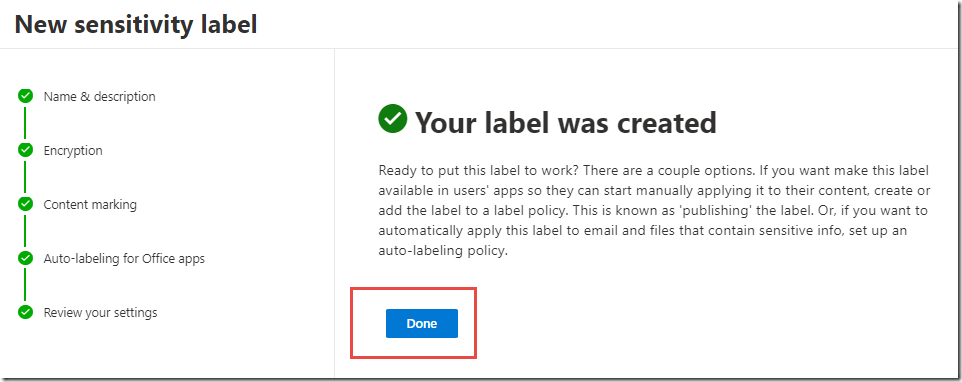
Click Create to complete creation of the new sensitivity label
-
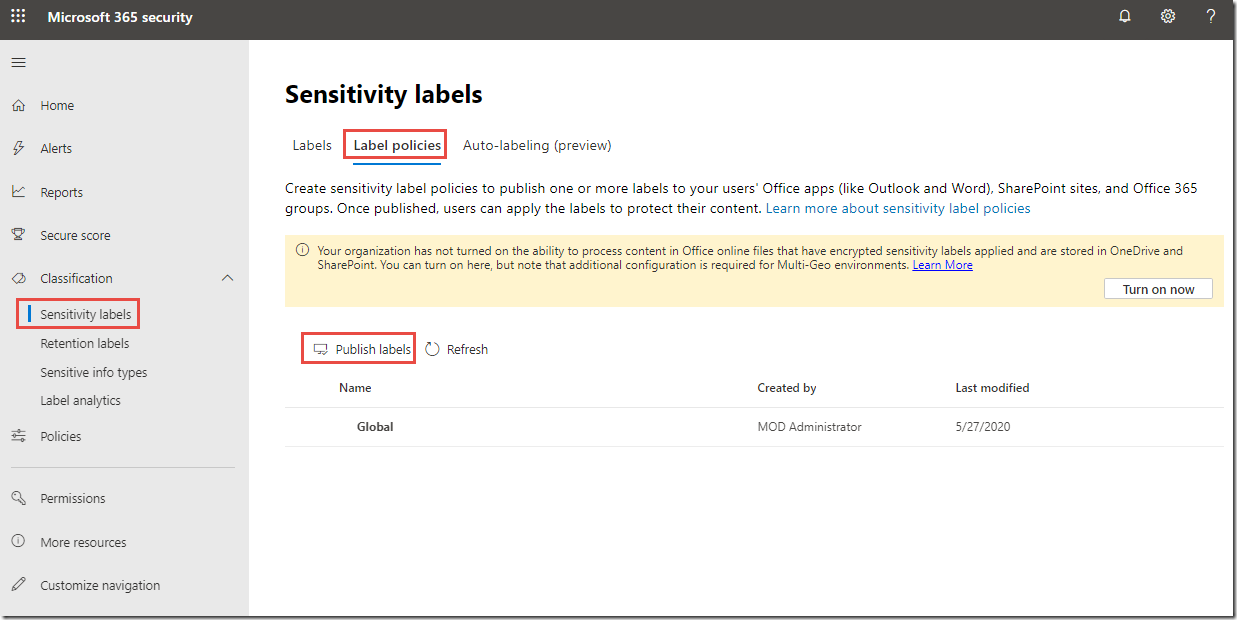
Under Classification on the left, click Label policies then click Publish labels
-
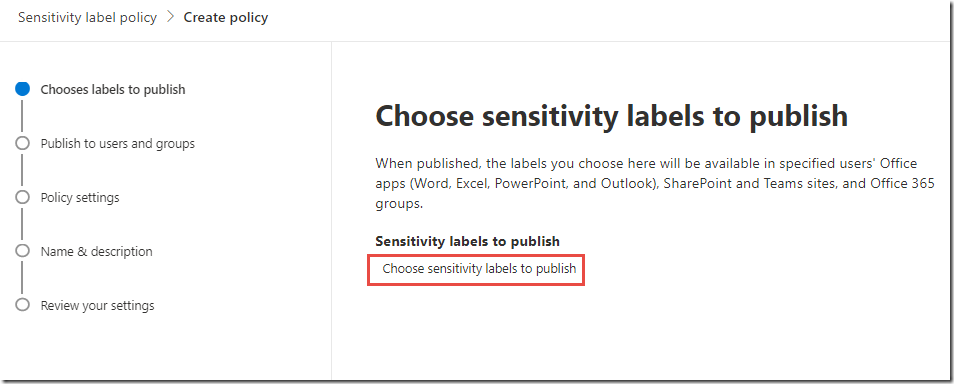
In the New sensitivity label policy, click Choose labels to publish
-
-
In the Choose labels blade, click the + Add button
-
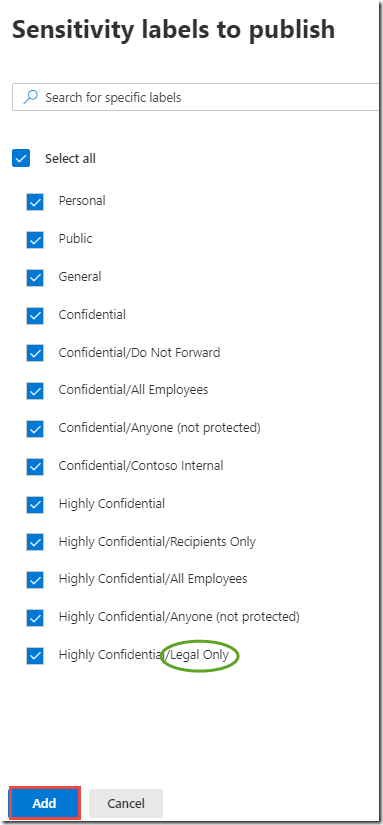
In the Choose labels blade, check the box next to Display name to select all labels
Note that this also includes the new Legal Only label that is not present in the global policy.
-
-
Click the Add button
-
In the Choose labels blade, click the Done button
-
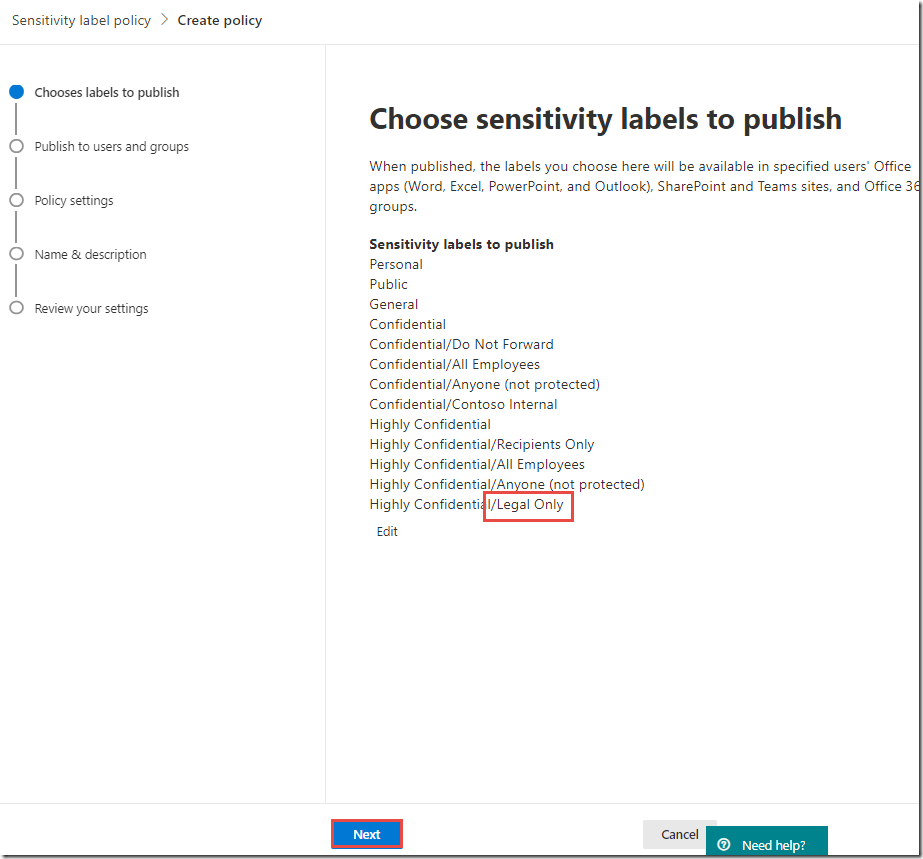
On the Choose labels to publish page, click the Next button
-
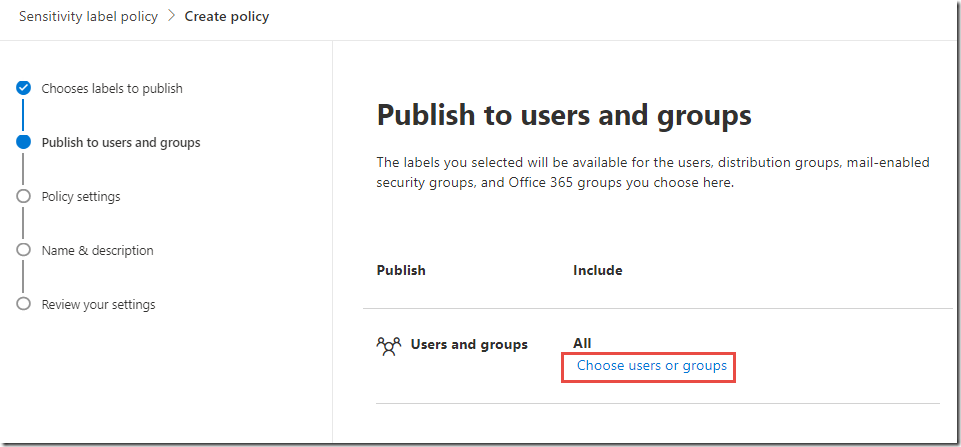
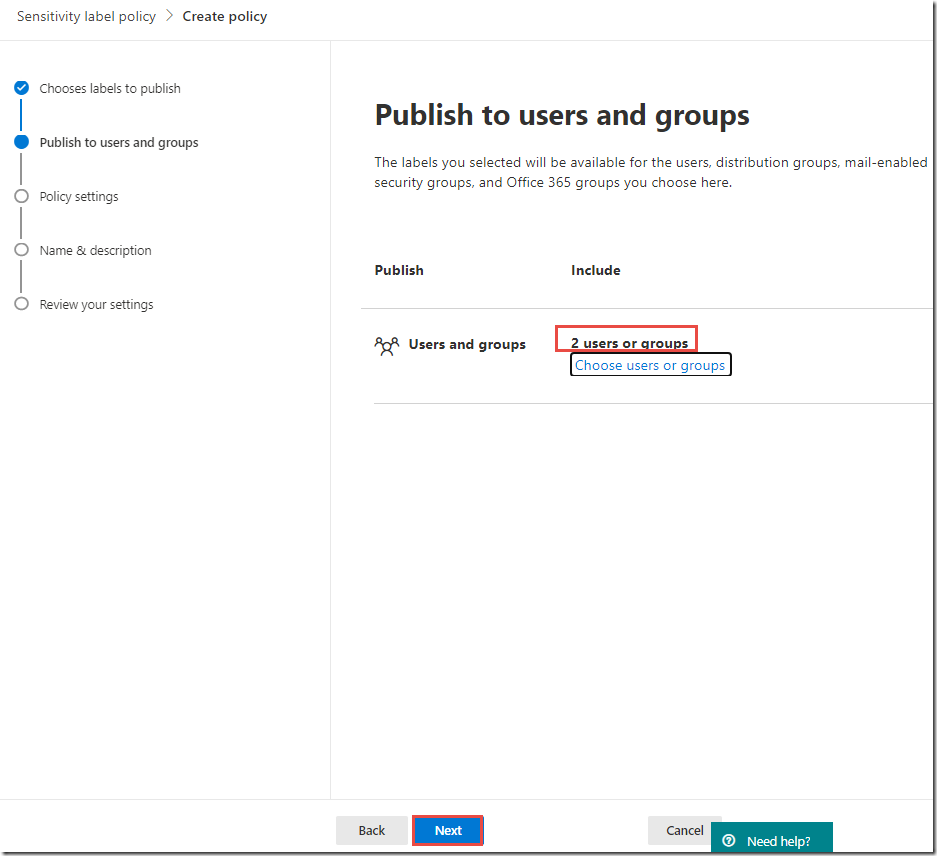
On the Publish these sensitivity labels page, click the link to Choose users or groups
-
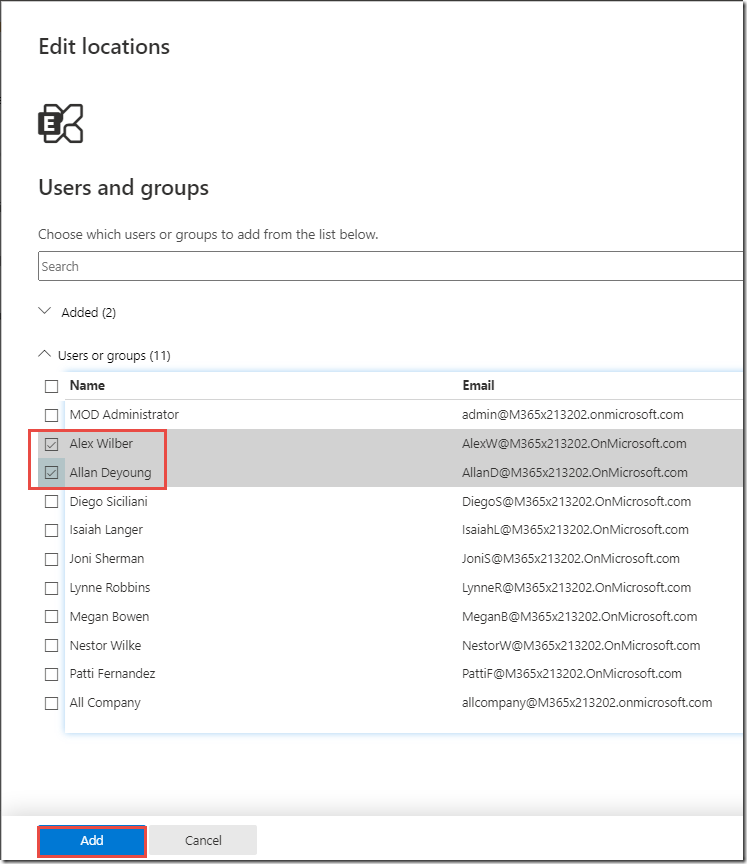
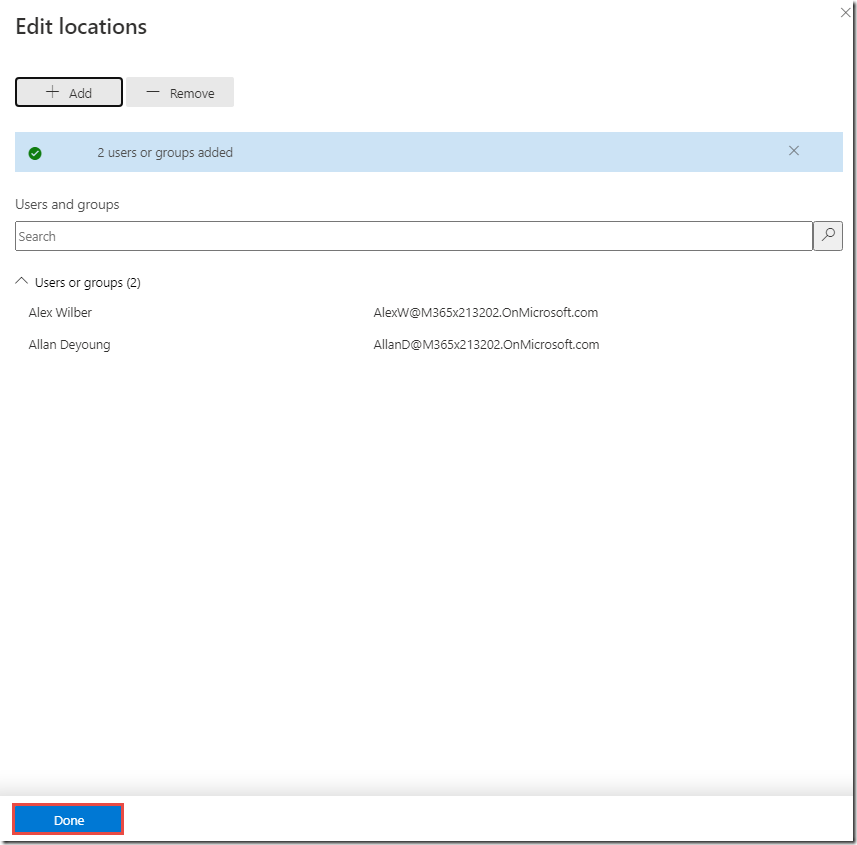
On the Add users or groups page, click + Add
-
Check the boxes next to Alex Wilber and Allan Deyoung and click Add
-
Click Done
-
On the Publish these sensitivity labels page, click the Next button
-
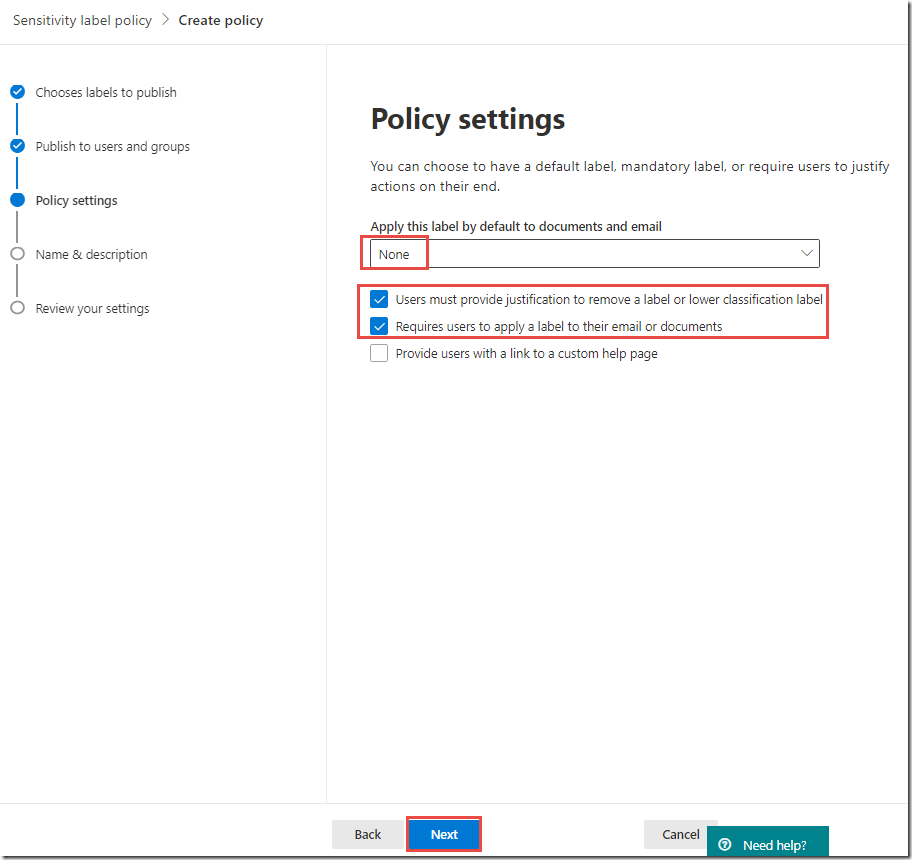
On the Policy settings page, next to Apply this label by default to documents and email, leave the drop-down set to None
-
Check the box next to Users must provide justification to remove a label or lower classification label
-
Check the box next to Require users to apply a label to their email or documents
These settings DO NOT apply a default label to all documents and emails, but DOES require users to justify any downgrade or removal of labels, and requires that all documents and email are labeled in some way. This is a setting that requires users to make active classification decisions.
Later in this section we will discuss advanced settings that can help to reduce the impact of this type of policy.
-
Click Next
-
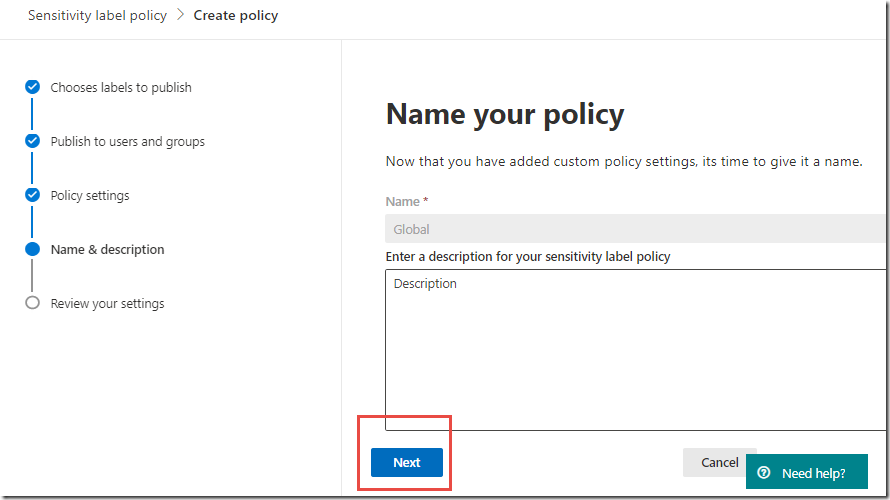
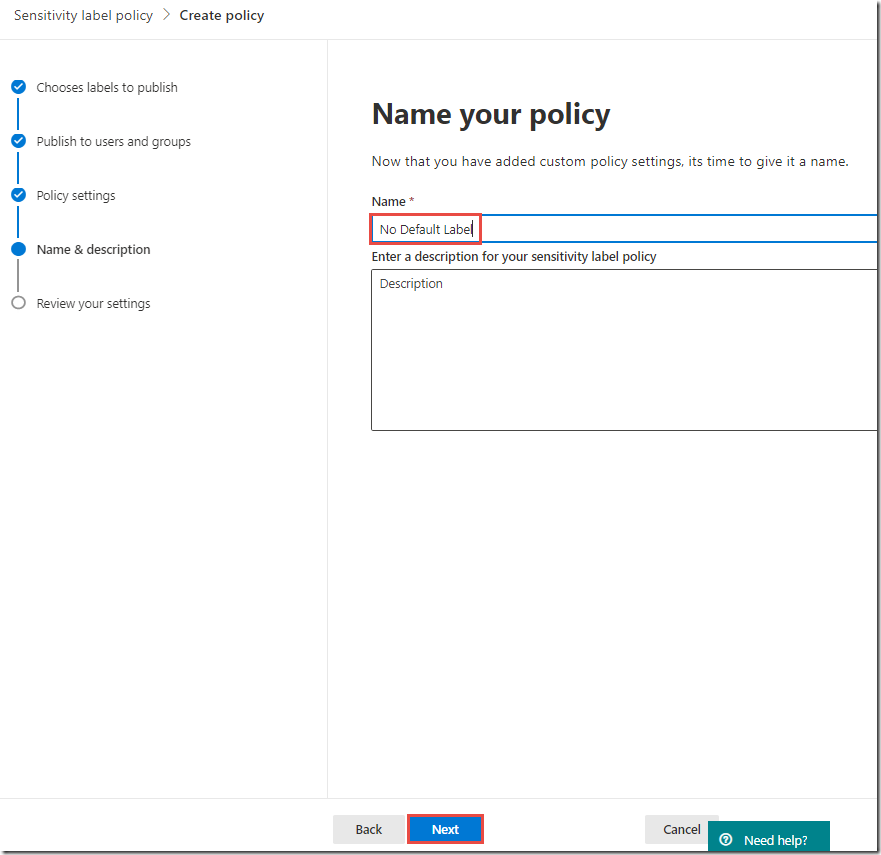
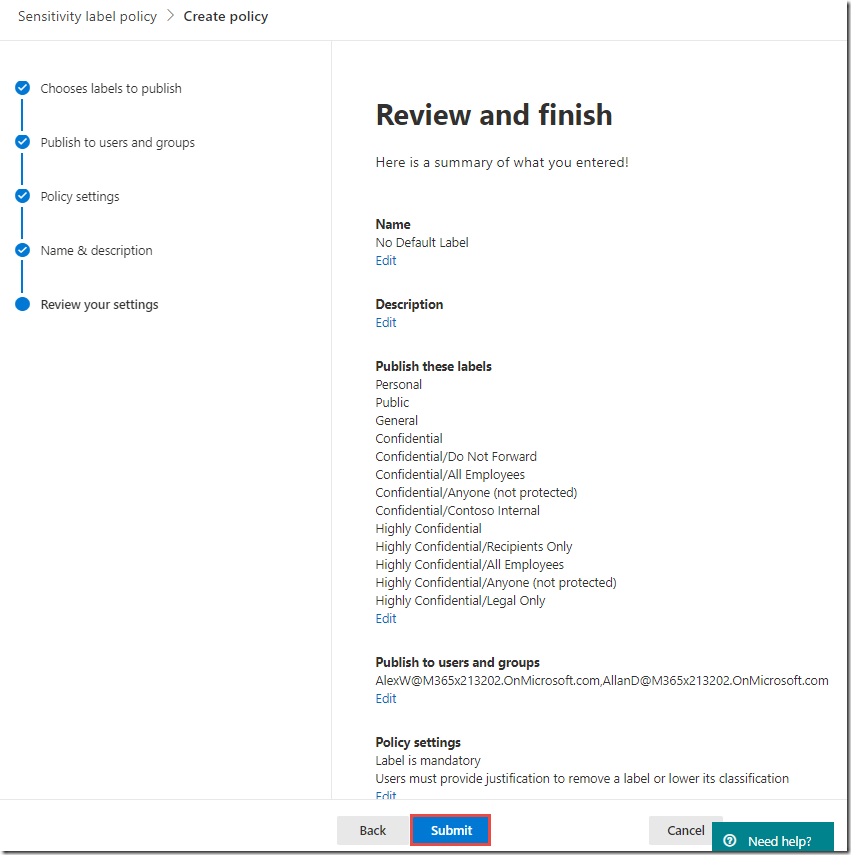
On the Policy settings page, in the Name text box, type No Default Label
-
Click Next
-
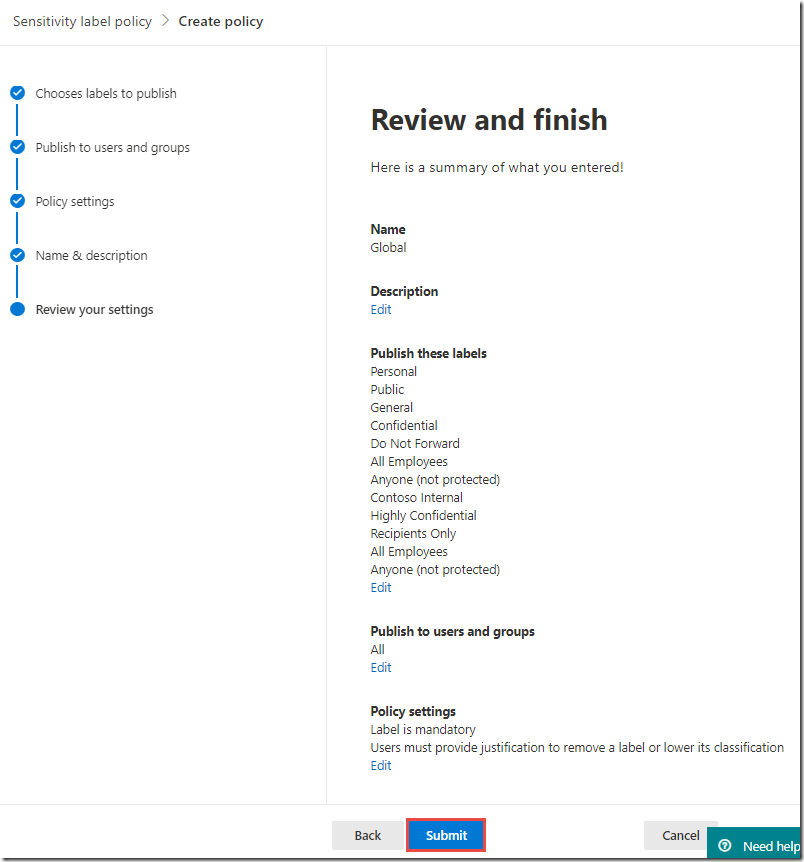
On the Review your settings page, click Publish
Defining Recommended and Automatic Conditions
One of the most powerful features of Azure Information Protection is the ability to guide your users in making sound decisions around safeguarding sensitive data. This can be achieved in many ways through user education or reactive events such as blocking emails containing sensitive data.
However, helping your users to properly classify and protect sensitive data at the time of creation is a more organic user experience that will achieve better results long term. In this task, we will define some basic recommended and automatic conditions that will trigger based on certain types of sensitive data.
-
Under Classification on the left, click Sensitivity Labels
-
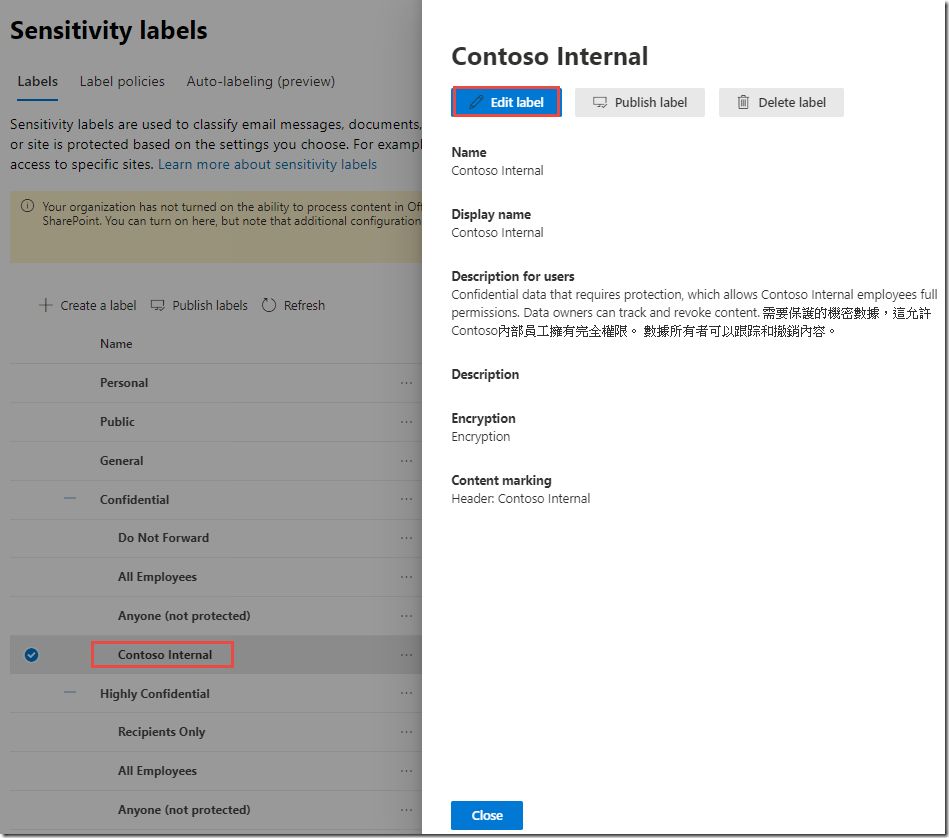
Under Confidential, click on Contoso Internal
-
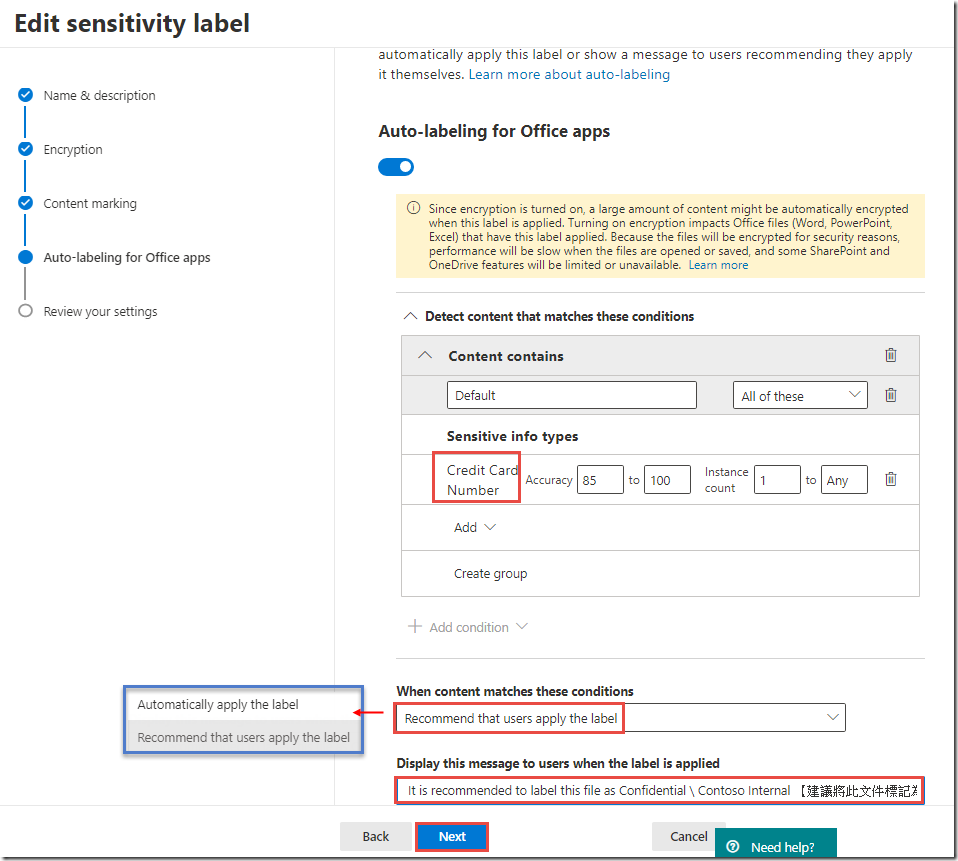
In the Contoso Internal panel, next to Auto labeling, click Edit
-
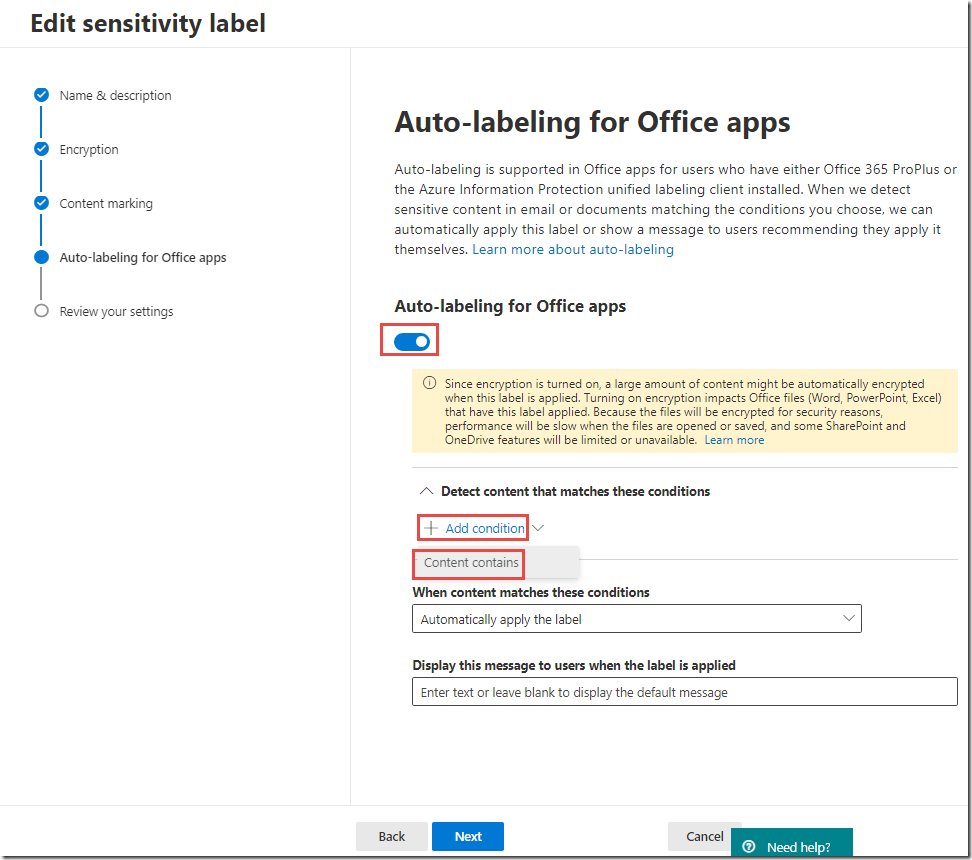
On the Editing Auto labeling page, toggle Auto labeling to On
-
In the Detect content that contains section, click + Add a condition and click content contains
-
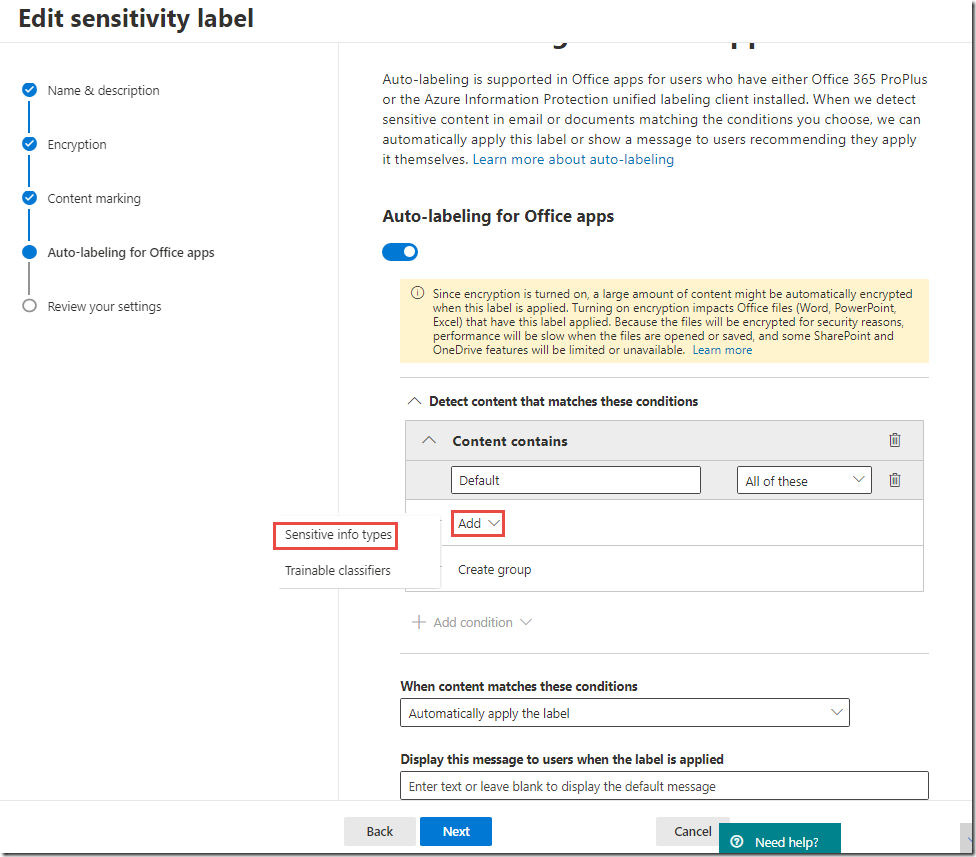
In the Content contains section, click the Add drop-down and click Sensitive info types
-
In the Sensitive info types panel, click + Add
-
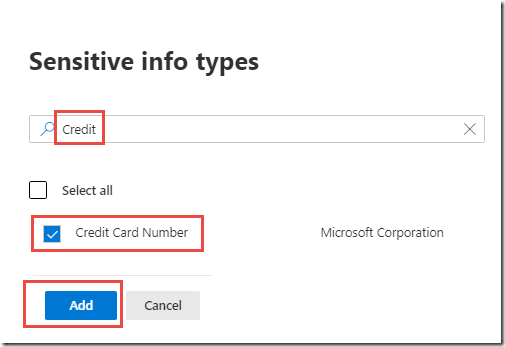
In the Sensitive info types panel, type Credit in the Search box
-
Under Sensitive info types, check the box next to Credit Card Number and click Add
-
In the Sensitive info types panel, click Done
-
On the Editing Auto labeling page, under When content matches these conditions change the value of the drop-down to Recommended that user apply the label
-
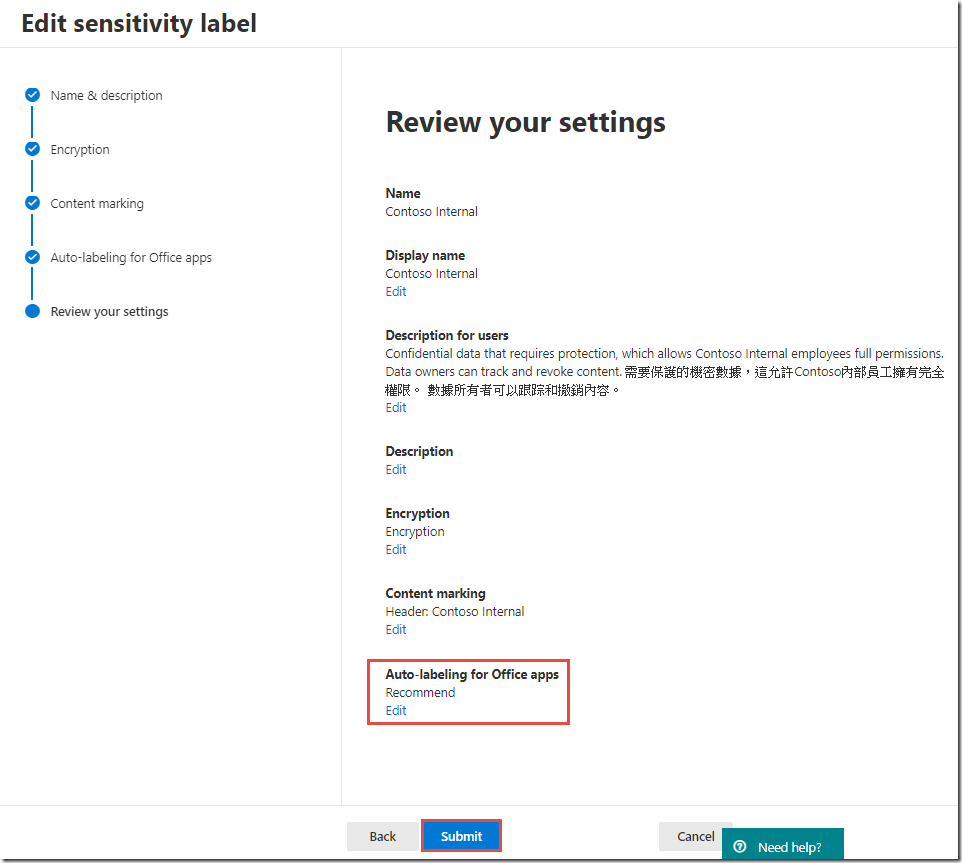
In the Message displayed to user text box, type It is recommended to label this file as Confidential \ Contoso Internal and click Save
-
-
On the Contoso Internal page, click Close
-
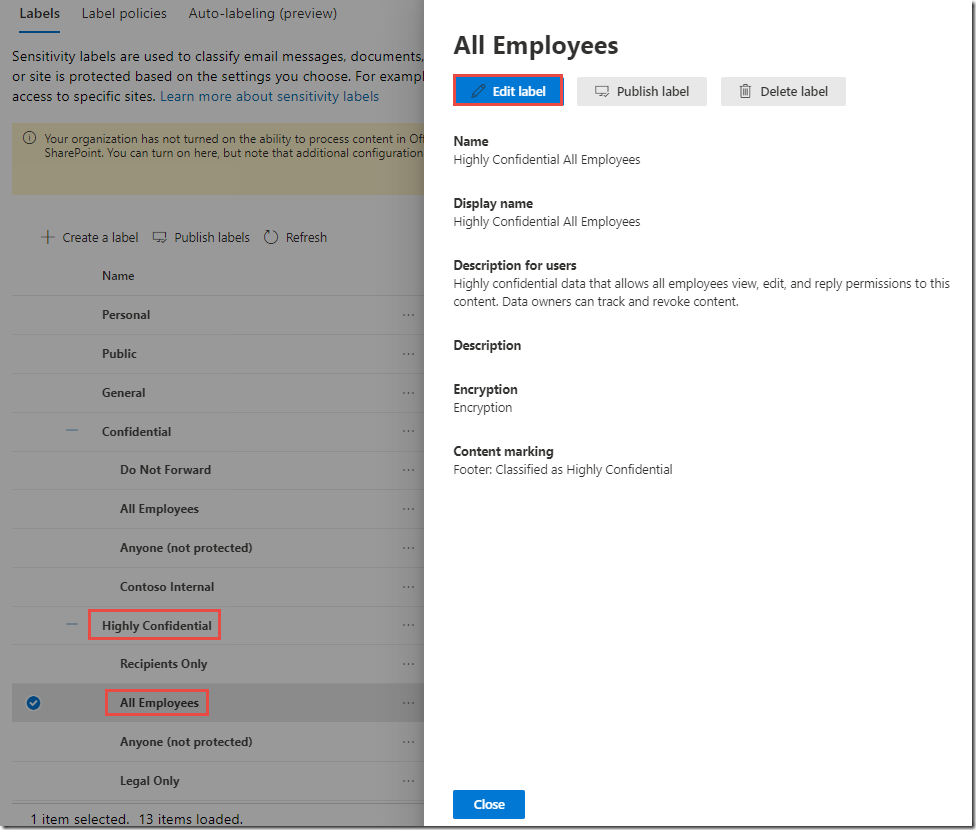
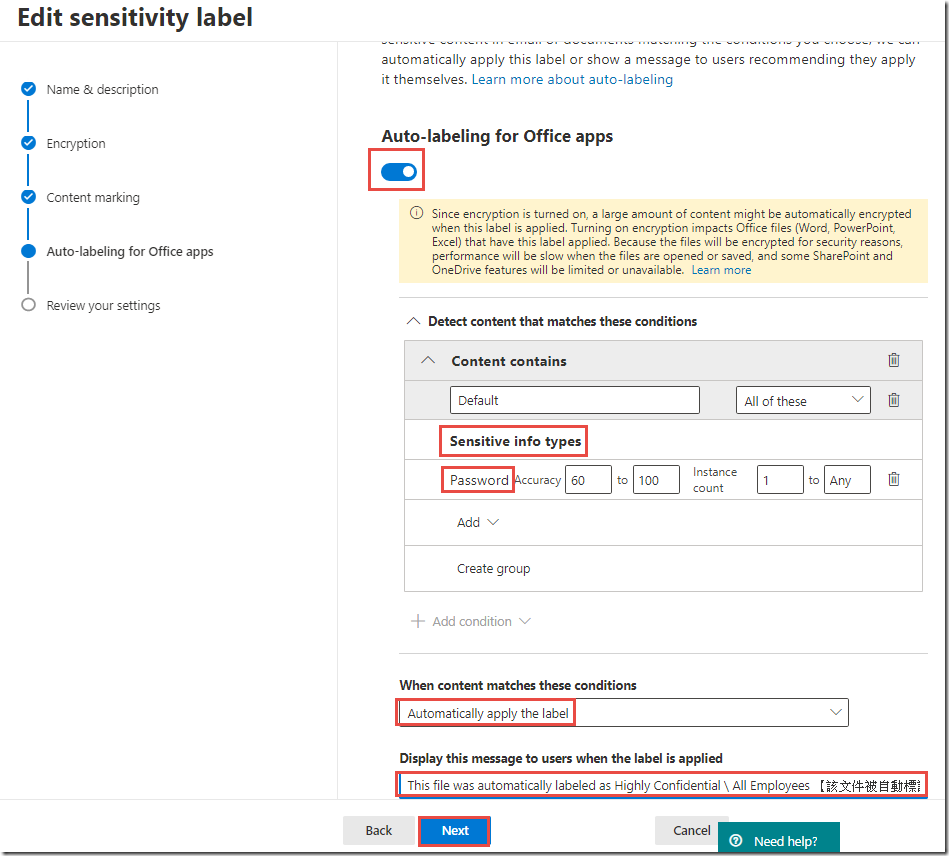
Next, under Highly Confidential, click on All Employees
-
In the All Employees panel, next to Auto labeling, click Edit
-
On the Editing Auto labeling page, toggle Auto labeling to On
-
-
In the Detect content that contains section, click + Add a condition and click content contains
-
In the Content contains section, click the Add drop-down and click Sensitive info types
-
In the Sensitive info types panel, click + Add
-
In the Sensitive info types panel, type Password in the Search box
-
Under Sensitive info types, check the box next to Password and click Add
-
In the Sensitive info types panel, click Done
-
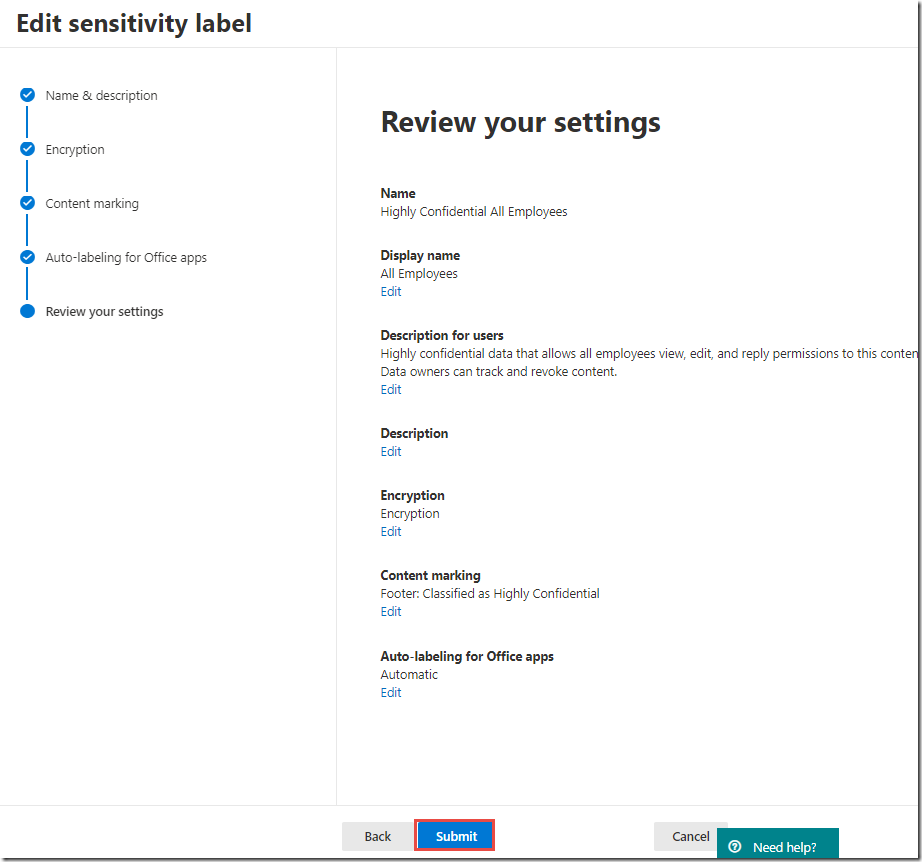
On the Editing Auto labeling page, in the Message displayed to user text box, type This file was automatically labeled as Highly Confidential \ All Employees 【該文件被自動標記為 Highly Confidential \ All Employees】and click Save
-
-
On the All Employees page, click Close
Adding Advanced Settings
Next we will add some settings using Security and Compliance Center PowerShell. The common settings we will be adding here are OutlookDefaultLabel and HideBarByDefault. These are just a few of the many advanced settings available online at https://docs.microsoft.com/en-us/azure/information-protection/rms-client/clientv2-admin-guide-customizations .
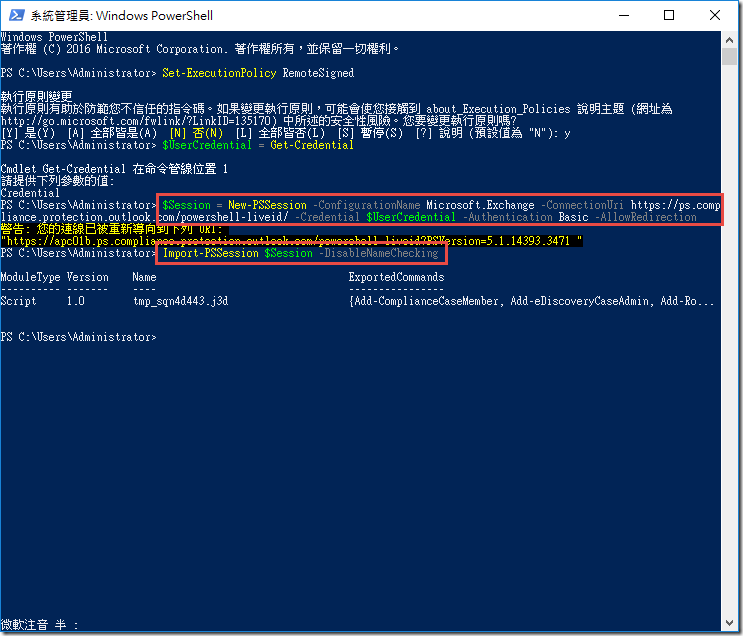
To begin configuring AIP unified labeling client advanced settings, you must first connect to Security and Compliance Center PowerShell. Follow the steps below to connect:
-
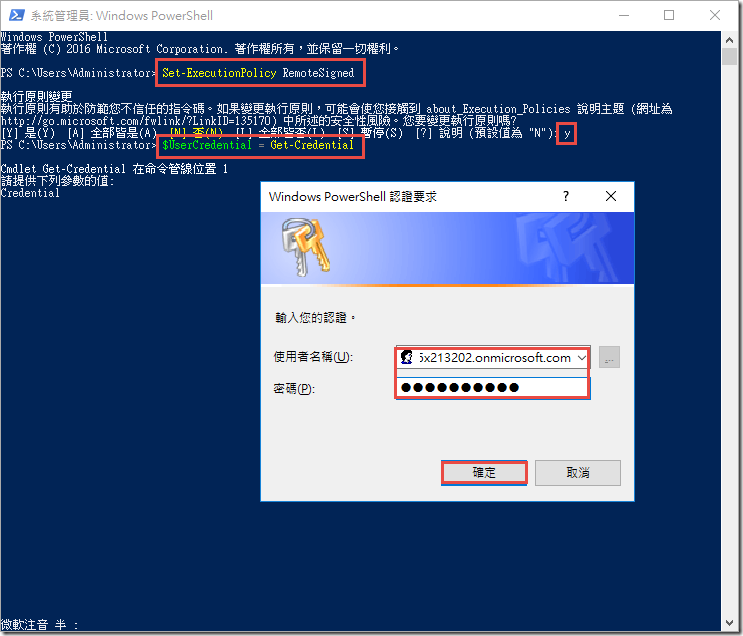
Open an Administrative PowerShell prompt
-
Type the code below to allow scripts to run and capture credentials as a variable
Set-ExecutionPolicy RemoteSignedType Y when prompted
$UserCredential = Get-CredentialProvide the credentials below when prompted
admin@M365x057144.onmicrosoft.comm6qh/vU67?=! -
-
Run the command below to connect to SCC PowerShell
$Session = New-PSSession -ConfigurationName Microsoft.Exchange -ConnectionUri https://ps.compliance.protection.outlook.com/powershell-liveid/ -Credential $UserCredential -Authentication Basic -AllowRedirectionImport-PSSession $Session –DisableNameChecking
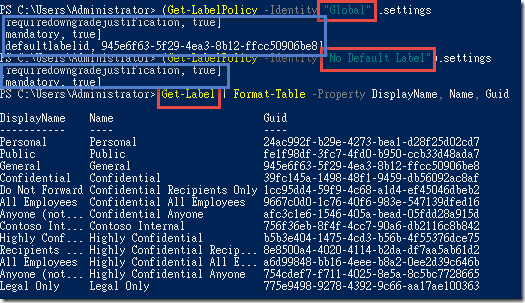
Now that you have connected to SCC PowerShell, you can run some commands to get information about the unified labeling configuration and labels.
-
In the SCC PowerShell window, type the commands below to get the current settings applied to the Global policy and to see a list of labels
(Get-LabelPolicy -Identity "Global").settings(Get-LabelPolicy -Identity "No Default Label").settingsGet-Label | Format-Table -Property DisplayName, Name, Guid -
To help mitigate the user impact of the No default label policy, we will create a default label for just Outlook. Type the commands below to add this setting.
-
# Get GUID for "General" label and copy GUID to a variable -
$outlookdefaultlabel = (Get-Label -Identity "General").Guid.Guid? Set-LabelPolicy -Identity "Confidential Default" -AdvancedSettings @{OutlookDefaultLabel=$outlookdefaultlabel}This is a recommended setting as users typically create far more emails every day than documents. Thus, even for policies that do not set a default label (or set a protected default label), setting a default label like General is commonly used to improve usability.
-
-
-
Error → Confidential Default (Label Policy) 要先建立
-
-
In the Azure Information Protection client (classic), the Information Protection bar in Office apps was displayed by defualt. In the AIP unified labeling client, users must select the Show Bar option from the Sensitivity button to display this bar.
You can use the advanced setting below to automatically display this bar for users so that they can select labels from either the bar or the Sensitivity button.
Set-LabelPolicy -Identity "Global" -AdvancedSettings @{HideBarByDefault="False"} -
Set-LabelPolicy -Identity "No Default Label" -AdvancedSettings @{HideBarByDefault="False"} -
Run the commands below to see the results of the advanced policy changes
(Get-LabelPolicy -Identity "Global").settings(Get-LabelPolicy -Identity "No Default Label").settings -
Run the command below to disconnect the remote PowerShell session when you are done modifying advanced settings
Remove-PSSession $Session
As mentioned earlier, there are many more advanced settings available at https://docs.microsoft.com/en-us/azure/information-protection/rms-client/clientv2-admin-guide-customizations
but these are some of the most common ones. Later in this lab, we will test out these settings to see how they affect the clients.
Review
In this section, we have created and modified labels, defined settings in global and scoped policies, and created recommended and automatic conditions to help protect our users.
In the next section, we will test these settings and see how they work with actual users.
Previous
4 of 6
Introduction to Azure Information Protection, Unified Labeling, and Office 365 Message Encryption
45 min remaining
Testing AIP Policies
Now that you have users being affected by different policies, we can start testing these policies. This section will run through various scenarios to demonstrate the use of AIP global and scoped policies and show the functionality of recommended and automatic labeling.
Testing User Defined permissions
請先確認 Office 版本 > 1810
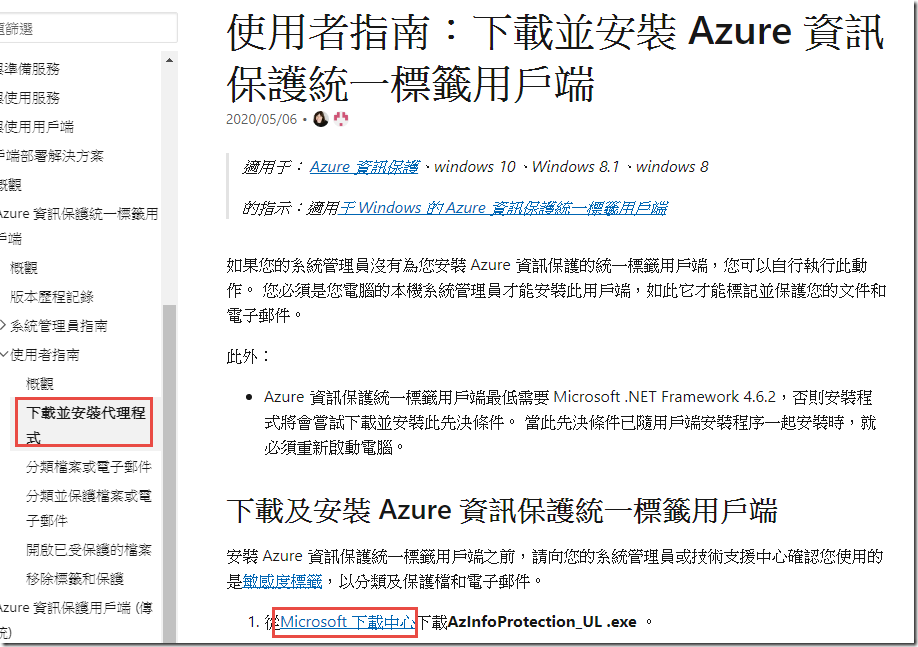
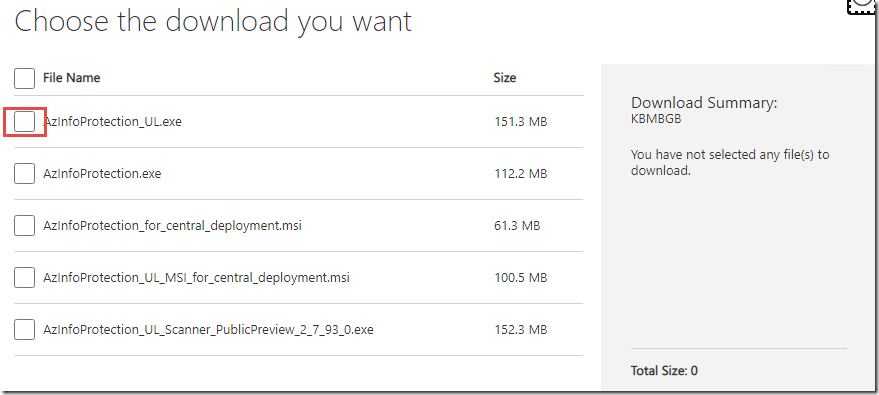
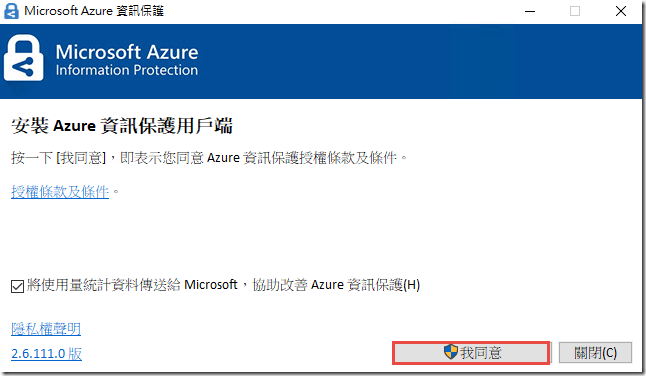
安裝 Azure 資訊保護統一標籤用戶端
One of the most common use cases for AIP is the ability to send emails using User Defined Permissions (Do Not Forward). In this task, we will send an email using the Do Not Forward label to test that functionality.
-
On the desktop, double-click on VictimPC and log in using the credentials below
Contoso\JeffL
Password$fun
-
Launch Microsoft Outlook, and in the username box, type
MeganB@M365x057144.onmicrosoft.comand click Connect -
When prompted, type the password
m6qh/vU67?=!and Sign in
-
Once configuration completes, uncheck the Box to Set up Outlook Mobile and click Done.
-
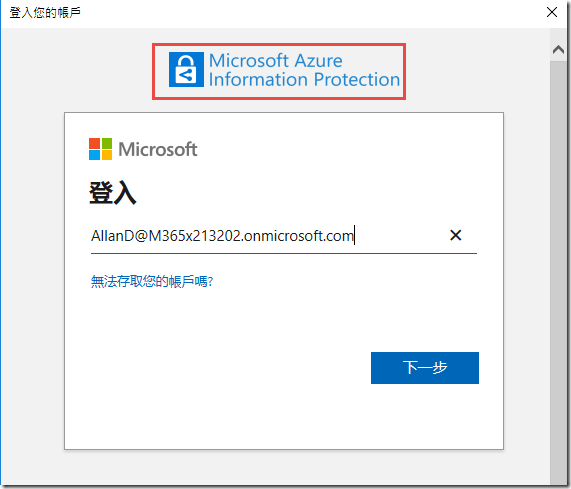
In the Microsoft Azure Information Protection prompt, type
MeganB@M365x057144.onmicrosoft.comand click Next -
When prompted, type the password
m6qh/vU67?=!and Sign in
-
In the Sign in to set up Office dialog, click Sign in
-
In the Activate Office dialog, type
MeganB@M365x057144.onmicrosoft.comand click Connect. -
When prompted, type the password
m6qh/vU67?=!and Sign in
-
Click on the New email button.
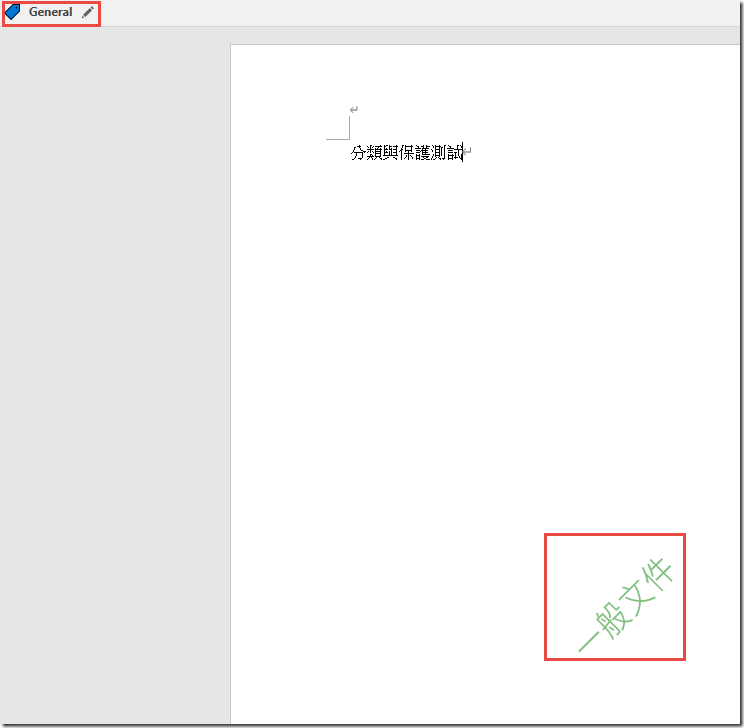
Note that the Sensitivity is set to General by default.
-
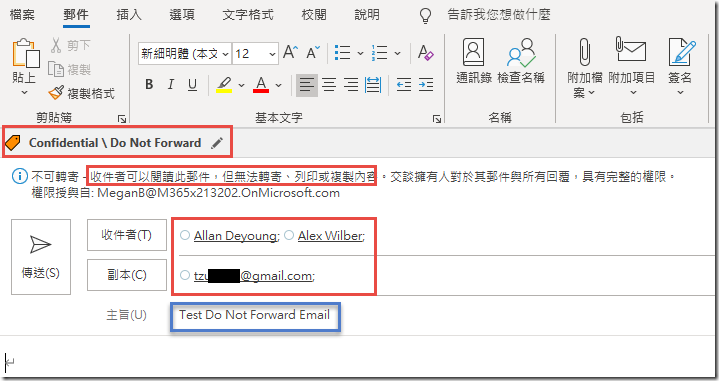
Send an email to Allan Deyoung and Alex Wilber (
Allan Deyoung;Alex Wilber). Also add an external email address (preferably from a major social provider like youremail@gmail, yahoo, or outlook.com) to test the external recipient experience. -
For the Subject and Body type Test Do Not Forward Email .
-
In the Sensitivity Toolbar, click on Confidential and then the Do Not Forward sub-label and click Send.
-
Minimize VictimPC and double-click on Client01C
-
Log in using the credentials below
Contoso\LisaV
HighImpactUser1!
-
In the start menu, click on Outlook
-
Run through setup again, this time using the credentials AllanD@M365x057144.onmicrosoft.com and
m6qh/vU67?=!.
-
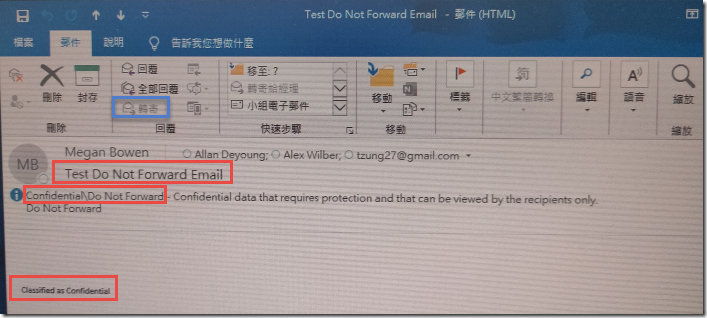
Review the email in Allan Deyoung’s Outlook. You will notice that the email is automatically shown in Outlook natively.
-
無法擷取畫面
Testing Office 365 Message Encryption
Follow the steps below to review the Do Not Forward message in the Office 365 Message Encryption portal.
-
Minimize Client01C and log into your external mailbox
-
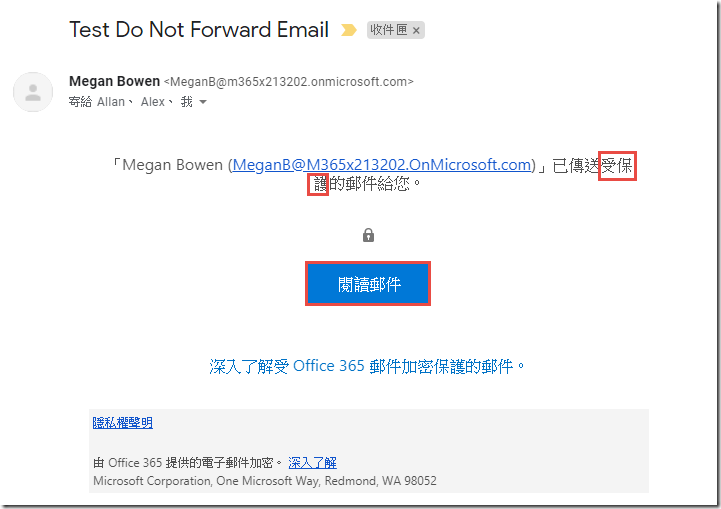
Click on the Test DNF message
-
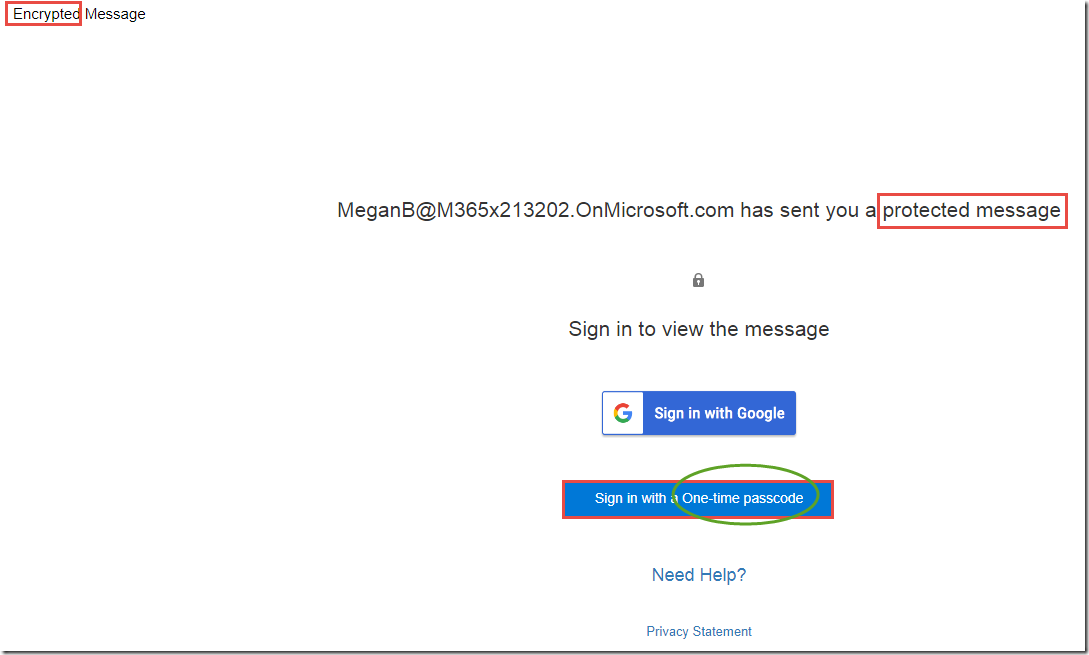
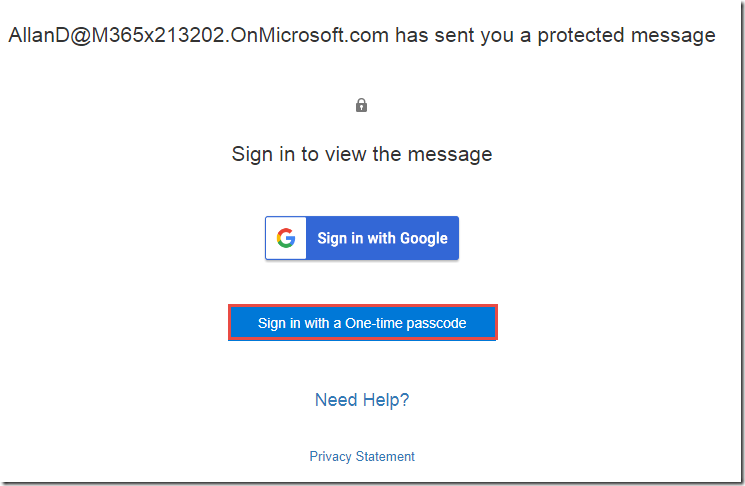
Click on the Read the message button to launch the Office 365 Message Encryption portal
-
You now have the option to either log in using the social identity provider (Sign in with Google, Yahoo, Microsoft Account), or to sign in with a one-time passcode.
-
If you choose the social identity provider login, it should use the token previously cached by the browser and display the message directly.
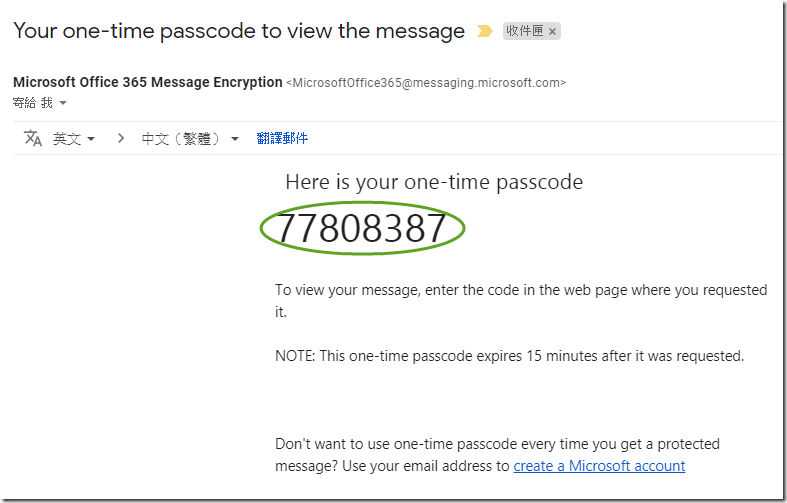
-
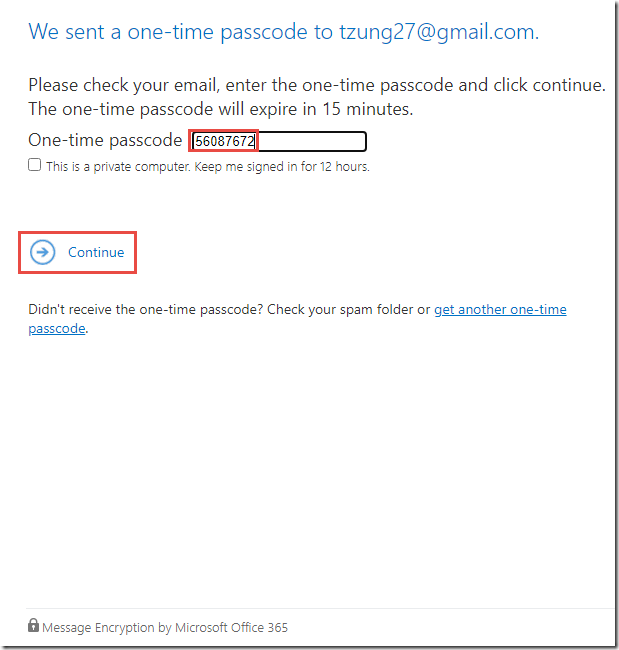
If you choose one-time passcode, you will receive an email like the one below with the one-time passcode.
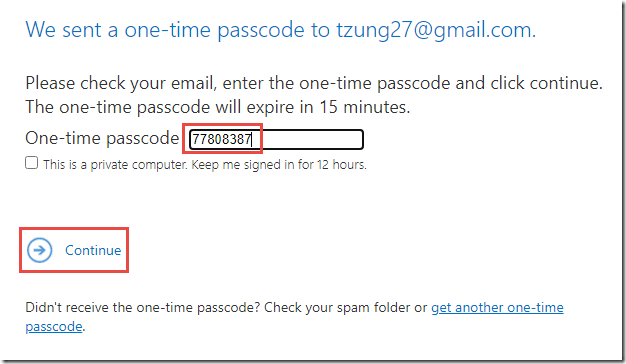
-
You may then use this code to authenticate to the Office 365 Message Encryption portal.
-
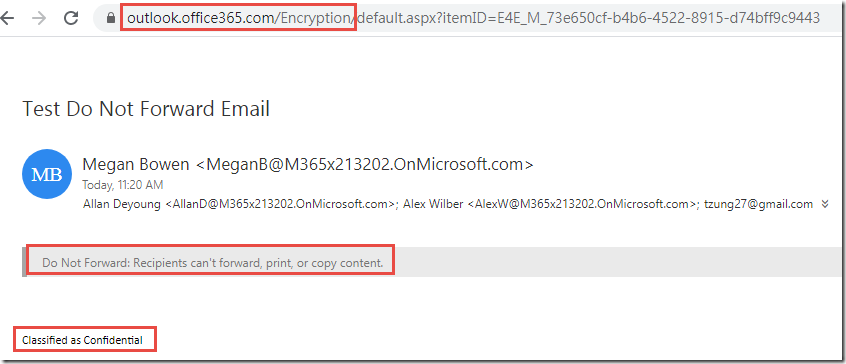
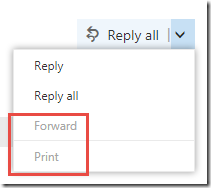
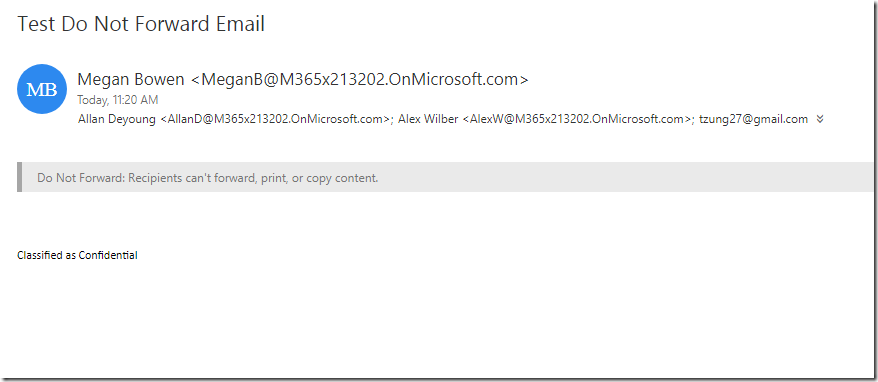
After using either of these authentication methods, you will see a portal experience like the one shown below.
-
-
Gmail 可以截畫面 ?
-
>NOTE: You may Sign Out of the OME portal to test the method you did not use previously.
Testing Global Policy
In this task, we will create a document and send an email to demonstrate the functionality defined in the Global Policy.
-
Restore Client01C from the taskbar
-
Send an email to Megan Bowen, Alex Wilber, and yourself (
Megan Bowen;Alex Wilber;Your Email). -
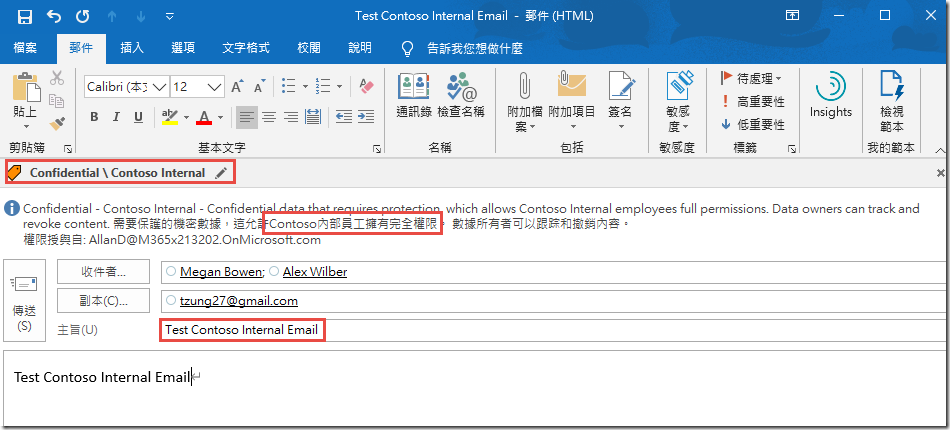
For the Subject and Body type Test Contoso Internal Email .
-
In the Sensitivity Toolbar, click on Confidential and then Contoso Internal and click Send.
Test Contoso Internal Email
-
Switch to VictimPC
-
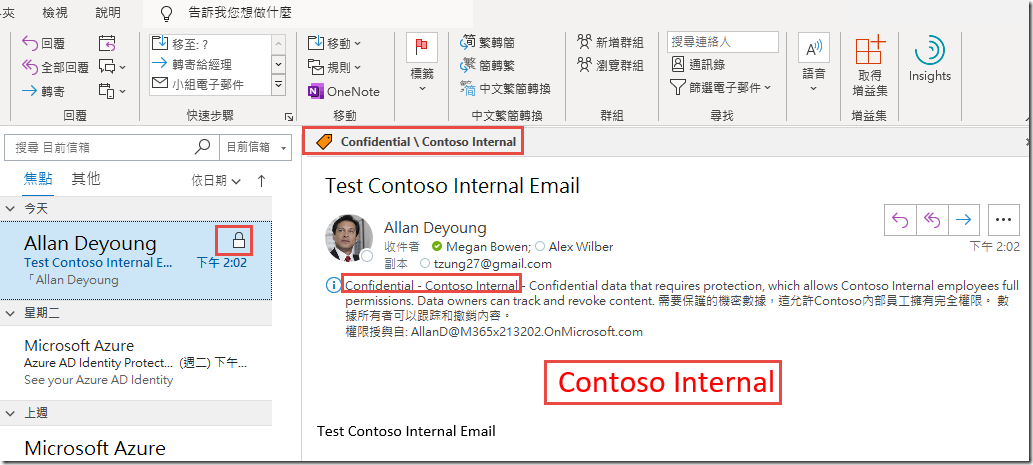
Observe that you are able to open the email natively in the Outlook client. Also observe the header text that was defined in the label settings.
-
Minimize VictimPC and return to your email
-
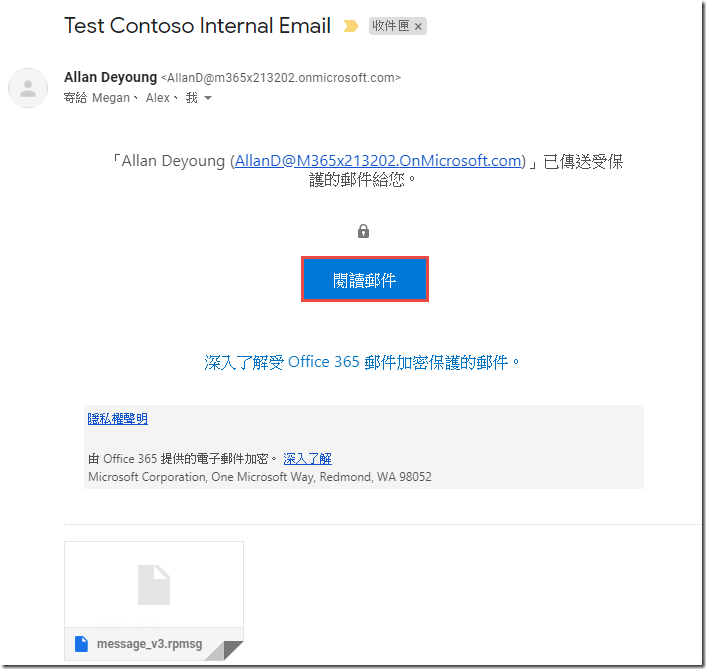
Click on the Test Contoso Internal Email and click Read the Message
Note that you are unable to open this message. This experience will vary depending on the client you use (the image below is from the Office 365 Message Encryption portal) but they should have similar messages after presenting credentials. In the Deployment Acceleration Guide lab in this series, we configure advanced client settings to prevent Internal labeled messages from being sent to external users.
Testing Scoped Policy
In this task, we will create a document and send an email from one of the users in the Legal group to demonstrate the functionality defined in the first section.
-
Restore Client01C
-
In Microsoft Outlook, click on the New email button.
-
Send an email to Alex Wilber and Megan Bowen (
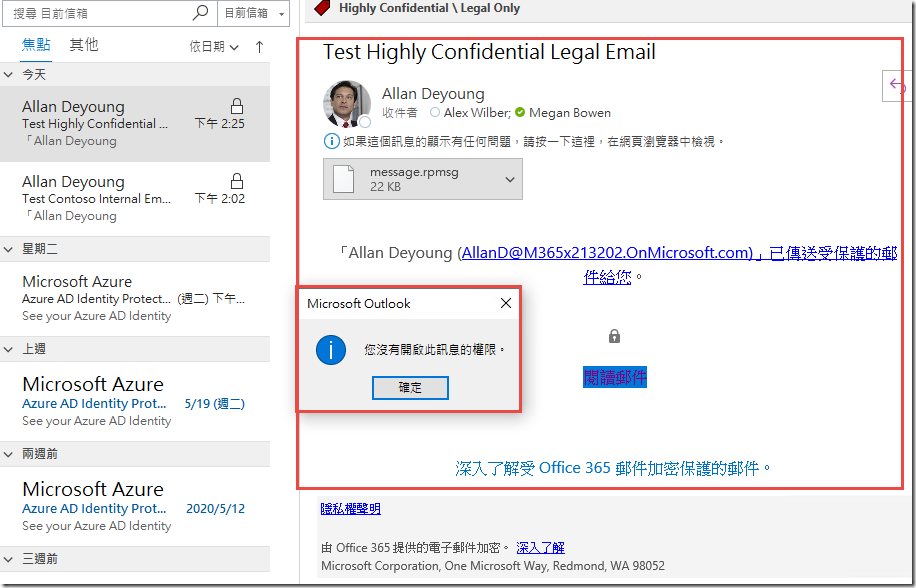
Alex Wilber;Megan Bowen). For the Subject and Body type Test Highly Confidential Legal Email . -
In the Sensitivity Toolbar, click on Highly Confidential and the Legal Only sub-label, then click Send.
-
-
Minimize Client01C
-
On the desktop, double-click on AdminPC
-
Log in with the credentials below
Contoso\SamiraA
NinjaCat123!@#
-
Right-click on the desktop and create a New Text Document
-
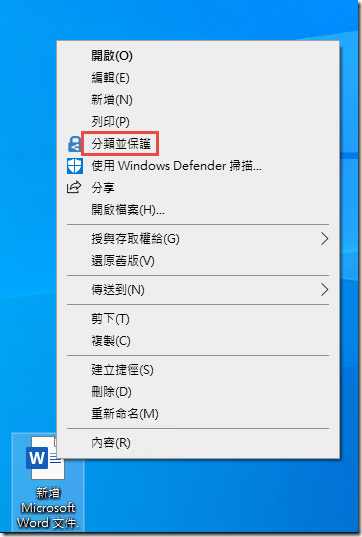
Right-click on the New Text Document and click Classify and protect
-
-
In the Microsoft Azure Information Protection prompt, type AlexW@M365x057144.onmicrosoft.com
-
When prompted, type the password
m6qh/vU67?=!and Sign in
-
Close the Classify and protect dialog
-
-
Run through Outlook setup, this time using the credentials AlexW@M365x057144.onmicrosoft.com and
m6qh/vU67?=!
-
Review the email in Alex Wilber’s Outlook. You should be able to open the message natively in the client as Alex.
-
Switch to VictimPC
-
Click on the email. You should be unable to open the message as Megan.
-
Switch to Client01C
-
Open Microsoft Word
-
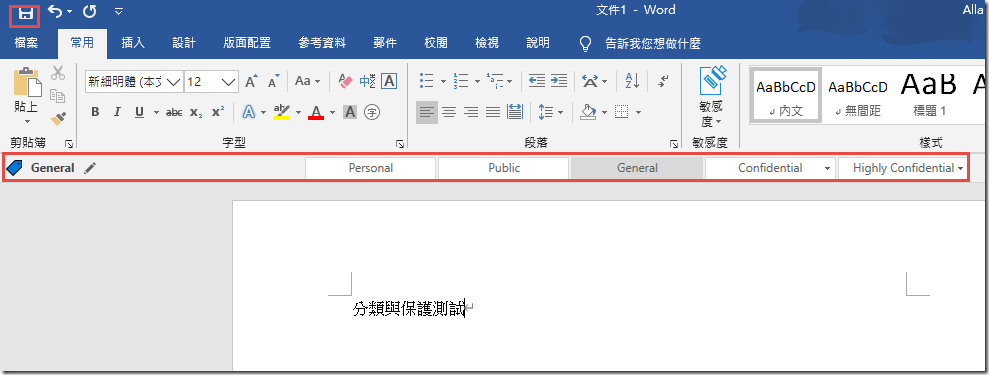
Create a new Blank document and type This is a test document and save the document.
-
When you click Save, you will be prompted to choose a classification. This is a result of having None set as the default label in the scoped policy while requiring all documents to be labeled. This is a useful for driving active classification decisions by specific groups within your organization.
-
Choose a classification to save the document.
Testing Recommended and Automatic Classification
In this task, we will test the configured recommended and automatic conditions we defined earlier. Recommended conditions can be used to help organically train your users to classify sensitive data appropriately and provides a method for testing the accuracy of your dectections prior to switching to automatic classification. Automatic conditions should be used after thorough testing or with items you are certain need to be protected. Although the examples used here are fairly simple, in production these could be based on complex regex statements or only trigger when a specific quantity of sensitive data is present.
-
On Client01C, launch Microsoft Word.
-
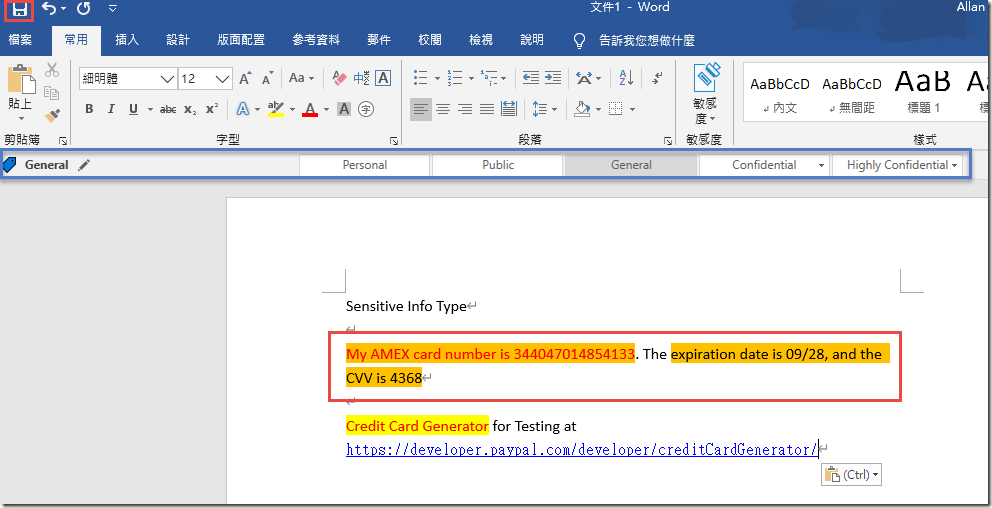
In Microsoft Word, create a new Blank document and type My AMEX card number is 344047014854133. The expiration date is 09/28, and the CVV is 4368 and save the document.
This card number is a fake number that was generated using the Credit Card Generator for Testing at
https://developer.paypal.com/developer/creditCardGenerator/. The Microsoft Classification Engine uses the Luhn Algorithm to prevent false positives so when testing, please make sure to use valid numbers. -
Notice that you are provided with a recommendation to change the classification to Confidential \ Contoso Internal in the save dialog
-

Notice that, like the email earlier in this section, the header value configured in the label is added to the document.
-
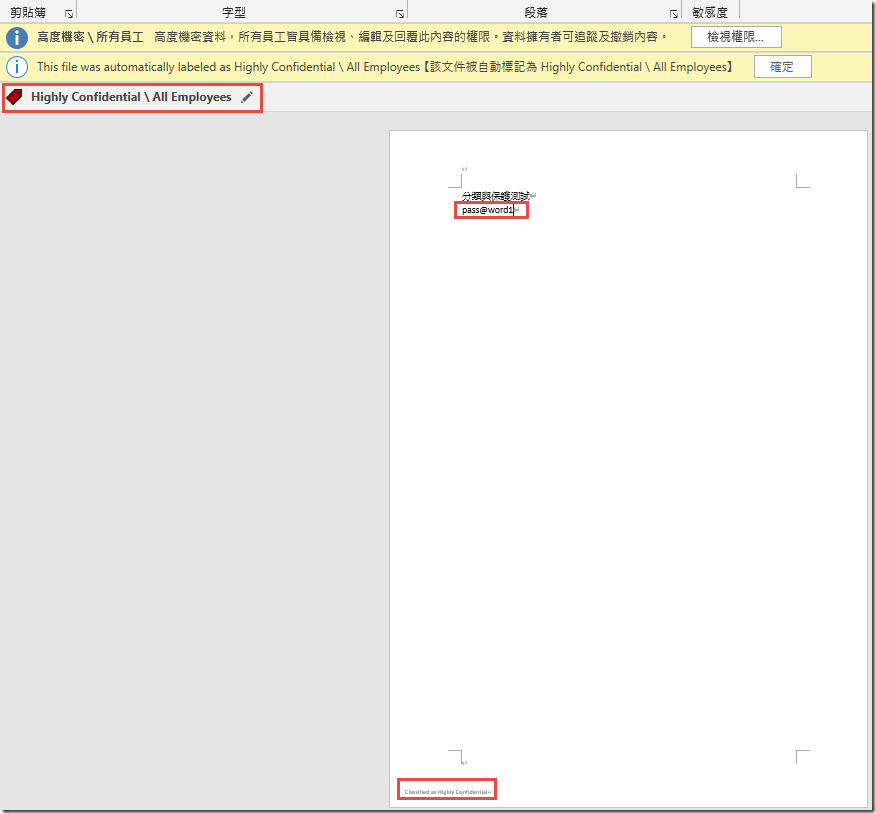
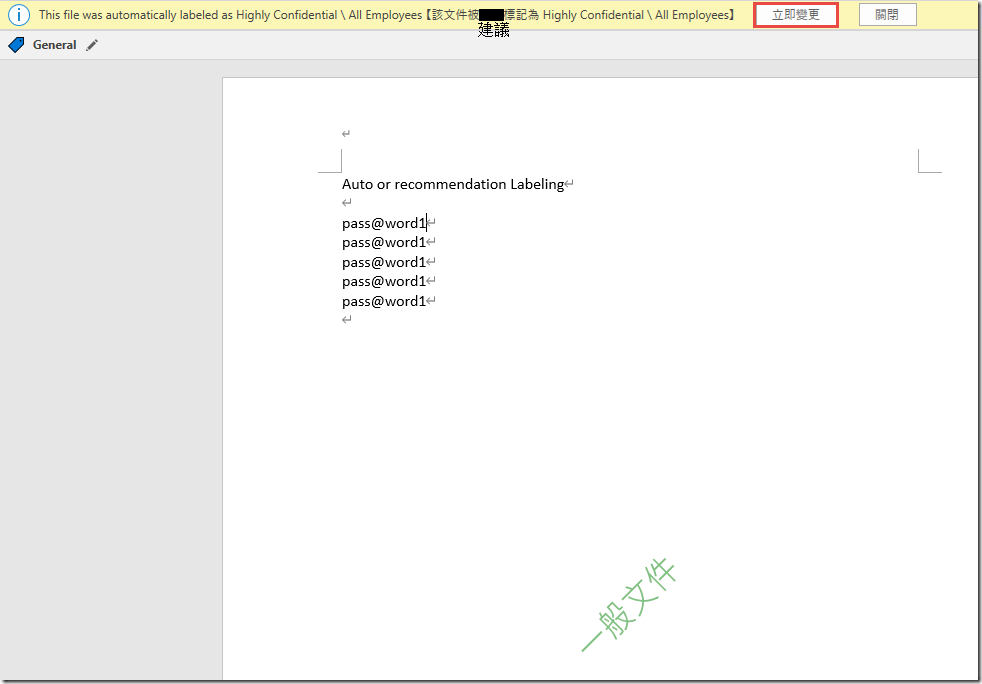
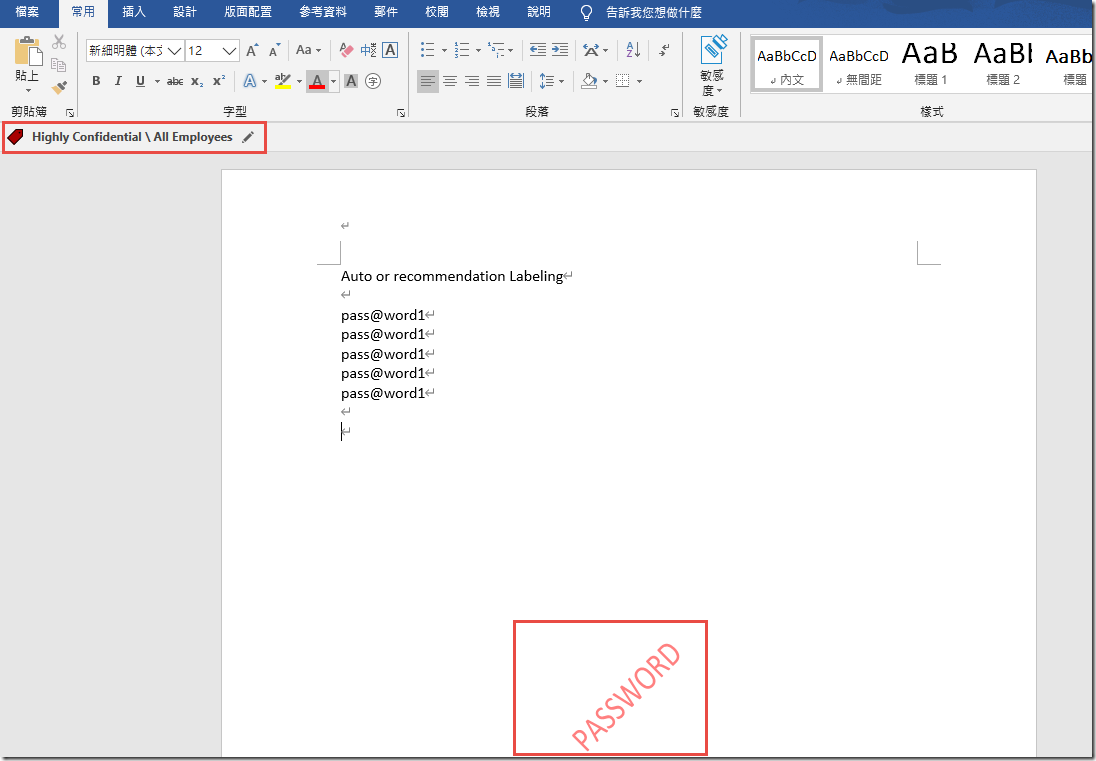
In Microsoft Word, create a new Blank document and type my password is pass@word1 and save the document.
Notice that the document is automatically classified and protected wioth the Highly Confidential \ All Employees label.
-
Review
In this section, you have tested Office 365 Message Encryption using the Do Not Forward label, tested the functionality of global and scoped policies to label, mark, and protect documents, and tested recommended and automatic conditions.
In the next section, we will take a look at how to bulk encrypt large amounts of documents easily.
Previous
5 of 6
Introduction to Azure Information Protection, Unified Labeling, and Office 365 Message Encryption
45 min remaining
Bulk Classification
In this task, we will perform bulk classification using the built-in functionality of the AIP client. This can be useful for users that want to classify/protect many documents that exist in a central location or locations identified by scanner discovery. Because this is done manually, it is an AIP P1 feature.
Using the Classify and Protect File Explorer Extension
-
Switch to AdminPC
-
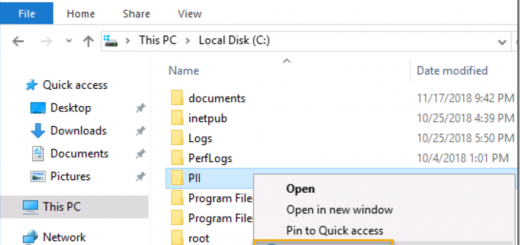
Browse to the C:\.
-
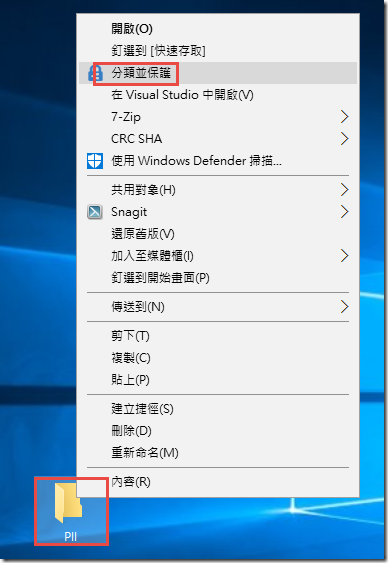
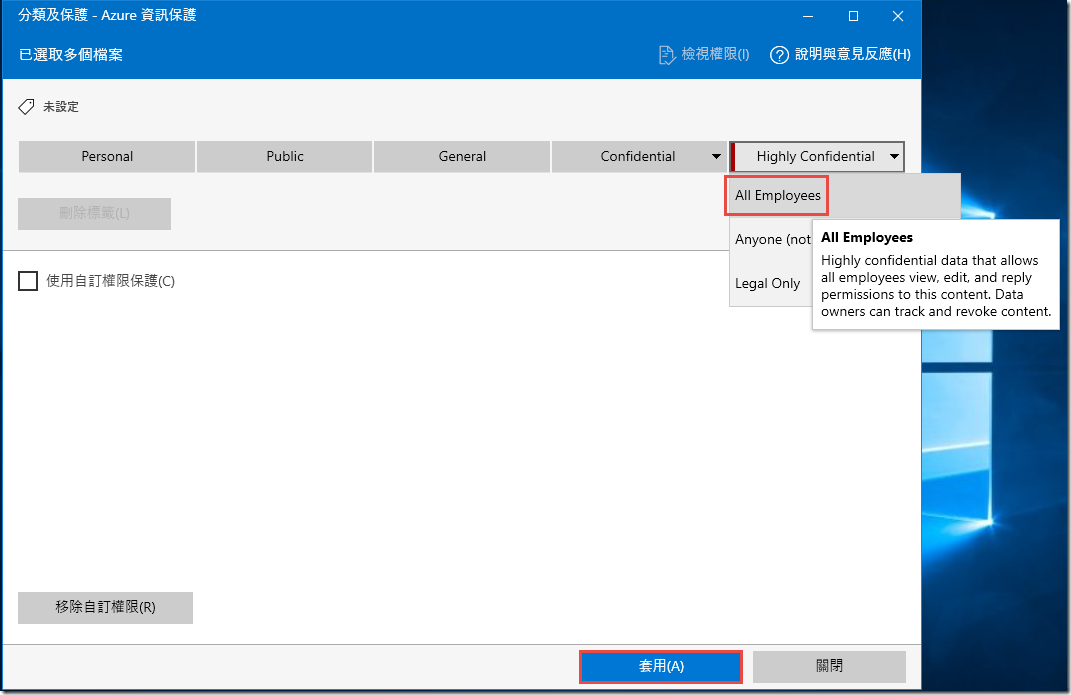
Right-click on the PII folder and select Classify and Protect.
-
In the AIP client Classify and protect interface, select Highly Confidential\All Employees and press Apply.
-
-
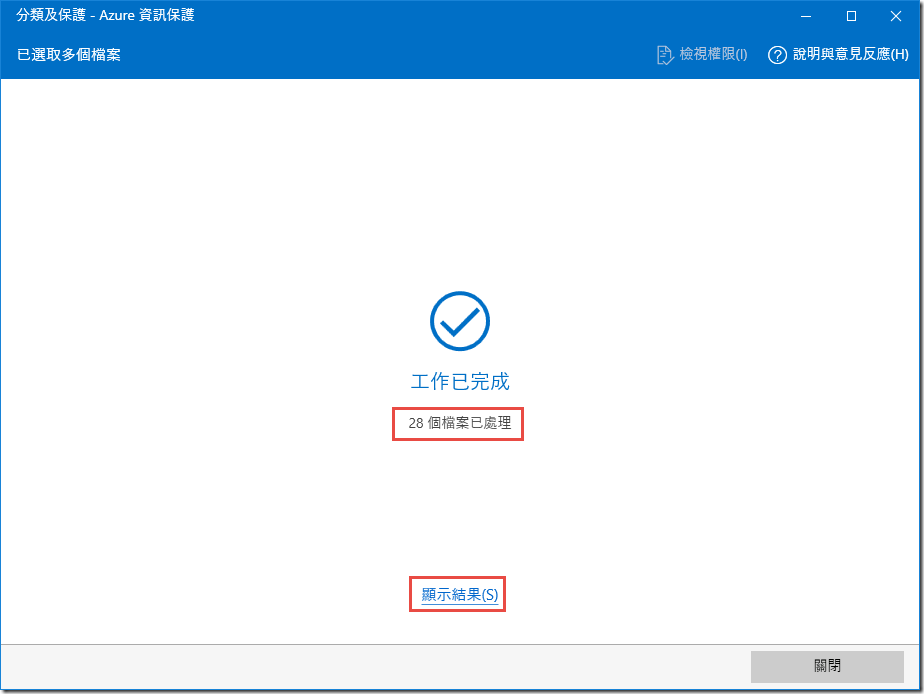
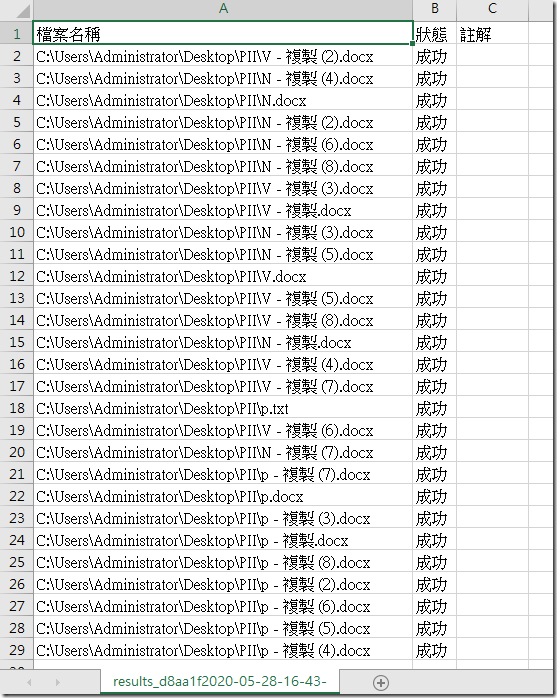
Note: You may review the results in a csv file by clicking show results, or simply close the window.
If you have AIP Analytics enabled, you can also get additional information regarding the information types included in bulk classified files. This is helpful for PCI and other data audits to locate specific types of data that have been processed by the AIP client or AIP scanner.

Review
In this section, we used the right-click functionality to bulk classify a folder and all documents within. This can be used if you have specific locations that you would like to quickly protect.
Previous
6 of 6
Introduction to Azure Information Protection, Unified Labeling, and Office 365 Message Encryption
45 min remaining
Introduction to Azure Information Protection, Unified Labeling, and Office 365 Message Encryption Lab Complete
In this lab, you have learned about the basic elements of Azure Information Protection, Unified Labeling, and Office 365 Message Encryption.
You should now have knowledge of:
- How to use AIP to classify, label, protect, and control access to sensitive data
- Configuring labels and policy within the Azure portal
- Unified Labeling and how to configure and deploy labels within the Security and Compliance Center for use with Windows, Mac, Mobile, and 3rd party Unified Labeling clients
- The difference between the AIP client (classic) and the AIP Unified Labeling client and when each should be deployed
- How to configure recommended and automatic conditions in the Azure portal and the SCC
- Be able test manual, recommended, and automatic labeling using the AIP client on Windows systems
- Send email messages with Office 365 Message Encryption for secure collaboration to any recipient
Please refer to the other labs in this series for detail around deploying the AIP scanner and Advanced functionality of AIP.



















近期留言